What is a hot shoe versus a cold shoe in photography?

Hot and cold

A hot shoe is a flash interface that you find on the top of some cameras that enables an external flash and the camera to communicate. Cameras with built in flashes will not have a hotshoe whereas many DSLRs and mirrorless cameras do have a hotshoe.

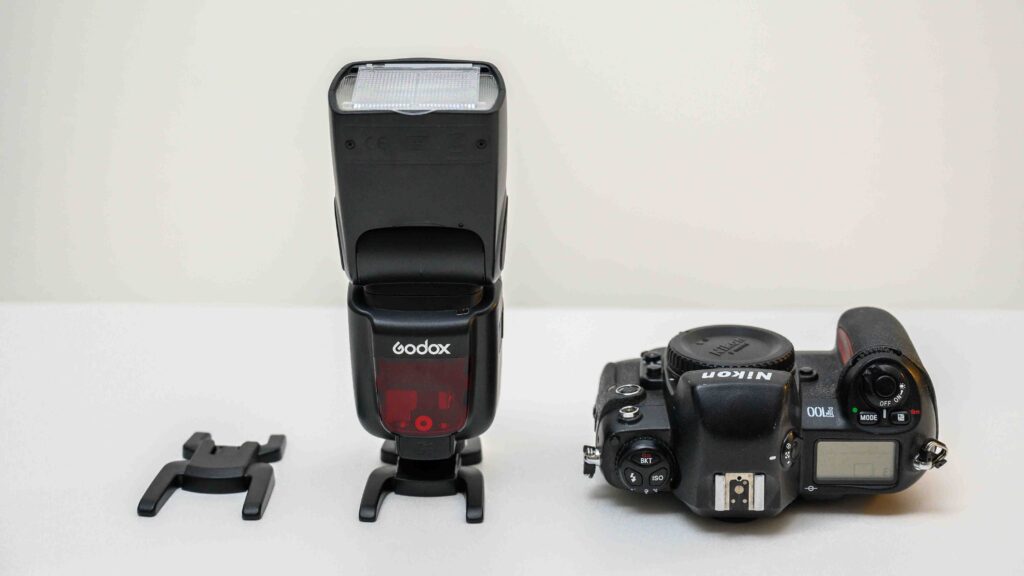
The camera lying down to the right displays the hot shoe sitting on top of the camera (metal). The flash in the middle is positioned in a cold shoe. A cold shoe is on its own to the very left.

The hot shoe is brand specific. It looks similar across all camera brands, but the specific position of the contacts and the protocol used differs, unfortunately.

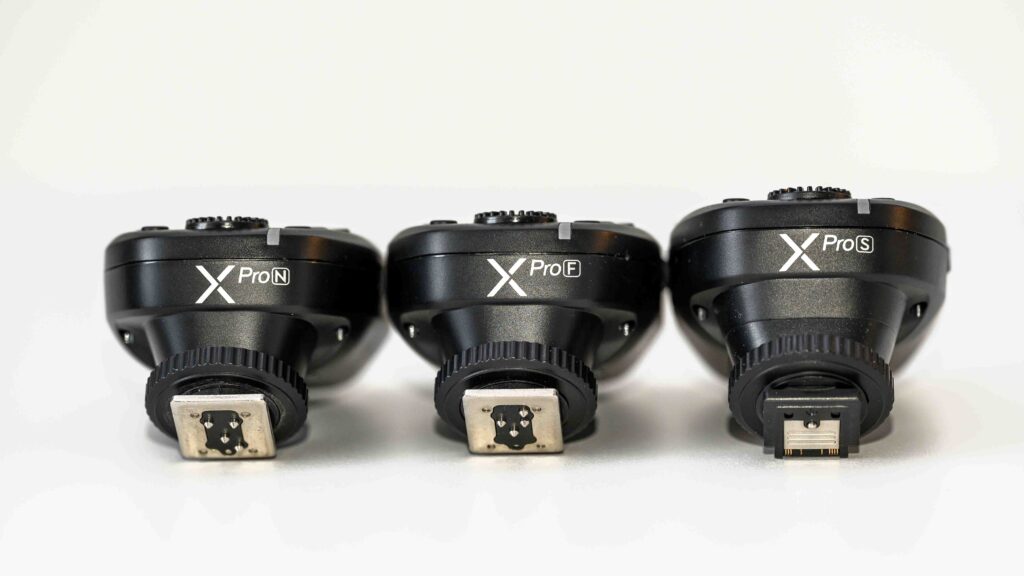
Transmitters to be mounted on Nikon (N), Fuji (F) and Sony (S) going left to right.

In the image above you can see 3 different camera brands and what their contacts for the hot shoe look like. You can see that the number of contacts and their position is not the same, so you need to buy a flash specific for your camera brand if you plan to mount it on camera. The above 3 is so called triggers that allow you to operate the flash off camera via a radio signal.

A cold shoe is just a hot shoe with no contacts. It allows you to mount the flash in the shoe, that either serves as a stand on its own, or enables you via a thread to attach it to a stand. A cold shoe works for all flash brands.


What is a shoot through umbrella?

Diffuser

I guess the name says most of it: shoot through umbrella! It is a light modifier that you shoot through to diffuse and soften the light. It really looks like a white umbrella. A shoot through us opposed to umbrellas with reflectors on the inside, where they reflect the light rather than letting it through.

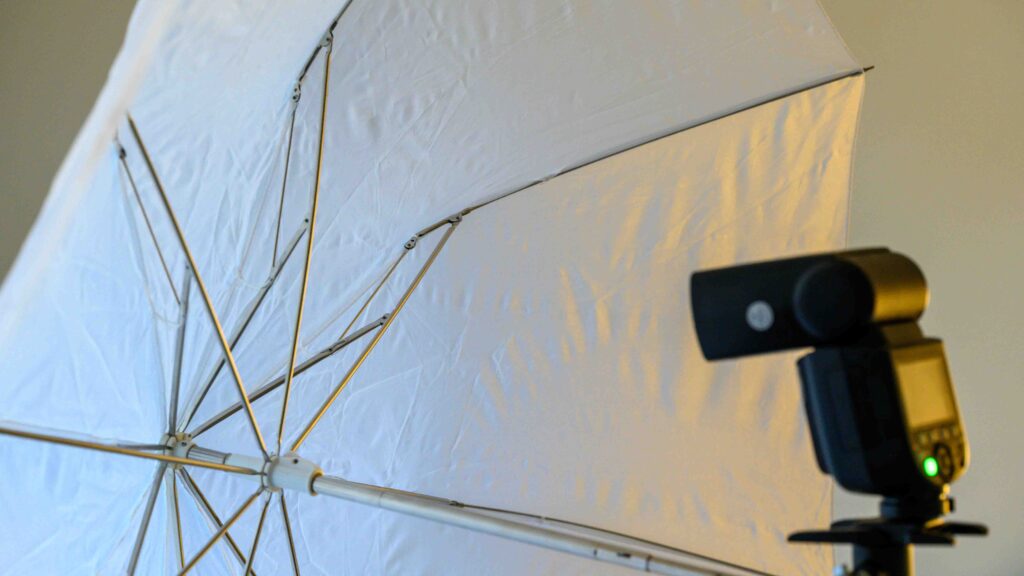
The umbrella left mounted horizontally, the flash to the right.

I guess professionals with a studio don’t use umbrellas as they have softboxes and beautyboxes and the like that is much better at directing the light where it is needed.

However, don’t write off a shoot through umbrella just yet! First of all it is very inexpensive, secondly it folds down to taking almost no space in your camera bag and thirdly it yields some beautiful light. The reason the light is so beautiful is that it is soft – the umbrella makes the light source much bigger than the head of the flash, and as you probably know: beautiful soft light is all about getting a very large light source very close to your subject. And an umbrella can help with both! Don’t be afraid to move the umbrella close to your subject – you will love the effect!

Off camera flash

An umbrella requires that you have an off camera flash. Otherwise you will be pointing the lens straight into the umbrella, and there is not much point to that way of working! So in the image above you can see my Godox flash is mounted on a stand that also holds the umbrella. Not a camera in sight.

The flash and the camera talks to each other via a radio transmitter mounted on the top of my camera in the hot shoe. You can also make the flash go off camera via a long cable, but I find it so much more enjoyable to work with a radio transmitted signal. So if your budget allows, consider a radio controlled flash and a transmitter to match.

Flash zoom and umbrella distance

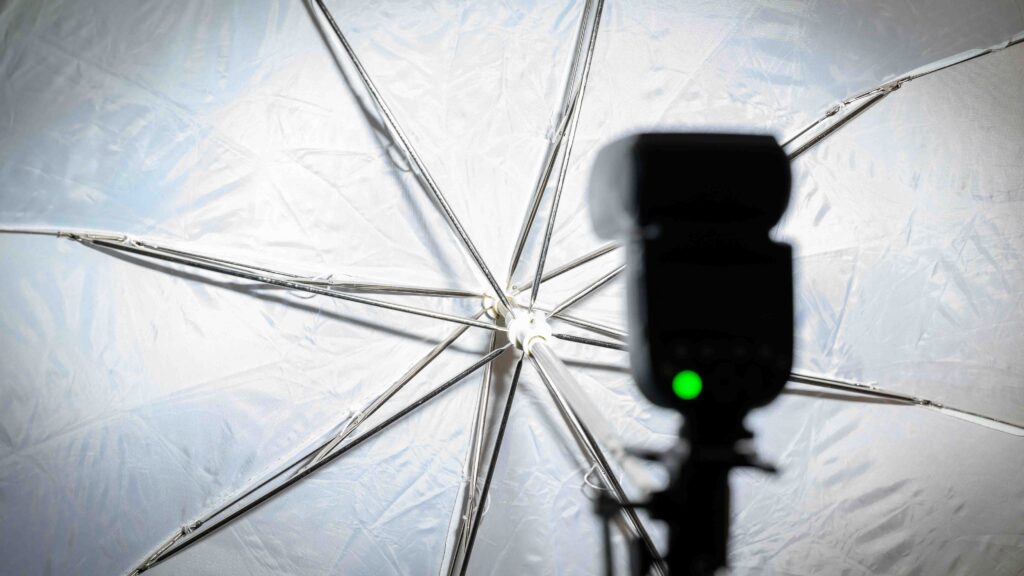
The umbrella and flash at work. The flash could make better use of the umbrella if the zoom on the flash is a tad wider.

One tip to get the most out of the umbrella: adjust the focus of the flash so that it uses the entire umbrella. In the example above, you can see that I have only used the centre part of the umbrella. You can either move the umbrella further away (until you reach the end of the arm!) or you can adjust the zoom on the lens to go wider.

Umbrellas comes in different sizes. If it is not a problem for your camera bag, I would recommend large rather than small. You have probably guessed why: it makes the potential lightsource as big as possible = soft light. You can always zoom in to make use of only the centre of the umbrella if that is to your liking. The other way around is more complicated!

What is the wide-angle diffuser in your flash?

Wide-angle diffuser

I must admit that it was only because I read the manual, that it dawned on me that there is a thing called a wide-angle diffuser built into my flash. I think it is quite common for flashes, as I have seen it on both Yongnuo and Godox flashes.

In hiding

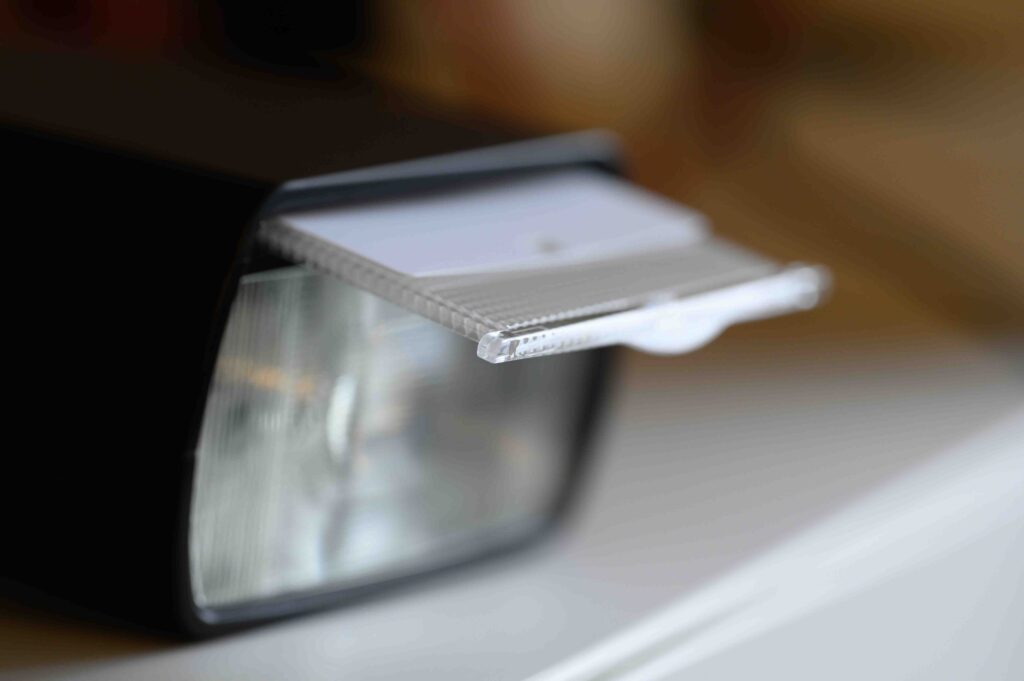
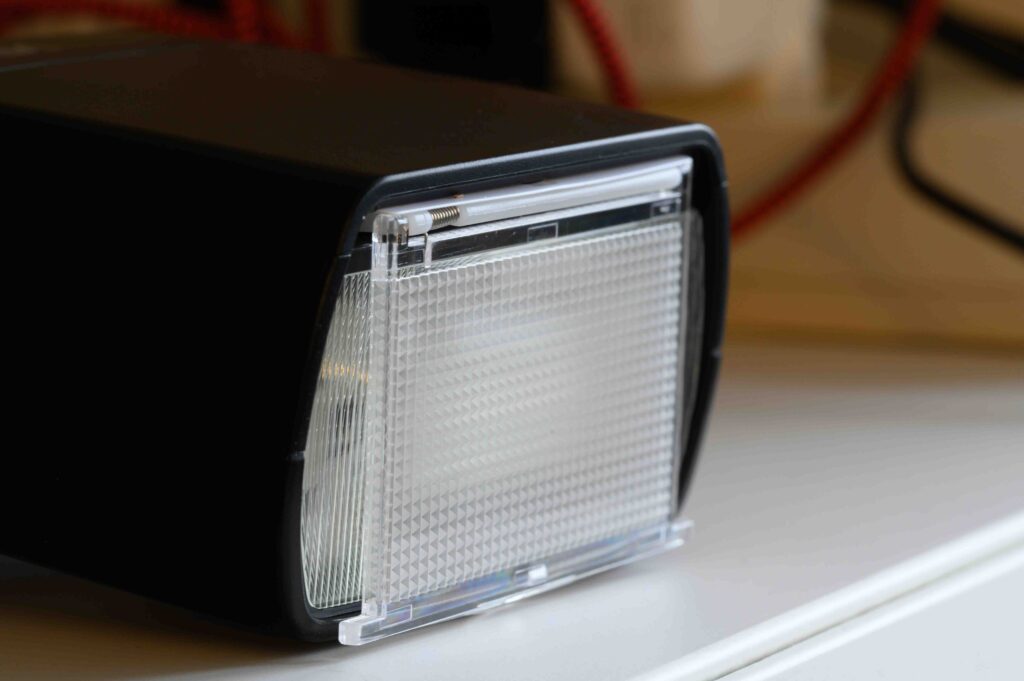
The wide-angle diffuser sits a bit hidden on the front of the flash. It is just a piece of clear plastic that you can pull out from its hiding and mount it over the front of the flash. It is hinged, so it is quite easy to do and it swings into position almost by itself when you pull it all the way out. The plastic has some structure or pattern in it, which helps diffuse the light.

The Wide-angle DiffuserThe Wide-angle Diffuser sits hidden in the front of the flash. Here it is halfway out.

In position

When you have put the wide-angle diffuser in position, you will hear the motor in the flash working (provided the flash is turned on). When you engage the diffuser, the lens moves to the widest position it can offer, typically 14mm or 18mm. And you can no longer change the zoom – it is locked.

The Wide-angle Diffuser
The Wide-angle Diffuser is here active and covers the front of the flash.

The the diffuser and the wide position of the zoom in the flash in combination is intended to diffuse the light as much as possible and give a more soft light. In my experience the effect is noticeable but no match for a large diffuser like a softbox or simply bouncing the flash against the (preferably white) ceiling. But in a pickle, it can mitigate the harshness of the light a flash produces.

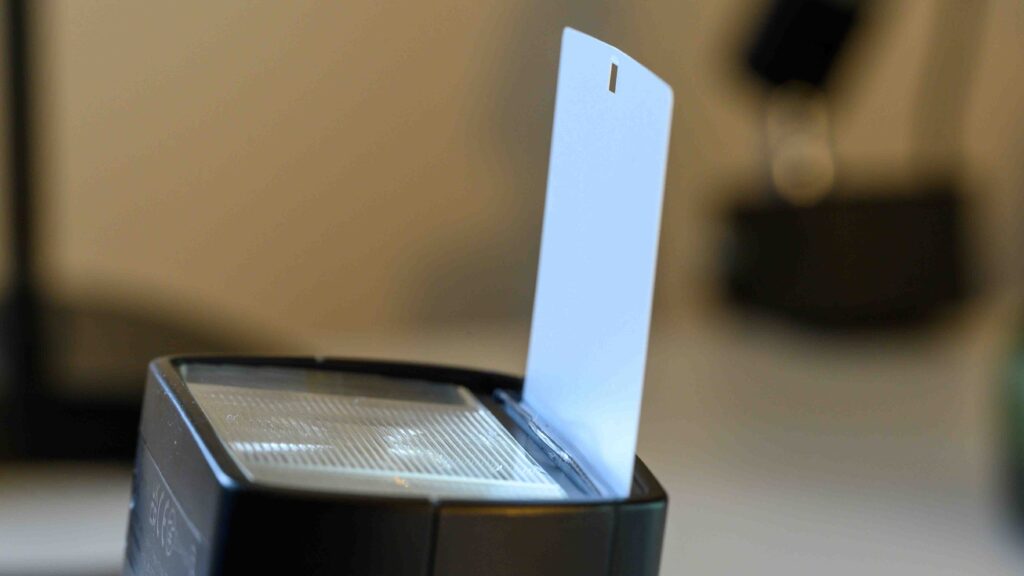
In the image above, you may have noticed the little white piece of thin plastic next to the diffuser (a reflector). They sit in the same slot in the flash, and when you pull out the diffuser, the reflector tags along. You can push the diffuser back in the slot and have the reflector out still, as shown in the image below.

The Wide-angle Diffuser
The reflector is here engaged to give catch light in the eyes of people photographed.

If you set the flash so that it points upwards to bounce against the ceiling, the reflector can be used to create catch light in the eyes of people photographed.

Video link

Related reading

What is the guide number (GN) for a flash?

What is flash exposure compensation?


What is red eye reduction in photography?

Low light

When you shoot a scene where there is very little light, say at a party late at night or a dinner at a restaurant, then a flash may be the only way to get sufficient light to enable you to capture an image.

The human eye is like the aperture of your lens: in low light it opens up the pupils (aperture blades) to maximise the light intake. Unfortunately, the light that enters your eye is also reflected by the eye to a very large degree. So wide open pupils equals lots of light returned.

A cat’s eye reflects even more light than the human eye, and the result can be quite erie when shooting with a flash!

Pre-light

A way to mitigate this is so simple it’s almost complicated: if your camera before firing the flash gives a strong light to make the pupils contract, then you have minimized the problem! The only requirement is that the pre-light and the flash are fired right after each other. The so called “red eye reduction” is an option available with many point and shoot cameras.

So, is this a good way of solving the problem? Well, it certainly gives less red eyes, but you will also see that people are not unaffected by the strong pre-light and often look as if they are looking into the headlights of an oncoming car. Which is actually pretty close to what has happened! And it is not the most flattering look!

Secondly, a lot of post processing software (like Lightroom) offers standard solutions to remove red eyes that is both efficient and simple to use. So for these reasons, I do not use red eye reduction when I shoot with a flash.

What is flash duration? And should you care?

At work

When you see a flash working, you are probably left with the impression that it emits the light in a binary fashion: it is dark, then very bright and then dark again. So from zero to full speed in no time.

Actually your flash takes a little time to build the light intensity to peak, and also a little time to turn it off again, so you get a curve that looks like a wave. Flash duration is about how long time it takes from the flash is fired until the light is turned fully off again.

Measurement

If the flash emitted the light in a fully binary fashion, it would be easy to measure the duration of the light being on. But when you have a curve, you need to find a point on that curve to use. So typically the flash duration is measured from when the light has reach 50% of full throttle to when the light has either dropped to 50% of full throttle. An alternative is to do the same, but for 10% instead. These two measurements are often named t0.5 or t0.1.

For producers of flash, the competition to have the best numbers in the spec sheet often leads them to give the 50% value, as it is the fastest number. If they don’t tell you how they have measured, my bet is that they have taken the fast number and put in the spec sheet, i.e. t0.5.

Power

Another complicating factor is that the more power the flash lets out, the slower it typically gets. So the flash duration is very fast if you only use a fraction of the power the flash can provide. For this reason, the flash duration is often listed in the spec sheet as an interval. The Godox V860II has a flash duration listed as 1/300 to 1/20000 seconds.

And so what?

I Granted, there are probably many flash photographers out there that really don’t care too much about the flash duration, unless they are specialized in super high speed photography. For me the importance of flash duration is to realize that your flash (often) is much faster than your shutter speed, and this is vital in order to understand other flash related concepts like front curtain synchronization, rear curtain synchronization and high-speed synchronization.


Flash photography – why bother?

No, no, no!

You may have or have seen some horrible images from a party or a vacation: people with red eyes in harsh white light, staring at the photographer like a deer caught in the headlights, and dark shadows right behind them that adds to the eerie feeling you get when studying the images! The only logical conclusion is: flash photography – no thank you! It is not for me!

But I ask you to consider this: Why is it that many professional photographers always use flash when shooting? Even when shooting outdoors on a sunny day? Do they not have the same horrible vacation images as the rest of us? Apparently not.

In this post I will briefly give a few motives for why to shoot with flash, and hopefully this may give some inspiration for getting started with flash photography. Or the opposite – basically confirming you in your choice to stay clear of flashes! We’ll see!

Signal to noise

Signal to noise. Sounds complicated, right? And it is, if you want to be an engineer and dive into this interesting concept. Lots of math and complexity. But for us photographers, all you need to know is that light is a signal and that your camera is a system that inherently holds or produces noise. So there is a balance between the input in the shape of light and noise during the production of the output, the image. That balance is signal to noise. And the stronger the signal is relative to the noise, the better, i.e. the more clean the image will appear.

If you have been shooting a low light scene with the ISO cranked up to ridiculous levels, then you will see the result of a poor signal to noise ratio, in photography that comes in the shape of grain and noise and washed out colors. The camera sensor simply gets so little light, that the noise is as strong as the light, and hence the sensor starts mistaking noise for light. And that is not good.

Flash photography has an amazing signal to noise ratio. The flash light is super bright (and super short lived) and that means all noise in the camera is effectively suppressed. And the result is super clean images with amazing colors and details.  And especially portrait and fashion photographers love this, and the buyers have come to expect this quality.

Freeze!

A flash is fast. Very fast. So fast that your shutter speed relative to the flash speed is like your granny trying to keep up with Usain Bolt! And for that reason subjects that move fast will be frozen when caught in the light of a flash (provided the ambient light is kept out of the equation, but that is another story).

So flash photography can capture hummingbirds with still wings, balloons that explode, drops of water that hits a still surface, etc. The ability to freeze a moment is much better with flash than a shutter. And even if you don’t want to capture something that moves super fast, the flash can be a safe way to avoid blur from the subject or the camera moving. And this again aids the production of sharp images.

Control

If you are a landscape photographer, you have probably been up early in the morning to catch that special light in the morning when the sun rays travel the long distance through the atmosphere and yields that wonderful soft light and long shadows. And been equally disappointed when the sun promising weather forecast was wrong and the rain pouring down.

Flash photography is all about control. You can control the direction, intensity, temperature  and color of the light. Nothing is left to chance – you have full control. Of course it comes with a price, that you need to have flashes and light modifiers and learn the trade of flash photography, but the reward is that you will have lots of control. And many professionals need that to secure that they make money – they cannot wait for the conditions to be right for photography. Every day has to be the right day!

Predictability

When you control the light, you hold the formula for success. If you are a portrait photographer and have learned a flash setup that gives exactly the rembrandt lightning that you want for you corporate headshots, then you are able to reproduce this over and over. So you don’t have to re-invent the wheel, but can do today exactly what you did yesterday. You have a formular for – if not success – then a formula for getting the same results over and over again. For a professional photographer the ability to reproduce the same results without the need to set off time for learning and tuning, is vital.  Time is money. Literally.

What about you?

So how is this relevant to you? Well, it may not be. There are tons of adventure, wildlife and landscape photographers that do fine without flash photography. But if you want to dive into product shoots, portraits, event photography, macro photography or flower photography, then I think you will find that a couple of flashes and a few well chosen light modifiers may be what takes your photography to the next level.



What is a lens reproduction ratio?

Projection

When a subject is captured by the lens and projected onto the camera sensor, the ratio between the subject and the projection is the reproduction ratio. So if you shoot a small ant that is 0.2 centimeters long in  real life and it is projected to the sensor as being 0.2 centimeters long on the sensor as well, the reproduction ratio is 1:1. Had the ant been only 0.1 long on the sensor, then the reproduction ratio had been 1:2. Some also write this as 0.5x.

So why should you care? Well, unless you are a macro photographer in search for a lens that will zoom in on your tiny, tiny subjects as much as possible, I think you can lead a great life as a photographer happily ignorant of the term reproduction ratio!

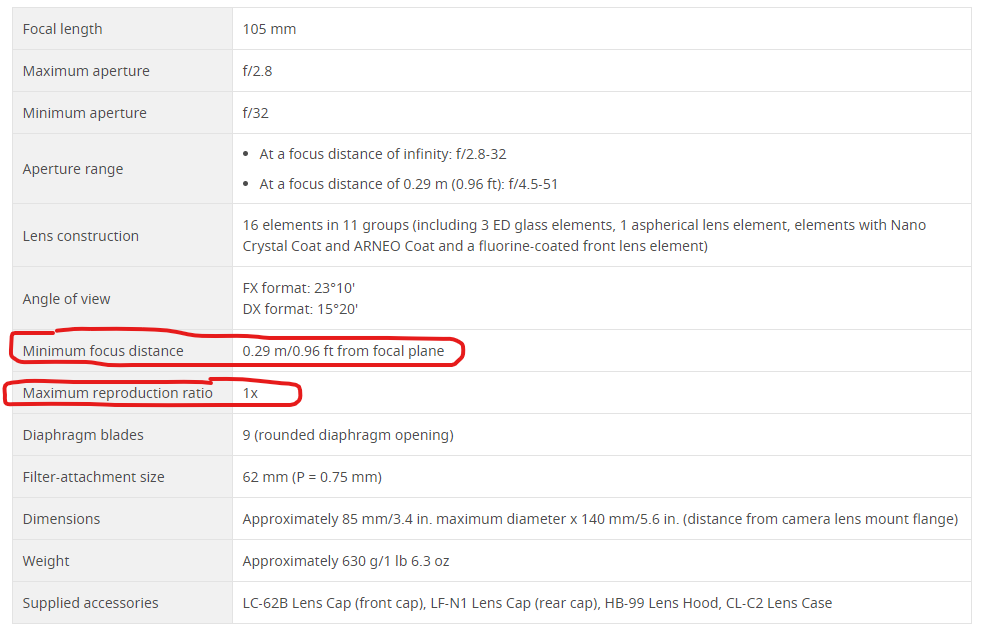
The reproduction ratio is influenced by the distance to the subject, and the distance to the subject is limited by the minimum focus distance of the lens. If you cannot get the lens to focus on something very close to you, try to take a step back and see if it gets better. If it does, you have tried to focus closer than what the minimum focus distance allows. When you focus as close as the lens allows, you have reached the maximum reproduction ratio of the lens. You can find both the reproduction ratio and the minimum focus distance in the lens specification list.

Above is the specifications for the Nikkor MC 105 2.8 S macro lens. The circled in lines show that the closest it will focus is 29 centimeters, and the maximum reproduction ratio is 1:1 or 1.0x.

You can get some very specialized lenses that will yield a reproduction ratio of more than 1x, but I think they are rare. In the case above, I think it is more than fair that Nikon calls this a macro lens.

As a fun fact, even though the minimum focus distance allows you to go crazy close to the subject, then this is no guarantee for a large reproduction ratio. The Nikkor 20mm S lens has a minimum focus distance of 20 cm (!) but still only has a reproduction ratio of 0.19x.


What is rear curtain synchronization in flash photography?

A barn door of time

One of the fascinating things about flash photography is that your flash, besides being able to put out an impressive amount of light, is also able to do so in a very short interval of time. In fact, it is so fast that relative to a shutter speed of 1/20th second, the flash sees this as a barn door of time!

Decisions, decisions

Provided that the flash is fast and the shutter is slow (even when fast!), this gives an interval – a string of options for when to fire the flash when the shutter is open. Most cameras will default to firing the flash at the beginning of the shutter being open, but there typically is also an option available in your camera settings to fire the flash towards the end of the shutter being open. So the “string” of options is on most cameras reduced to two options: early or late. The late one is often called something like rear curtain sync.

Subject move

If you take a picture in a low light situation where you need to keep the shutter open for say 1/10th of a second, you will see that anything bright and moving will leave a trail of light. So the headlights on a car on a highway at night will leave a trail of lights as the car moves through the frame.

Now on top of this ambient exposure comes the flash. And it can be added early or late in the exposure. Again, remember that the flash is blazing fast and only uses a tiny, tiny fraction of the 1/10th in the example. Provided the flash is strong enough, it will add an additional exposure of the car, where the car stands out much stronger relative to the exposure done by the ambient light. In fact, the car may not be visible at all in the ambient light exposure – only the headlights.

So here is the thing: do you want the car to be exposed as the headlights start to be captured or towards the end of the headlights being captured (= rear curtain synchronization). That is basically what the rear curtain sync option governs. Most cameras will default to early sync, and have rear sync as an option you need to actively select.

If this sounds all mysterious and convoluted, my best advice is to give it a try. Shoot something bright moving at night and see the effect of turning rear sync on and off. It is the best teacher. Far better than any blogger! Enjoy!


Why color temperature is vital in color photography

Light sources

If you are new to photography, then color temperature may not be the first thing you worry about. There are many other dimensions of photography that demands you attention, ranging from selecting the right camera and lens, to composition and exposure. However, when you have found your feet and start getting the results you want, then white balance and the color temperature of light may start to be one of the more advanced subjects that you want to dive into.

Every light source has a certain color temperature. It is measured in Kelvin, and for reasons beyond me, it is typically on a scale between 2000 and 10000, and to signal it is a value on the Kelvin scale, a “K” is added after the number. So for example candlelight is 2000K whereas an overcast sky is around 6000K. So low values equals more red, high values more blue and in between is white.

You are fast!

No, I don’t write that headline to charm you, but it is a fact that your brain adapts to new light sources with astonishing speed and probably without you noticing. So if you walk from noon daylight (5200K) into a tungsten lit living room (2500K), then you’ll adapt to the new temperature of the light super fast and probably without noticing. And colors will look like they always do, and white will look white, simply because you adapt fast to a new light source. It is really smart design!

Your camera is not so smart

You camera is not so smart. In order for it to record the light in a way where the images that comes out of it look natural (e.g. white looks white), then the camera needs to know the temperature of the light. If it doesn’t, then I can assure you the colors will be strange – white will be yellow and blue will be purple, etc. So you need to tell the camera what color temperature you are shooting at.

Auto white balance

Luckily, most modern cameras has an option named auto white balance where the camera itself reads the light and figures out the color temperature of the ambient light. It works really well in most cases. You can try to play with a manual setting of the white balance, just to get a feel for what happens if the white balance is off and what options this gives you for giving your images a distinct look. If you have ever seen images by Bryan F. Petersson, you can find some amazing images where he gives the night sky a distinct purple look using manual setting of the white balance.


What is white balance in photography?

True colors

As strange as it may sound, white is not just white. Subject to the temperature of the light, measured in Kelvin, white is many different shades of yellow! Why is this hard to believe? Because your brain does an amazing job compensating for the color temperature, so that different version of white always appears to be the same white to you.

Unfortunately your camera is not as smart as your brain! Your camera needs to know what the color temperature of the light is in order to reproduce white (and colors) so that it looks credible when you see it in the screen or the print. If the white balance setting is off relative to the temperature of the ambient light, the colors (and the white) in the image will look unnatural. This can be used as a tool for making your images stand out, but for now I just assume that you want your images to look natural.

Auto white balance

Most modern cameras has an auto white balance function that in far most cases will give the technically correct white balance settings. Also, if you shoot in RAW format, the options for adjusting the white balance as part of the post processing work makes the wrong white balance settings less of a catastrophe – of course it is always nicer (and less work!) to get the white balance settings right in camera, but when shooting in RAW, hard work in post can make your images look right.

Manual white balance

You can set the white balance manually also. Typically your camera has two options, either you can go hard core manual and enter the Kelvin value directly (typically between 2500K and 8000K), or you can select between some predefined values such as sunlight, overcast, tungsten, incandescent, and so on. These names are just name for a specific Kelvin value – if you for example have a value on your camera called “overcast”, it is the same as entering a Kelvin value of about 6000K to 6500K.

Several light sources

Recently I was shooting images at a lunch party, where the party was held inside with tungsten light, but the light from an overcast sky seeped through large windows that (unfortunately!) served as a backdrop for many of the images. Although the auto white balance in my camera did it’s best, the mix of two different light sources with two different Kelvin values did not work out well for my images. The people at the party either had a very red color in their faces, or if I adjusted so that they looked more natural, the light from the windows started to look weird. That taught me to be careful mixing different light sources – had I chosen to frame the images differently (without the windows), this would not have happened.

Bottom line

If you are new to photography, I would not worry to much about white balance for starters. Set your camera to auto white balance, and focus on other matters like composition and storytelling. However, if you want to dive more into playing with color temperature and see what it can do for your images, try to study the Kelvin scale and start to set the white balance manually. Once you are comfortable with manual white balance, next step is to play with white balance settings on your camera that do not match the available light! Have fun!