When you use a long lens in photography relative to a short lens, the long lens will – all things being equal – give the impression of the picture being compressed. On other words, the background will appear to be moving closer to the subject.
Intuitively, you would expect that if you took a picture with a short lens, then mounted a long lens and walked back until your subject would fill the same in the frame, then the two pictures would be about the same. But they are not. For two reasons. One is compression, the background will appear to have moved closer to the subject, and the other is field of view. The long lens sees a much narrower part of the surroundings of the subject. Sounds complicated? Lets look at some examples.
The first picture here is taken at 18mm focal length:
18mm
You can see that I have put a shovel behind the chair to help me size the subject in the frame as I start to walk backward. Notice the greenhouse to the right.
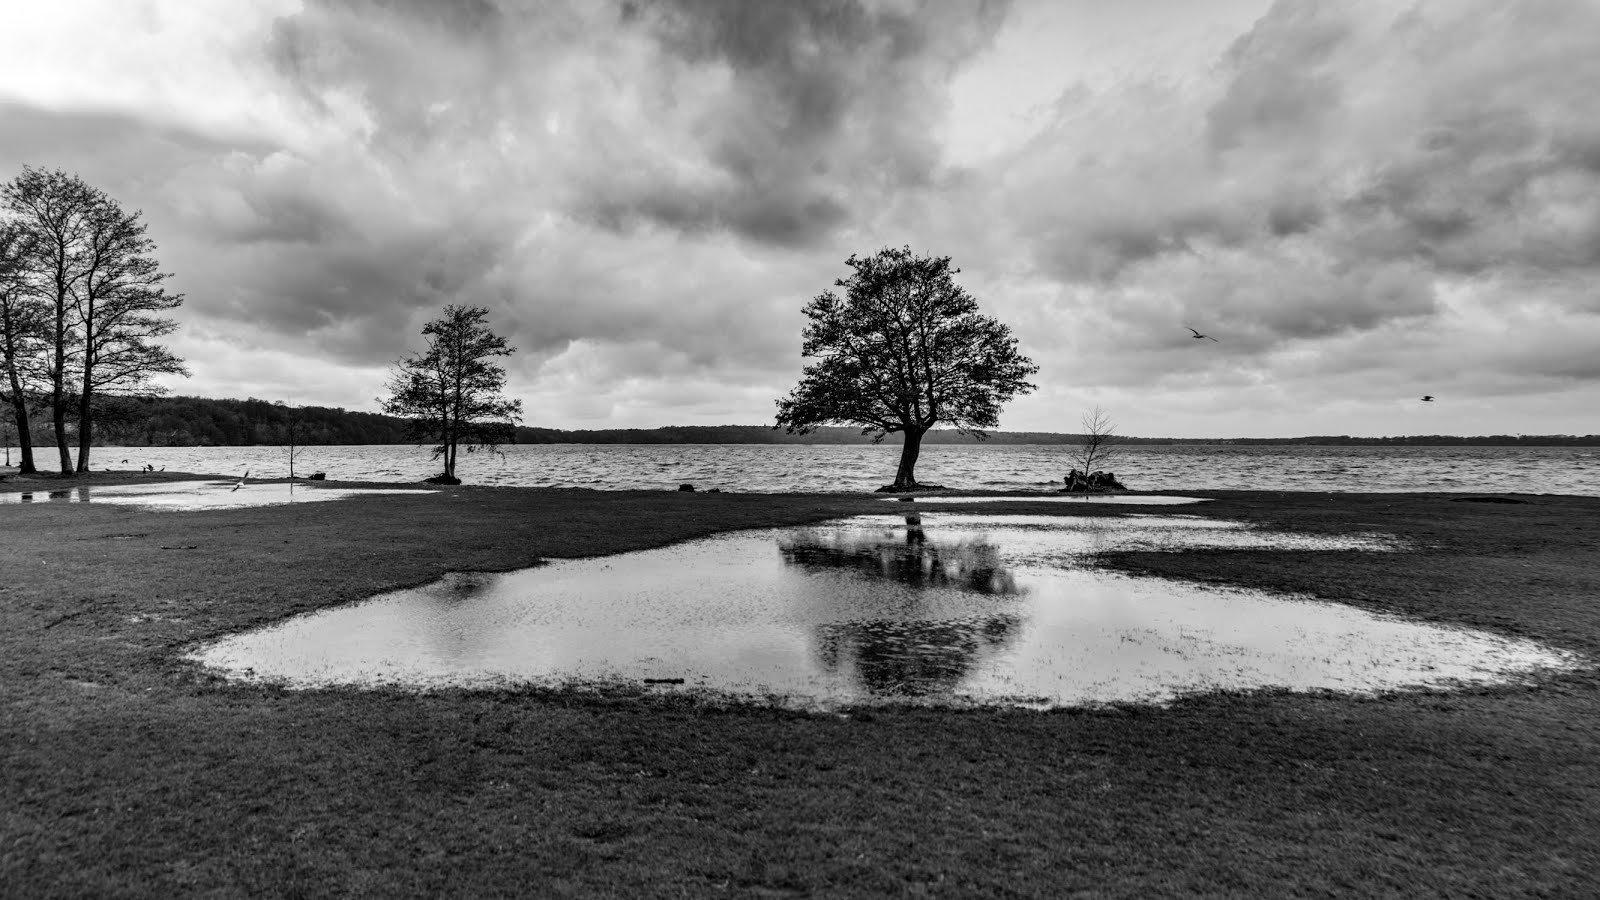
Next picture is shot at 70mm:
Notice how the greenhouse to the right has disappeared due to the more narrow field of view. And the fence at the back of the garden seems closer – the picture is more “compressed”. Hence the name. And notice also how the arms on the chair no longer point so much outwards, they appear more parallel in the 70mm picture.
If we take it one step further to 135 mm:
You will notice that the black chair behind the brown chair in the foreground suddenly appears. This is because I have walked so far back and the field of view is so narrow that the brown chair no longer “shades” the black chair. And the fence has moved even closer. And finally 300mm:
More of the same: fence is closer, black chair even more visible, greenhouse long gone, etc.
What happens is illustrated below. As you can see, the angle of view is much more narrow with a long lens and hence the greenhouse disappears from the frame in the examples above.
Did you notice how the chair looked more and more natural as the focal length increased? In the first picture the arms pointed very much outwards, but this became better and better with increasing focal length. This is useful for portrait photographers, because shooting too close to your subject with a too wide lens will give a less pleasing picture. You can try to take a selfie with your nose into the lens, and I can assure you that it will not be pleasing! Therefore many portrait photographers prefer relatively long lenses, typically 85 to 135mm.
You will also see that the composition of your picture changes when the focal length is increased. There is less distracting elements in the pictures with the long lens, simply because the angle of view is more narrow. So you can make a picture where the subject is less disturbed by distracting elements around it.
The exposure triangle is probably not new to you, the point is simply that the aperture, the shutter speed and the ISO controls what level of exposure your picture will get. Changing one of the three in upwards direction will require one (or both) of the other two to drop accordingly to maintain the same exposure. And the other way around. In (fully) manual mode, you set all 3 values.
Apertureis the iris of the lens. The more light you let in, i.e. the more open the aperture is, the more exposed your picture will get. The confusing part is that the aperture is measured in f-stop numbers, and these are “upside down”, meaning that a low F-stop number means the lens is letting in a lot of light.
Shutter speed is more intuitive, if you ask me. The longer the shutter speed the more light is allowed to hit the sensor. A fast shutter speed is great if you want to avoid camera shake (you move the camera while the shutter is open) or motion blur (the subject moves while the shutter is open). But fast shutters lets in only a little light, so a balance it to be found.
Finally ISO is how sensitive your sensor appears to be. I say appears to be, as it technically is a gain that is applied to the base sensitivity of your sensor, but don’t focus too much on this part. All we need to know is that higher ISO means more sensitive to light. There is no free lunch in photography – so the price to pay for high ISO is grain. So we want to keep the ISO at bay. Modern cameras can ramp up the ISO with impressive results, but for now let’s just say that beyond 1600 you need to be more cautious.
The exposure triangle – Aperture, ISO and shutter speed.
In order to use your vintage glass on the Fuji X-T20, the first thing you need is an adapter that enables you to mount the vintage glass on the Fuji body. I always go for a “dumb” adapter, meaning that there is no communication between the lens and the camera body which of course means the camera has no idea what focal length is mounted or what aperture is used, but I can live with that. What is probably worse is that you also loose the auto focus, but if you shoot mainly stills, portrait, landscape and street, then I think you will find the manual focus to be ok, some even start to like it more than auto focus, as they feel more involved in the process of taking a picture.
In my case, I have Nikkor (Nikon) vintage glass made for full frame cameras, and as the Fuji is a cropped APS-C camera, that means I will have to multiply the length of the lens with 1.5 due to the crop factor. However, you can get a so called speed booster to reverse this effect, and in addition it gives you a stop more light, i.e. makes your lens faster. I went for the Zhongyi Lens Turbo II:
Zhongyi Lens Turbo II adapter.
But there are many other good options to choose from. Here you can see what the Nikon 135mm f/2.8 looks like with the speed boost adapter mounted:
Zhongyi Lens Turbo II with the Nikon 135mm
And here is the camera with the 135mm lens mounted:
Zhongyi Lens Turbo II with the Nikon 135mm on the Fuji XT20
As you can see it is in this case a long lens for such a small camera body and it also makes the camera quite “front heavy”. Some don’t like this – I don’t mind, but as the X-T20 is quite a light camera, mounting fast FX glass will often give a dramatic weight increase to the total system. I have the Fujinon 27mm lens to the right, just to compare.
Shooting “blind”
As the camera has no communication with the lens, you need to tell the camera it is OK to release the shutter with no lens mounted. It will look that way to the camera! Go find the tool menu and in that menu look for “button/dial settings” and select that menu:
“button/dial settings” menu
In that menu, find the item “shoot without lens” and make sure it is set to “on”:
“shoot without lens” set to “on”.
Now your shutter should work with a vintage lens mounted!
Focus aid
The next thing is to select how you want the Fuji to help you focus. I prefer the focus peak option, where the camera highlights the areas in the picture with strong contrast, which is often also where you will have the focal plane. In the “AF/MF” menu (the second from the top), select the “MF assist item” (MF is Manual Focus):
Manual focus assist in the shape of peaking highlights.
In the sub menu that appears, the manual focus assist settings can be chosen. I go for the focus peak and select the color to help me find the area of focus:
Manual focus assist in the shape of peaking highlights.
Now we should be ready to shoot!
Final hurdle
When shooting in this setup, there is however no focus peak assistance! It is possible to shoot and focus, but you get no help with the manual focus! How come?
The solution to the problem is on the front left of the camera. Here you select drive mode by turning a little dial, i.e. if the camera is in (S)ingle frame mode, (C)ontinuous or (M)anual mode. Hence the letters S, C and M:
Dial on the front left of the camera
You need to turn this dial to “M” in order for the focus peak to start working. Then the high contrast areas area highlighted in the viewfinder and LCD screen. Enjoy! (Remember to flick the switch back to C or M when you mount a Fujinon lens – otherwise you will continue with manual focus…!)
Further aid
When you shoot, in addition to the focus peak, you have the focus magnification that helps you zoom in on details in the frame to see if they are sharp. Press the rear command dial (yes, it feels strange – you are used to turning it! But press as in push!):
Zooming in using the rear command dial
and the camera will show you a magnified area of the picture:
Zooming in using the rear command dial
If you then turn the rear command dial, you will see that the camera flicks between two levels of magnification. In the first example you can see the entire cow, but if you turn the rear command dial the zoom gets extended:
Zooming in using the rear command dial
Now you can only see parts of the cows head! Notice how the graphics (the two boxes – one white and one green (blue?)) show you the zoom level. When you turn the command dial again, the camera jumps back to first level of zoom. So turn the rear command dial to select between the two zoom levels. Press (push) the rear command dial go leave zoom again. And press it once more to get back in, etc.
You will notice that with a long lens and the extended zoom peek switched on as shown above, the picture gets very nervous if the camera is hand held! This is a good reminder to shot with a fast shutter speed to avoid camera shake and hence blurry pictures.
Finally
The Fuji X-T30 offers 3 different manual focus aids:
Standard (basically no aid!)
Digital split image
Focus peak highlight
In the examples in the previous sections, I have only used the focus peak highlight, as I find it to be the best aid for manual focus. However, some like no aid and some like digital split image (where you have to align two pictures so that the vertical lines in the intersection are exactly on top of each other).
If you want to switch fast between the 3 modes mentioned above, you can push the rear command dial for a few seconds (not a brief push – you need to push the button in for a few seconds) to change to the next mode (the button is hiding behind my thumb top right):
Fast switch between focus modes.
When you have kept the button in for a few seconds, the mode the camera is about to switch to will be shown in a bar in the lower part of the screen. If the camera is in standard mode, it will switch to split, if in split then it will shift to focus peak, if in focus peak back to standard and so on. So it is like a wheel turning: standard -> split -> focus peak -> back to standard. Remember to keep the button pushed in until you see the bar on the screen.
A panorama is typically a photo stitched together of a series of photos, either purely horizontally or vertically to produce a picture with dimensions out of the ordinary. Below is an example of a very wide photo created using the panorama function in the Sony RX100M3:
Lightroom panorama function
Lightroom enables you to stitch together a photo from a puzzle of photos provided that sufficient overlap is secured. Good news is that the photos can be combined horizontally and vertically at the same time, i.e. in the same photo, which enables you to increase both width and height in the same photo, much like you would see with a wide lens. Hereby the panorama function in Lightroom is more advanced than the panorama function you would typically find in a smartphone or the in camera function of the Sony RX100.
As far as I can tell, there is not requirement to have the photos in a certain order, but of course for your own administration it is probably useful to have some system in the order of the photos. In the example below, in total 8 photos have been stitched together via two columns of photos: The left hand side is built up of pictures moving the camera from bottom to top, and the right hand column follows the same logic but with a solid overlap to the left hand column. This is illustrated in the light blue graphics to the left where the darker areas are the overlap. You probably need more overlap than what the graphics indicate (1/3rd is a safe margin), but it also depends if there is some easily identifiable objects in the overlap zones:
The resulting photo looks like this:
Ease your administrative work
When you are in the field and shooting the photos, you can help your work back at the desktop stitching pictures together by following a few tips. When you are out and about it may seem very uncomplicated and straightforward when you shoot the photos, but not so much when you look a them in the Lightroom grid view. It can be difficult to figure out when your series start and stop and which pictures are “normal” pictures and which ones are part of a series. Therefore I recommend that you find a hand signal to start and stop the series, so that you via a scrap photo can easily identify the start and the top of the series. I usually point to the direction I will move the camera to open the series, and to end the series, I simply hold up an open hand:
These photos are of course not to be used as input to the combined picture but are simply for the benefit of easing your administration of the pictures in Lightroom. Here you an see the overwhelming view in Lightroom and how these pictures help you getting an overview – I think the two “handsignal” pictures gives some guidance:
In the field
In my experience you get the best results using a tripod. I know, they are a nuisance in terms of weight and size to carry around. But a tripod gives you the least variance between pictures – you want the height to be the same between photos and you want the pictures to be without camera shake. And a tripod is the most save route to those objectives. You can also give it a try to kneel down and use your knee to support your elbow and that way get a very solid foundation for the camera if the tripod is at home. In terms of camera settings, my recommendation is that you shoot in manual mode ideally, because you then have the least variance between shots in terms of ISO, Aperture and shutter speed. In automated modes, the camera will change the settings based on changing light conditions and any variance will complicate the merging process. Also, unless you have a specific plan with varying the focus across the shots, my recommendation is that you disengage the auto focus with the shutter half pressed and go for back-button focus, or instead that you shoot with a manual lens where you actively have to change the focus. You can, however, re-focus every photo and create some amazing pictures with a depth of field a single shot cannot deliver, but you may find that Lightroom is struggling to merge the pictures if the overlapping parts of the pictures are not sufficient similar. A varying focus may be a complicating factor that could make the picture merge process fail.
Post processing – how to
In lightroom, in the grid view (press “G”), simply select the photos to be stitched together by holding down the shift key and marking the photos in scope. You can either mark them individually or point to the first and the last photo – Lightroom will know you want to include all in between.
After selecting the pictures, right click, and a small window with a menu appears, select “Photo merge” and then menu item “Panorama”. You can also simply press ctrl-M to achieve the same effect, and a picture with a preview and some options appear:
You can try the different projection options, but I find that for landscapes the “perspective” option works best. If you remove the “auto crop” check mark, then you can see the full picture including the parts without coverage:
If you use the “boundary warp” slider, you can get Lightroom to stretch the existing pixels into the areas not covered, so you get a picture with no bare spots, but of course the dimensions may be seriously skewed.
After playing with the parameters, simply press the “merge” button at the bottom right of the screen and Lightroom starts a batch process to merge the pictures. You can follow the progress via the little bar in the screen top left. Unless you have a VERY powerful PC, I recommend that you leave the PC alone while this process is running, as it is demanding, both in terms of memory and CPU capacity. If you press Ctrl-Shift-Esc (Windows), you can monitor the “stress level” of your PC while the process is running.
Once the process is complete, Lightroom will add the picture to the current folder and name the file the same as the last photo in the merged series, with the addition of “-pano” to the file name for easy identification.
Pros and cons of this approach
Pros
More wide and tall pictures simulating a wide angle lens
Two dimensional stitching beats traditional panorama function
Great fun when the result surfaces in the panorama preview – more rewarding?
More resolution – I think…
Cons
Cannot be used for moving subjects or changing light conditions
More work, more pictures, more disk space, post processing, etc
No in-camera result
Best result requires a tripod
Straight lines may be ”fisheyed”, i.e. look strange
Very demanding on your PC if shooting in RAW
Access to picture processing in Lightroom or the like is a prerequisite
A few tips
As shown above, mark the start and end of a panorama series with scrap pictures to easily be identified in grid view
Keep all settings the same for all pictures
Ideally shoot manual mode, or try to keep the setting the same across all pictures
Use back button focus so your focus is the same (again, to keep settings the same)
Use a tripod and ideally also a L-bracket if shooting in portrait mode
Make sure you have solid overlap between pictures – best to have some easily identifiable objects in the areas that overlap.
Keep the number of pictures low if shooting in RAW – maybe start with JPG to see how your PC is dealing with the task
Questions and comments
Questions and comments are more than welcome – please post below. Hope you found this blog useful. Thank you for reading!
Aperture is the iris of your lens. You can regulate the area that lets light pass, just like the iris in your eye. The larger the area, the more light it lets through. Typically on a modern camera, you can regulate the aperture via controls on the camera, but often you can also operate the aperture manually directly on the lens.
Just to confuse things, the aperture is measured in f-stop numbers, and the larger the f-stop the smaller the aperture.
Fast and slow
A fast and a slow lens. This is not a reference to sending your lens to the race track, which of course would be pointless, but rather it is about how much light your lens lets through to the sensor under a given set of conditions. Fast = lets through a loft of light. Slow = less so. Using a fast lens at open aperture can be used to highlight a subject due to the background blur that is achievable with a fast lens. So we all want fast lenses in the best of worlds. But there is no such thing as a free lunch. It comes at a price, literally. And not only your wallet feels the weight, also your camera bag will be burdened with more glass if you insist on a fast lens. And more so if you do so with a full frame camera body. But let’s have a look at your lens speed and what the impact is on your photography.
Aperture measures
Aperture is measured in f-stop numbers, so that the lower the f-stop number, the more light is let through. A very fast lens has an aperture of f/1.4, whereas a not-so-fast lens has an aperture of f/5.6. The aperture numbers are odd and difficult to remember, but it is a good thing to understand the scale, as walking one step up and down the scale is referred to as “stopping down one stop” and “stopping up one stop”. An amazing fast lens has a minimum f-stop of f/1.0. The next f-stop on the scale is f/1.4. If you just remember these two numbers, and that the f-stop scale is a doubling of these numbers for every stop, then you can remember the entire scale. The f/1.0 series is hence: f/1.0 f/2.0 f/4.0 f/8.0/ f/16 f/32 Similarly the f/1.4 series is: f/1.4 f/2.8 f/5.6 f/11 f/22 If you then weave these two series together you get the following f/1.0 f/1.4 f/2.0 f/2.8 f/4.0 f/5.6 f/8.0/ f/11 f/16 f/22 f/32 The series can be extended beyond the above, i.e. some lenses are below f/1.0, but it is rare. On an old lens like this Nikon 135mm, you typically find the aperture scale in the bottom of the lens (closest to the camera) with a ring to turn in order to change the aperture. Notice how the numbers on the lens match the f-stop numbers above. Here the lens is set at f/8: If you try to look into your lens with the aperture wide open, you typically get a very good idea about how fast your lens is. This 135mm lens can stop down to an (relative to the length of the lens) impressive f/2.8, and as you can see, this lens is all glass, that uses every inch and mm of the inside of the lens to let through light:
Ambient light
Ambien or available light is important if you shoot in low light conditions where a flash or artificial light would ruin the scene or seem odd to those in the picture. Take this picture from evening in the summer cottage – the scene would simply not have been the same with a flash light added:
Bringing a flash to this scene would ruin it all…
So in low light situations a fast lens is key.
If you are so lucky to have lots of light available to your photography, no matter if it is ambient light created by the sun, or artificial light created with flashes, steady light, reflectors and what not, then the speed of your lens is less of a concern. But only less. If you have a slow lens, then artificial light can get sufficient light to your sensor so that your Shutter speed is fast enough to prevent both camera shake and subject move without raising your ISO to a “grainy” level.
However, a solid depth-of-field effect where your subject is clearly separated from the background (“pop out”) can be difficult to achieve with high f-stop numbers, as the depth of field increases as you reduce the aperture.
If you want to play with the options, this depth of field calculator shows you exactly how narrow your depth of fields gets when you work with a fast lens and get close to your subject:
So a fast lens is more important for ambient light shooters than artificial light shooters, but faster is also better in terms of background separation. If you are willing to pay the price and weight penalty that comes with the a fast lens is of course entirely up to you.
Your lens and the speed of it
Either on the front of the lens or on the side of it, the fastest aperture it will go to is clearly written on the lens. The picture shows a lens that will go down to f/2.8 as the fastest. You may also be able to see that this is a prime lens (it cannot zoom, the length is fixed), and that it is a 135mm lens.
The longer the lens is, the more difficult it is for manufacturers to construct the lens so that it lest through a lot of light. Physics simply dictate that a long lens requires more glass – this is also why long fast lenses (that sports photographers are so dependent upon) are super expensive.
Non-linear relationship
Now, you may think that the difference between a lens that is f/2.8 and f/1.8 is a relative measure indicated by the size of the numbers. It is not. If you stop down from f/2.8 to f/2.0 you have reduced the light that hits your sensor to 50%!! Every time you stop up or down one step on the aperture scale, you double or half the amount of light! That is why the speed of your lens is so important – we are not talking a marginal improvement as as a consequence of the last stop – we are talking an overwhelming doubling of the light. And that is why serious photographers can get a heated debate about how fast their nifty fifty (50mm prime lens) should be: f/1.4, f/1.8 or f/2.0?
As you can see, I found the f/1.8 version to be appropriate for my budget and need, but of course I have a dream to get a 50mm f/1.4 lens some beautiful day!
Now, just to illustrate how dramatically the amount of light is reduced when you stop up in the f-series, here is an illustration of how fast the amount fades upwards:
So, in my mind, the speed discussion is very fair – we are at the important end of the scale!
Questions and comments
Questions and comments are more than welcome – please post below. Hope you found this blog useful. Thank you for reading! Please share if you find this post useful.
The use of negative space is simply using nothing to put emphasis on something, i.e. leave a lot of unused or empty space to draw the viewers attention to what is in the frame:
It doesn’t really matter what the subject you want to emphasise is – it can be the tree above (or the man walking), or it can be a spider sitting on your kitchen window:
It may seem counter intuitive to use negative space, as the frame itself is a reduction or a selection of a part of reality, but it does give the picture a special mood of calmness:
However, it is important that there is a subject to be emphasised, otherwise the viewer is simply puzzled and cannot figure out what the point with the picture is. In the below example, there really is no apparent subject to be emphasised:
Sometimes negative space can be used to express isolation and loneliness:
Or being together in a bigger frame:
Or put emphasis on the sunrise and the silhouettes:
Or feeling very insignificant in a big universe:
Or simply majestically rise above the haze:
Or waiting for something to happen:
Or simply emphasizing a beautiful view:
Whatever your chosen use of negative space is, I hope the above has given inspiration for your creative work. Please leave a comment or question below – happy to try to give answers and inspiration for your work.
If your are new to photography like me, your first thought when you see a picture of a beautiful flower may well be: How difficult can it be to take a good picture of a flower? But I think that if you give it a try, you’ll find that there is more to it than just point-and-shoot. Not that it is complicated or anything fancy, but there are a number of things you can do to maximize your chances of a good picture. I’ll cover the basics here.
Taking flower pictures involves many hours out and about, so before moving into all the photo specifics: remember yourself first! I find that a rain coat, a cap, a bit of sunscreen, something to keep the mosquitoes at bay, a bottle of water, good walking boots (that supports your ankles) and a few biscuits are invaluable items when spending many hours in nature.
1. Bad weather is good weather!
Bad weather is your friend! Quite counter intuitive, bad weather is good weather for flower photography! A cloudy day, even a rainy day, is excellent: direct sunshine from a cloud free sky gives harsh light and strong shadows and can make it really difficult to get some appealing shots of flowers. And a few drops of water on a flowers petal almost always looks beautiful! I know that some use a spray bottle to add water but I find that mother nature is so much better at this, that I prefer not to, and instead shoot flowers after the rain has ended.
If the sun is beating down and there is no clouds in sight at all, you can diffuse the light with a thin white piece of cloth (like a piece of sheet wrapped around a hanger) or you can buy an umbrella designed to diffuse the light – you can get one for a very reasonable price, they wont take up much space in your camera bag and it doubles as a wind shield.
2. Stabilize your subject
Wind will push your subject around and make focus difficult. See if you can find a quiet corner if it is windy. Flowers sitting low are typically less prone to wind, and you can also try to see if a shield (yourself or a piece of cardboard) can help. Supporting the flower with a stick and a clothespin can also help, especially if in combination with some kind of shield. Finally, there tends to be less wind early in the morning or in the evening.
In the picture below (yes, I admit it is somewhat busy) you can see that I have a clamp around the stem of the little purple flower I am shooting. The clamp is not holding the stem as such (it would probably ruin the stem), instead it simply creates a tight space where the stem can only move very little and that is enough to stabilize the flower head also. The stand that I am using was too tall for this flower, so I had to tilt the stand 90 degrees to get it low enough. This is where more clever photographers buy one of these flexible arms with a clamp (also known as a plamp) to get the job done in a more elegant way!
The reason a stable subject is vital for flower photography is that you typically shoot with the lens very close to the flower, and hence the depth of field (how much of your picture that is in focus) becomes very shallow, so that even a very small movement of the flower can change it from in focus to out of focus. In other words, a stable subject is key to success.
3. Stabilize your camera
3.1 Tripods and monopods
Stabilizing your camera is as important as stabilizing your subject. You can get really great stabilization either via the lens or the camera body (IBIS – in body image stabilization), but you may not have access to such gear and anyway it can never be a bad thing to have a stable camera to avoid camera shake.
I am only too aware that not everyone likes a tripod, but if you don’t mind, get a heavy tripod like the Manfrotto 550 (no, not sponsored by Manfrotto). You can of course use a sand bag or something heavy to make the tripod more heavy and stable, but I find it is easier if it is simply born heavy. Also, if you can get a model that (as in the picture above) can go really low by spreading the legs almost parallel to the ground, this is a great aid when trying to capture a flower sitting low.
If a heavy tripod is not to your liking, then a lighter travel friendly tripod could work for you, like the Manfrotto Befree (no, still not sponsored by Manfrotto), and if that is to heavy for you or takes up to much space, a mono pod could be the answer.
A mono pod only stabilizes the up/downwards movements obviously, but it is better than no stabilization. If you wear a camera strap around your neck, you can push the camera away from you so that the strap is tight, further eliminating back and forth movement. A mono pod may seem like the least optimal solution, but if you go looking for flowers where the ground is covered by bushes or other stuff that makes it difficult for the tripod to get footing, the mono pod may simply be the only viable option for such locations.
If none of all this sounds appealing to you, then my best advice is to use your own body for stabilization. Squat down and let your elbow rest on your knee and hold the camera tight to your face to reduce movements and shake.
3.2 Remote triggers
In the best of worlds, you should also use a remote trigger. I seldom do, I must admit, but if you want to minimize all the factors that contribute to camera shake, there is no way around a remote trigger. Notice that with many cameras you can remotely trigger your camera via your smartphone and an app – no need to invest in a separate remote trigger.
A good compromise is to you can use the timer function so that your camera releases the shutter after 5 or 10 seconds – this is my preferred option, as it is almost as good as a remote trigger and it gives me one piece of gear less to remember when I pack my bag.
4. The gear
4.1 Use a reflector
A reflector is cheap, light, packs down easily and does a lot of good in terms of casting more light to your subject! I find it is one of the most overlooked or under-praised aids of photography! Even on an overcast day the reflector helps a lot and can remove unwanted shadows or simply give you more light to work with.
So always bring a pack able reflector! You can get smaller version that the one in the picture above (!). If you don’t have a reflector, use something reflective to add light to the flower – try using your smartphone or a piece of tin foil.
If you do decide to buy a reflector, no need to buy a big one. The one that I show here is 30 centimeters in diameter, and it does not need to be much larger than that to work for flower bud shooting. This version is a 5-in-one version that has both diffusor, reflector (white, silver, gold) and a black side. It serves me well.
If you find you don’t need the reflector, it can double as wind shield, so in my mind it always comes in handy. The biggest problem with a reflector (other than learning how to fold it down!) is to hold it in the right position and stay there! If you have someone with you, this is where an extra pair of hands really make a big difference. And if not, this is where you will be extra glad that your tripod holds your camera steady, so you have one moving part less to deal with!
4.2 Use an artificial background
Experienced flower shooters knows that a good part of a good flower picture is the background. Sometimes the background can be difficult to control – no matter how much you change your angle and try to be creative, the background is simply too busy or too bright. You can try to use the reflect as background (many reflectors have a black side and a white side in addition to the silver) and even better you can bring a piece of cloth or cardboard or whatever in the color of your liking:
Above I am using a green piece of cloth to isolate the rose, but you can try with many different colors. If you don’t have a piece of cloth, the reflector can be used as a background – here I am using the black side of the reflector to create a more “calm” background:
This enables you to – with a bit of post processing – to create a picture where the flower is the only subject of interest in the frame and hence no distracting elements.
If you instead use the reflector as background, you get a very different expression. Here I was so lucky that the sun lit up the diffusor that I held just behind the flower, and as you can see the expression in this picture is very different from the one above:
4.3. Use the lens you have
I suggest you to start out with the lens that you have available and see how you like flower photography, before you move on and invest in a lens. A kit lens or a 50mm nifty fifty can be used for starters. In my mind the most important for your lens is to go close to the subject. If you cannot help investing in a new lens, see if you can lend or borrow it and try it out, before you make the decision.
I know that some like to use a long lens and zoom in heavily, and if you have a long lens available, you should certainly give this a try. The advantage of using a long lens is that the background is more compressed and hence it is easier to compose the picture. Further, the increased distance between lens and subject also increases the depth of field, making it easier to get the entire flower in focus – when you are very close to the subject, even with very narrow aperture (high f-stop numbers), the depth of field is paper thin.
However, I find that the camera shakes in such setup simply make me seasick as the slightest move of the lens makes what I see in the viewfinder jump up and down vigorously! So I use a lens that can go close to the subject, i.e. where the minimal focal distance is 30-40 cm or so. If you have a long lens, give extension tubes a try – they are metal rings (extension tubes) that you put between the lens and the camera body to increase the distance between the two. The effect is a reduced minimum focus distance, i.e. your lens becomes more of a macro lens.
If you decide to invest in a lens, one way to save money is to go for a used vintage lens. I use the Nikon Nikkor 35-70 mm 2.8D that I think you can get on e-bay for 100 EUR or a little more, subject to the condition. The Nikon has a macro mode that enables you to really fill the frame with the flower.
Another classic lens for macro / close-up photography is the 100mm Tokina F2.8D, which is very fairly priced even from new. I think it comes with different mount systems, so with a bit of luck, there also is a version for your camera body. The Tokina is known to be a budget friendly lens that produces pictures with a sharpness you would expect only from much more expensive lenses.
4.4. Using a non-macro lens
Sometimes the scene or the setting is as important as the subject. With macro lenses or lenses that can go very close to the subject, you often want the subject to fill the frame and be the only start in the picture. However, sometimes the flower sits in a wonderful setting, where the scene or the setting is as big a star as the flower itself. In such cases you can use a short lens to capture this:
The above picture was shot with a Samyang 14mm f/2.8 which is a very short lens (manual focus, aperture control on the lens). You can also give a nifty-fifty lens a try in order to capture the setting.
In the examples above I used the 50mm Pentax Super Takumar f/1.4 vintage lens. As you can see I cannot get as close to the flower as with a macro lens (and cropping would yield a too low resolution result). So I have included more of the setting or the scene the flower sits in.
4.5 Add flash
Adding a flash may sound like a lot of complication for taking a simple picture of a flower, but you will find that adding a flash will raise the quality of your pictures. I have heard that most professional flower photographers shoot with flash maybe 95% of the time, so it is worth a try to see if it works for you. Rather than being frustrated with all the technical terms like TTL and other advanced flash features, simply set the flash in manual mode at say 1/64th for starters and see what it does to your pictures. If you can get the flash off camera so that you can control the angle of the flash independent of your camera angle, then that can really help getting those dark areas and shadows lit.
Try moving the flash closer to and further from the flower and also try to change the power of the flash output – start with say 1/64th and work your way up and down from there. You will quickly find a level that too much power makes your picture look artificial, too little will leave the shades too dark.
If you want to rely solely on the flash light, that is also possible. Simply set the ISO and shutter speed so that the ambient light alone gives a completely black picture. Then add flash and see what happens. The picture above of the yellow flower is made that way. It gives some great options for isolating the flower completely on a pitch black background. Notice that the flash will make the flower cast a shadow and reflect light from any objects close near by – make sure the flash light is reflected outside your frame.
4.6 Take care of yourself!
I think many of us photographers get so into the process of shooting pictures that we forget everything around us, including ourselves! If you plan to stay out for several hours, think about your own comfort and that you will need drink and food. A banana and a bottle of water cannot hurt – the weight penalty in the camera bag is small compared the benefit.
And in terms of comfort, I know that some bring a little fold-able chair along, others – like me – even bring a pillow of some sort to lie on when shooting flowers close to the ground.
When you lie flat on the ground face down, your elbows and body make up a very natural tripod, so if you know you are going to shoot some flowers close to the ground and only that, then you may find that you can do without your tripod.
5. The site
5.1. Start close to home at first
Before your run into the woods or up a mountain or whatever your plans are, my advice is to start close to your home or your base, so that it is easy to return to base. I often find that I forget something (like the SD card!) that I need for my flower photography, so test your setup in your own garden or in the yard where you live, so it is not too much of a pain if you have forgotten something. After a few shooting sessions close to home, you will know the gear you need. Make a checklist and follow it every time before you leave home. You will not regret it, although it not that exciting.
5.2 Location scouting
Obviously you need to find some beautiful flowers to shoot, and my guess is that you may already have some ideas as to where they can be found. If not, see if there is a public available flower garden near you, or simply take a walk in the woods or in the city. You will find that flowers are everywhere, especially if you look for small ones!
Once at your location my best advice is: take your time. Go look! Use your eyes! Wait at least 5 minutes before you start shooting pictures. Scouting the location will give you a good overview of what is available and what to expect. And you can start with some of the best flowers rather than the first flower you com across. So no stress. Take your time!
6. Plan the shot
6.1. Arrange!
I know this is a bit controversial, but I think we are allowed to intervene and arrange things to make it look as beautiful or pleasing as possible. I know some purists will say that this is cheating and that mother nature put that faded leave in your frame for a reason, but I suggest you arrange and compose as you see fit. It can be removing withered leaves, pushing some less-than- beautiful leaves to the side or whatever is required. Of course, all with moderation and in respect of the locations you are using (the gardener may not like it if you cut off some of his flowers!), but I think we are allowed to improve the composition. Take this example where a flower stands out from the crowd:
And you may think that mother nature has arranged this composition? Not quite:
6.2 Composition is important
Much has been said about composition, and it is a big subject, so I will refrain from diving into it extensively here. But it is always a good idea to have the subject a bit off center and have a beautiful background to go along with the flower. Many good flower pictures are ruined not so much because of the composition, but due to the wrong background.
The rule of odds says that we like uneven numbers like 1, 3, 5, 7 and so on. You can use this when making your composition, so that there are e.g. 5 flowers in your frame:
Balance and symmetry is another thing to look for when composing your picture – a nice balance between the elements in the picture makes it more appealing and easy to take in:
Framing, i.e. “boxing in” your subject to guide the viewer to find the subject is also a classic composition technique, and often nature itself provides the framing if you look for it:
Make it easy for the viewer to find the “star” in your picture. In this example, as beautiful as it may be, it is confusing who is the star and what the photographers point with the picture actually is:
So, keep it simple. Both for your own sake, and to help the viewer read your picture.
Finding a good balance in the picture, maybe even symmetrical, is also a good composition principle, so that your picture is not e.g. “too lefty” meaning that a lot of the visually heavy elements in your picture are to the left. Try to strike a good balance:
When shooting, simply to change your angle of view (move your camera a little bit up, to the side, etc) to see the effect in the viewfinder. I am often surprised how moving the camera just a little bit can take a messy ad confusing background and turn it into a nice balanced scene for the flower.
6.3 Help the viewer
Your eyes tend to search towards things that are bright and in focus. Dark and blurry things the opposite. When you work with your pictures in post or when you select your composition during the shoot, think about how you can guide the viewers eyes to the main subject (the star!).
In the example above, the two flowers to the right are out of focus whereas the dust prisoners on the flower to the left are in focus. So your eyes will naturally go to the sharp areas whereas the rest of the picture is perceived more as a scene or framing.
6.4 Flat, flat, flat
You can angle your lens towards the flower as you see fit, but one way of making the picture very simple is to shoot a flat flower where the lens front glass is 100% parallel to the flower: This way you get the focal plane and the flower to be aligned, so that the shallow depth of field does not stop you from getting the entire flower in focus.This way of shooting can give some very simple yet powerful pictures where the flower seems to be “floating” in mid air as the flower is sharp but the rest of the frame is blurry.Some photographers are so dedicated to this way if shooting, that they only go for “flat” flowers, i.e. with very limited depth.I don’t think you should limit yourself in such way, but “straight on” pictures like the one above is good to include in your photography toolbox.
6.5 Morning light is good light
Morning light is special. I don’t know why, but I guess it is because the sun is lower in the horizon and hence the light has to travel further through the atmosphere before it reaches the ground? Anyway, the light is very soft and even if the sun is shining from a cloudless sky, the morning effect softens the light so you don’t get the same problem with harsh shadows that I mentioned in the start of this post. So if you are up for it, set the alarm clock and shoot flowers in the morning!
6.6 Back lit is a good variation
If you can get the angle right, then a back lit flower gives a very different expression than the more traditional “front lit”. You see the structure and the composition of the flower so much better: Droplets of rain (or some you add yourself) is another good variation, so shooting just after the rain has stopped is another way to vary your flower photography.
7. When shooting
7.1 Think background first
The headline seems counter intuitive. Of course you want the subject to be beautiful and stunning, but a good subject deserves the right setting, so work with the angles when you shoot. A messy and confusing background can distract the viewer from the beauty of your subject.
The example above is not an award winning picture, I agree, but it serves to illustrated the point: I managed to get the red to contrast with the black background. As you can see, had I chosen an angle just a little different, then both green and brown would have joined the party and made the picture more messy. I have heard experienced photographers say that the background is almost more important than the subject – not sure that I completely follow, but the background is as important to bring out the best in your subject.
7.2 Work with the aperture
As you probably know, the more you open the aperture, the more light the lens lets in but it also makes the depth of field more shallow meaning that backgrounds will be blurred. This picture is shot at f/2, meaning very wide open and with a paper thin depth of field:
Whereas this picture of the same flower with the same camera and lens is shot at f/16, and you can see much more of the background:
You may find the first picture more attractive as it has a more dreamy feel to it, but the challenge with shooting with wide apertures is that you get a very shallow depth of field and keeping the subject in focus is more difficult. In this case the flower is flat so you can’t really see it, but had it been deeper, it is likely that not all of the flower would have been in focus.
If you can, see if you can get the subject close to you and the background far away. That will give a blurred background, also at narrow apertures (high f-stop numbers). That way you can get the flower in focus even if it is a “deep” one and still have the blurred background. This one is shot at f/16 and the background is blurred despite the brutal f-stop:
For flower photography I always shoot in aperture mode, so I can control the aperture “manually”. I leave the shutter speed and the ISO for the camera to select (sometimes I also control the ISO manually), but most of the time I shoot in aperture priority with auto-ISO in. I find it is the best way that allows me to use my focus on the aperture setting and leave the rest to the camera.
7.3 Shoot, shoot, shoot!
I find that even though I hit the shutter with a few seconds interval, the result that emerges in Lightroom can be very different. I don’t know why it is so, but I guess that one explanation can be the flower moving a bit, me moving the camera a bit, or both. It can also be due to changes in the ambient light that you do not notice. Whatever the reason, I find that of two pictures taken seconds apart can come out as brilliant and hopeless respectively. So maximize your chances for success and fire away. In a digital world, all it takes is a bit of space on the SD card and a bit of battery power. And you can always delete when you work with the pictures in post.
7.4 Try manual focus
Should you be so lucky to have auto focus, then it is of course a big comfort, provided you can get the camera to focus exactly where you want it to. The number of focus points in a modern camera has inflated over the last years, but I find that the only one that works for me is single point focus, where I can control the focus point completely.
If you are up for it, give manual focus a try. Be prepared to invest a bit of time before you you get the hang of it, but it is worth every minutes spent in my opinion, and it is a more engaging way of shooting.
When not shooting with a tripod, I zoom in all the way and throw the focus ring to the closest to the subject possible, and then instead of focusing, I rock back and forth with the camera until focus is obtained. That way I know I have filled the frame to the max.
7.5 Watch the shutter speed
When you shoot in daylight with a very open aperture, your camera will – in the automated or semi automated modes – compensate by reducing both the ISO and the shutter speed to the minimum. Your cameras max shutter speed (typically 1/4000th of a second or 1/8000th), will sometimes not be fast enough to get the picture exposed correct. The result is that your pictures are over exposed, so watch out for the shutter speed – it will typically be flashing (or in other ways try to get your attention!) when the max shutter speed is exceeded.
The fix is to close the aperture a bit – one or two stops usually does it. You will then not get the ultra thin and shallow depth of field that gives the “dreamy” pictures that so many find appealing, but better that than overexposed pictures. Alternatively you can start working with ND filters or see if an umbrella or the like can reduce the amount of light in your frame, but then I find that things become too cumbersome for me and I take the easy way out and reduce the aperture a bit.
7.6 Try underexposing just a little bit
If you dial down on the exposure compensation, this may help you make the background more dark and hence make your subject stand out more clearly and even contribute to a more “dreamy” expression. You can do a lot of “recovery” in post processing with an underexposed picture – in my experience it is far more difficult to work with and overexposed picture because the details in the high end of the spectrum have gone lost. As with so many other things in photography, there is a balance balance to be found, so try to dial down maybe 1/4 or 1/2 a stop for starters, and see how you like it. Then you can always go to more extreme settings if you like to underexpose.
8. After the shoot
8.1 Post processing
I think most photographers do some level of editing although some dislike it and find it to be a bit of cheating. I just want to bring the best out in my pictures, so I have no problems with post processing in Lightroom or Photoshop or whatever you prefer.
When editing I have a few ground rules:
For every edit done, be careful not to edit too much. Less is more.
Leave the picture for 5 minutes (coffee break) and come back and see if you still like the edits. If you edit for too long without a break, your sense of proportion gets skewed and it gets worse and worse the longer you edit. Take a break.
Take a few steps back from the screen and see if you still like the picture. Sometimes your are too close to the picture when sitting in front of the monitor. Assessing the composition is difficult when your nose is 30 centimeters or so from the subject. Take a step back!
Remember that what is sharp and bright gets attention. Dark and out of focus the opposite. Use this to help the viewer take in the picture and focus on the important parts.
8.2 Try black and white
Often flowers are about vivid colors and the beauty in that, but you can try to blend in a few black and white photographs, to put emphasis on the structure and the form rather than the color. It may also open your eyes to new dimensions in the flowers and thereby take your color flower photography to a new level. I prefer to shoot everything in color and then convert to black and white in post processing, that that is due to my lack of experience: I have a hard time forecasting if a subject will work better in color or monochrome. So taking everything in colors gives me options for both at the price of a little bit of post processing.
Questions and comments
Thank you for reading this far! Questions and comments are always welcome! Hope you will enjoy shooting flowers as much as I do!
Starting my “career” as a photographer on a Nikon D5600, I quickly built a portfolio of good and less-good glass. One of my favorite lenses was the Sigma 18-35 mm 1.8 DC, and must admit that this lens was one of the reasons why I hesitated to go full frame – it is that good!!
However, someone kind told me that not all is lost. The Nikon F-mount is still the Nikon F-mount and the lens will fit and you will get all the EXIF information still. So what happens if you use the DX lens on an FX camera body?
Limited coverage
As you probably have figured out, the DX lens for the cropped sensor is designed to cover a smaller area than the FX sensor, so when you shoot with the DX lens, you will get vignetting meaning that especially the corners of the picture are darker or pitch black. The lens throws a light intended to cover the DX area comfortably, but when challenged with the FX sensors larger area, the circle cannot cover, and especially the corners are cut off.
However, how much depends on the zoom. The wider you go, the bigger the problem becomes. The first example here is at 35mm, i.e. the most zoom that the Sigma 18-35 mm 1.8 DC can give and as you can see there is some vignetting in the corners:
If you widen the perspective to 22mm (this is not even the widest it will go), you will see that the problems have gotten worse and now more of the corners are cut off:
However, if you study the pictures carefully, you will see that the 22mm has a wider reach than the 35mm despite the vignetting. In the water, top left, there are two buoys and you can see that there is more of the horizon to the left of them in the bottom picture. So although you have to crop the picture in post processing to get something useful, you still get a fairly wide picture using the Sigma 18-35 mm 1.8 DC on a FX body.
So, don’t sell all your DX glass if you decide to go for full frame – you may find that the DX glass is useful on a FX body. But it varies a lot from lens to lens, so the best is if you can test your lenses with the camera body you plan to buy, so you know exactly how useful your DX glass is on the FX frame.
Nikkor AF-S 18-140mm 3.5-5.6 ED DX VR
One of Nikons classic kit lenses is the Nikkor AF-S 18-140mm, and as you can see the vignetting is bad both when zoomed out (18mm) as this shot of a window frame shows:
And it only gets a notch better when zoomed in close – here at 140mm of the same window frame:
If you compare this to the Nikkor AF-S 35mm 1.8G DX, you can see that the vignetting here is much less, actually – I think – hard to see unless you know it is a DX lens on a FX frame:
I think you have to compare it to the 50mm FX equivalent (Nikkor AF 50mm 1.4D) to notice the difference:
So the Nikkor AF-S 35mm 1.8G DX in my mind is highly usable on a FX frame whereas the Nikkor AF-S 35mm 1.8G DX is much less. Finally, lets take a look at another classic kit lens.
Nikkor AF-S 18-55mm 3.5-5.6 G II ED DX
This lens is probably one of the most common kit lenses, and at 18 mm it – not surprisingly – shows the same vignetting as the 18-140mm:
However, at 55 mm there is hardly any vignetting:
So I think this illustrates that you need to test the specific lens you want to put on a FX camera as it is hard to make a conclusion or a guide that applies to all lenses.
Questions and comments
Questions and comments are more than welcome – please post below. Hope you found this blog useful. Thank you for reading! Please share if you find this post useful.


