Canon EOS 5D: How to do exposure bracketing

Dynamic range

Your eyes are amazing! They can take in a scene and cover a dynamic range of approximately 20 stops of light. So looking at a sunset, you can distinguish the light both around the sun and some shades on the ground at the same time! Your Canon EOD 5D unfortunately cannot. It can “only” cover around 11-13 stops of light, so if you have a scene where there is both some very bright parts and some darker ones and you’d like to cover the details in both ends of the spectrum, exposure bracketing is the tool to use.

Preconditions

With exposure bracketing, you are taking several images of the same scene at different exposure values. Perhaps needles to say, but you can only do this for stable subjects such as architecture or landscape photography. And you also need to make sure the camera is in exactly the same spot for the series of shots, and a tripod is the classic tool to make this happen.

Canon EOS 5D exposure bracketing
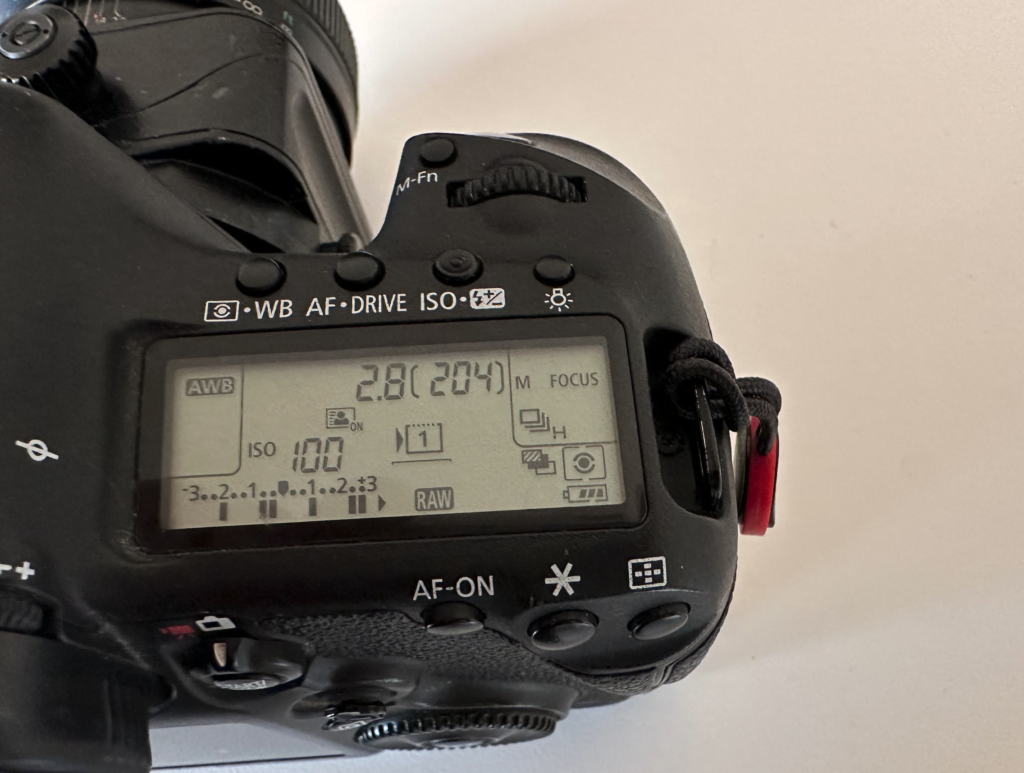
Avoid hitting the shutter several times: put the camera in one of the continuous release modes. Here high is selected.

As you are shooting a series of images, the easy way to get it done is to make sure your Canon EOS 5D is in continuous mode (low or high), so that it fires a series of shots when you hold down the shutter release. Otherwise you will have to hit the shutter several times to complete the series.

Finally, you need to give the camera some options for changing the exposure between shots and the semi automatic exposure modes like program, aperture priority and shutter priority are ways to secure this. You can also shoot in manual mode, but make sure the Canon 5D has auto ISO set to on, otherwise there is very little for the camera to vary between the shots!

How to

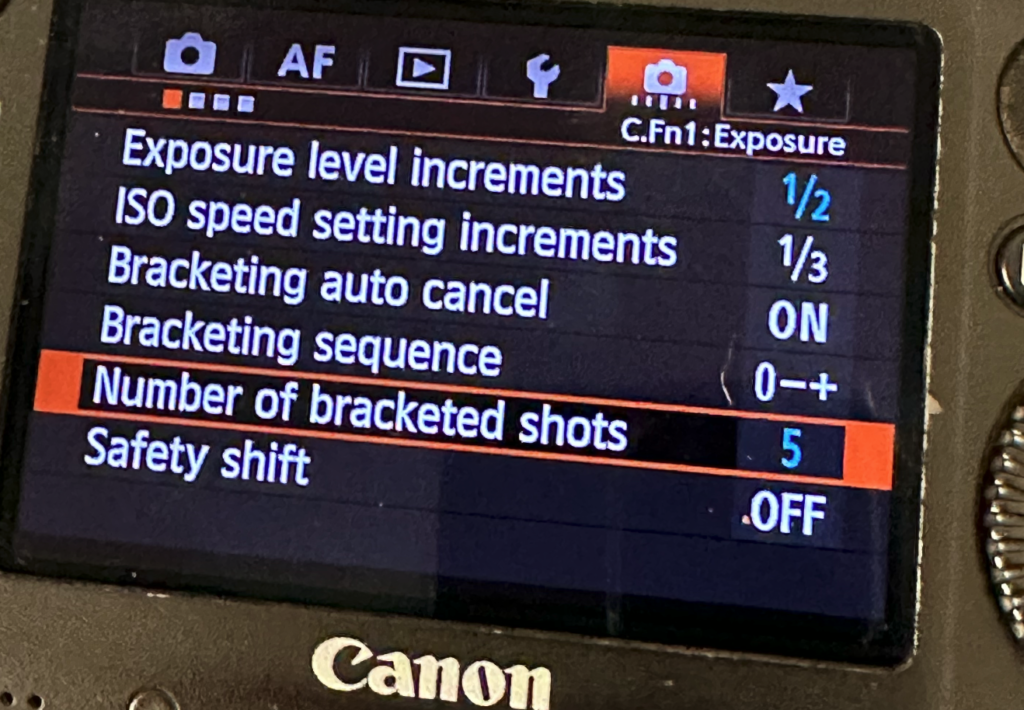
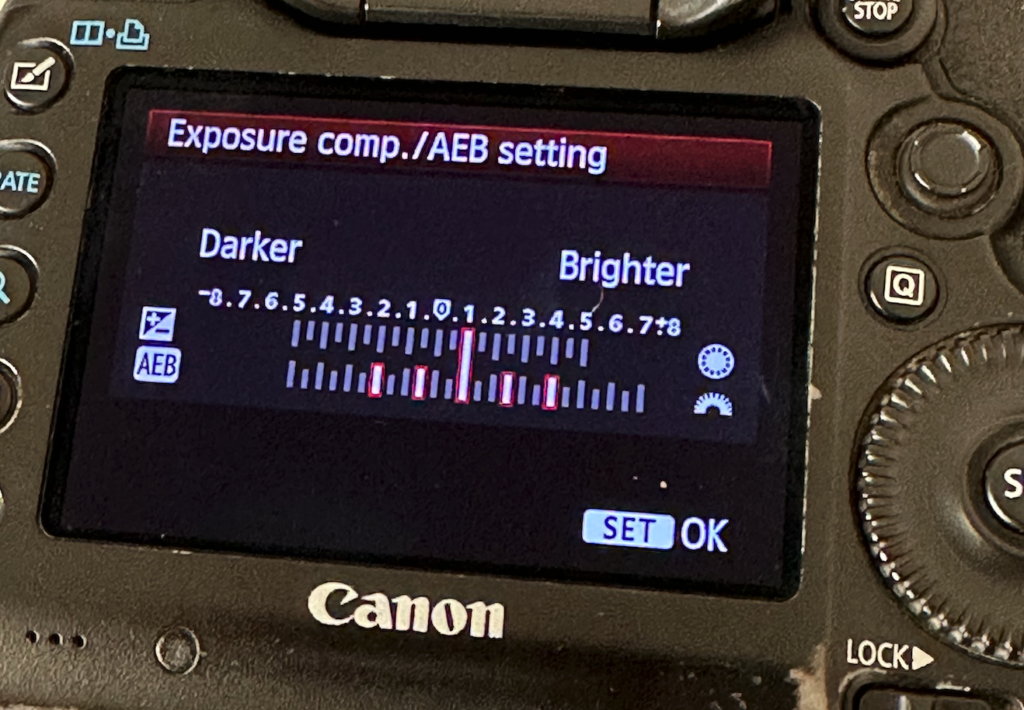
The Canon 5D  has two menus of relevance: one is where you configure the bracketing steps and the number of shots, the other where you configure the distance in stops between the shots and also if exposure compensation it to be applied also.

Canon EOS 5D exposure bracketing
Use the C.FN1:Exposure menu (second last menu item on the top level, first sub menu) to select the increments (first menu item) and the number of bracketed shots (second last item). I never use the bracketing sequence as Lightroom does not care about the order of the images.

Canon EOS 5D exposure bracketing

In the second sub-menu in the shooting menu (SHOOT2) you can configure the distance between the shots and exposure compensation. You can see in the example above that I have asked the camera to over expose all images with one stop and hence the middle of the 5 bars points to +1.Once you have captured a series of images, you will need to merge the images in post processing. I use Lightroom for this purpose, but there are probably other tools that can do exactly the samme. The software will pick the over exposed images to get access to the details in the shades and the under exposed images to get access to the details in the highlights, and by stitching the images together, a final image with improved dynamic range can be produced.

Video link

Nikon D4: How to do exposure bracketing

Dynamic range

Your eyes are amazing! They can take in a scene and cover a dynamic range of approximately 20 stops of light. So looking at a sunset, you can distinguish the light both around the sun and some shades on the ground at the same time! Your Nikon D4 unfortunately cannot. It can “only” cover around 12-13 stops of light, so if you have a scene where there is both some very bright parts and some darker ones and you’d like to cover the details in both ends of the spectrum, exposure bracketing is the tool to use.

Preconditions

With exposure bracketing, you are taking several images of the same scene at different exposure values. Perhaps needles to say, but you can only do this for stable subjects such as architecture or landscape photography. And you also need to make sure the camera is in exactly the same spot for the series of shots, and a tripod is the classic tool to make this happen.

As you are shooting a series of images, the easy way to get it done is to make sure your Nikon D4 is in continuous mode (low or high), so that it fires a series of shots when you hold down the shutter release. Otherwise you will have to hit the shutter several times to complete the series.

Finally, you need to give the camera some options for changing the exposure between shots and the semi automatic exposure modes like program, aperture priority and shutter priority are ways to secure this. You can also shoot in manual mode, but make sure the D4 has auto ISO set to on, otherwise there is very little for the camera to vary between the shots!

How to

You can bracket for many things such as white balance and also bracket using the flash light, but in this post I will just cover exposure bracketing using ambient light.

Nikon D4 exposure bracketing
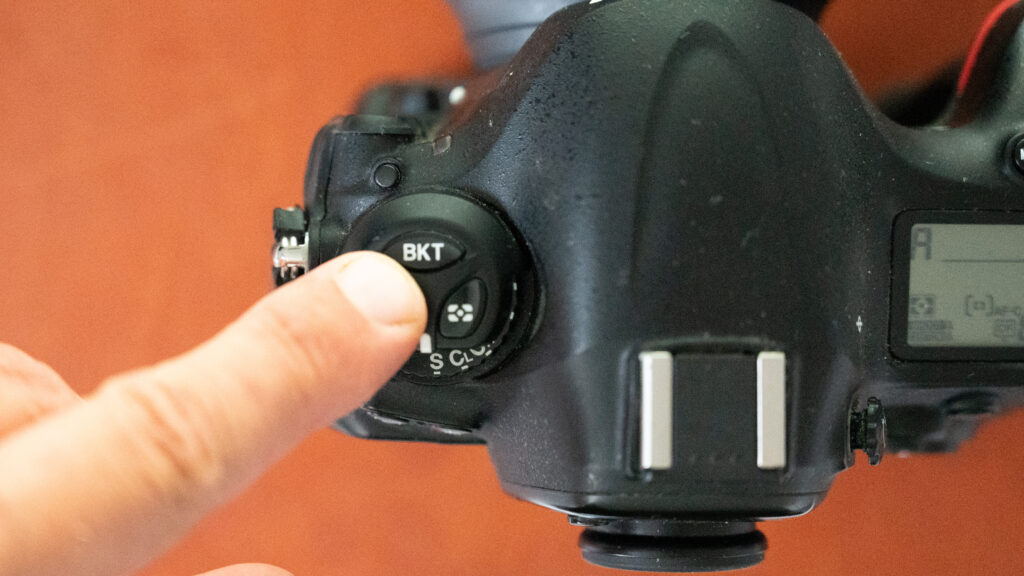
The Nikon D4 exposure bracketing button sits top left on your camera. It is marked “bkt” as an abbreviation for bracketing. You can change the parameters using the front and rear command dial. The configuration is displayed in the top LCD directly and on the large rear LCD if you hit the “info” button bottom left on the rear of the camera.

The wonderful Nikon D4 has a dedicated bracketing button sitting top left on the camera named “bkt”. If you hold down that button, you can set up how many shots you want in the bracketing series (3-5-7 etc) and also how many stops of light the exposure is to deviate from the normal exposure. Use the front and rear command dial to change the values. I usually set this to 1.0, but if you set it to say 0.3 or 0.7, you can select a larger number of images to be included in the series. If you set the number of images to 0, you are turning off the bracketing functionality.

Nikon D4 exposure bracketing
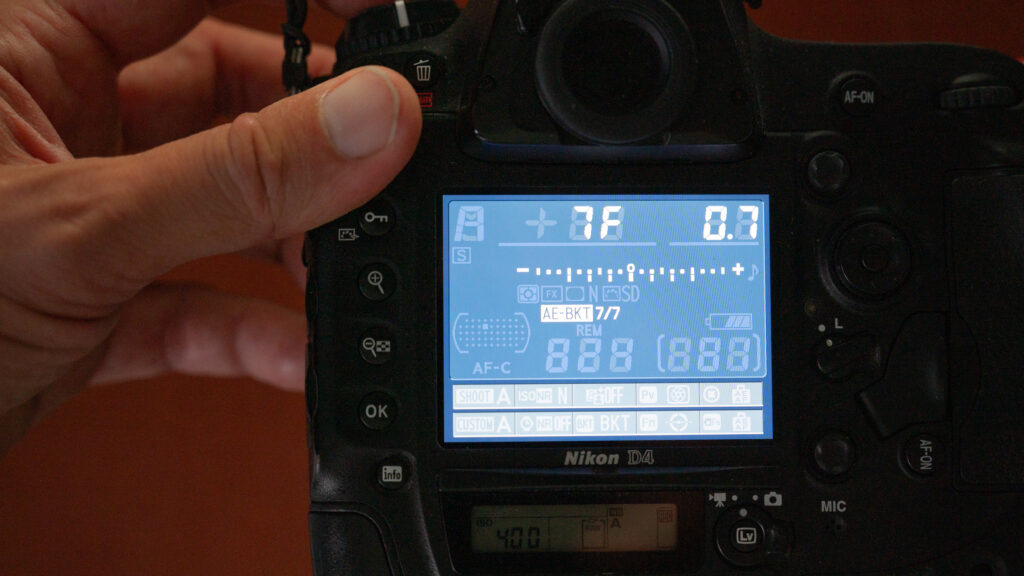
Nikon D4 exposure bracketing set up to take 7 images (frames) with 0.7 stops between each image. You can see how the graphics illustrate that there will be 3 images underexposed, 3 images overexposed and in the middle a normally exposed image. If you set the number of images to zero, it is the same as turning bracketing off.

Once you have captured a series of images, you will need to merge the images in post processing. I use Lightroom for this purpose, but there are probably other tools that can do exactly the samme. The software will pick the over exposed images to get access to the details in the shades and the under exposed images to get access to the details in the highlights, and by stitching the images together, a final image with improved dynamic range can be produced.

Video link

Is the camera shutter count important?

The odometer of a used car is an important indicator of just how used the car is! It may not tell exactly how well the previous owner(s) took care of the car, nor if they drove like rotten tomatoes or carefully like some senior citizens are able to. The shutter count on your camera is a little bit the same: it tells something about how used the camera is, but it is not the entire story.

You can tell a lot from the scratches and wear and tear on the outside of the camera body – many professionals (sports, photo journalism) do not baby their gear and you can certainly tell from the look of the camera. However, the cameras they choose for their line of business is built for the purpose, so factor this in when looking at a seemingly beaten up pro grade used camera.

In the spec sheet, camera manufacturers list the shutter count life expectancy for a given camera. The Nikon D4 is set to 400.000, but Nikon is notorious for being conservative when it comes to the life expectancy, and many report that they have passed the  expected shutter count by several factors!

The shutter in a DSLR is one of the parts that endure the most wear and tear, and hence the focus is very much on the mechanical shutter itself. If your cameras shutter stops working, it is often possible to have the shutter itself replaced and the camera re-calibrated, giving you – if not a new then – a refurbished camera that most likely will have several good years ahead. However, the precondition is that the camera is within the service window still and that spare parts are available. I have a Nikon D4 that is 10+ years old, and I doubt that I can get that serviced anymore as spare parts simply are no longer produced or in stock.

Other parts like buttons and dials are subject to wear and tear as well as the lens mount and doors in the camera. Print cards and electronics can also see the end of their life, but the mechanical parts is usually where the issues surface first.

Some think that the camera shutter counter is reflected in the file numbering of the pictures. And to some extend it is, but you can typically re-set or change the file naming counter, so it is not evidence of the shutter count. Unfortunately, most camera manufacturers do not provide the shutter counter to be seen via say the menu system or some other easily available option. It is hidden inside the camera!

Good news is that the EXIF information of the images contains the shutter count. So if you take an image and send it to this website, you can get the information “pulled out” of the image, provided your camera is supported. Although they say that the image is not stored, I would recommend that you use a test shot or something that is not dear to you as the image you upload. I have only been able to make it work for RAW files, not JPGs.

Sample shutter count for a Nikon D4

With the move from DSLRs to mirrorless cameras, the significance of the shutter count has dropped somewhat. However, there may still be a mechanical shutter in your mirrorless camera that is needed for flash photography or the like. However, when shooting with the electronic shutter, there is very little wear and tear of the mechanics of the camera (other than the shutter release button of course).

For a mirrorless camera you will typically find a counter for both the electronic and the mechanical shutter. For a DSLR, the distinction is between the counter including live-view shots and the more classic shutter release. It is a fair distinction, as the mirror is not flicking every time you shoot an image in live view.

Video link

What is Matrix metering from Nikon?

Matrix metering is the most advanced of the metering options on a Nikon camera, be it a DSLR or a ML camera. It divides the scene into multiple zones and evaluates the light intensity and contrast in each zone. The system considers the brightness and contrast levels in each zone to evaluate the overall exposure. Subject recognition may also be used to determine the most important zones as well as the zone that has the focus point. The system has developed over the years and hence the system is not static but had improved from one model to the next.

Nikon Matrix Metering can work with non-CPU lenses, but with some limitations. Non-CPU lenses do not transmit lens information (e.g., focal length, maximum aperture) to the camera, which can impact the metering system’s accuracy. Therefore the Nikon camera – when shooting with a non-CPU lens – will typically default to center-weighted or spot metering mode, instead of Matrix metering.

Related reading

What is exposure compensation?

What is the exposure triangle?


Review: Photographs by Ole Christiansen

Ole Christiansen, Photographs
Front page of the book. Iggy Pop obviously.

Danish photographer Ole Christiansen, born 1955, has created portraits of more and less famous people for 40 years. In this book a number of black and white portrait photographs are presented, along with a few images of street / architecture. However, the bulk of the book is portraits.

Ole Christiansen presents a mixture of Danish and international celebrities. Iggy Pop, Leonard Cohen, David Byrne and Yoko Ono are examples and shows that he apparently has a name internationally. But also people that are “world famous in Denmark” are portraits, such as Lars von Trier and former Danish prime minister Poul Schlüter.

Ole Christiansen, Photographs
Former Danish prime minister Poul Schlüter.

Ole Christiansen often uses hard light, which is normally not what you would use for (flattering) photography. But Ole’s project seems take the approach that the character of the person is key rather than beauty or a wrinkle free look.

Ole Christiansen, Photographs
Leonard Cohen, Obviously. Closed eyes.

You can find a few double exposures amongst the images in this book, and Ole does not shy away from using props such as mirrors, a record or a piece of paper. Or the subjects hand (see the front page with Iggy Pop).

However, for me, the most stunning images are the “simple” ones using a single hard light source to draw out and amplify the personality of the subject photographed. Even though his ability to put vivid focus on the eyes of the subject is stellar, you’ll also find images where the subject has eyes closed or is viewed in profile, i.e. not looking into the lens.

Ole Christiansen, Photographs
Hard light right, more classic portrait left.

If you like portraits and B&W images, this books comes highly recommended. There are also a number of street / architecture images, but for me the important work here is the portraits. There is no text other than a small introduction to Ole Christiansen on the cover page – this is a book with only images. Just the way I like it.

Related reading

Review: Looking East, portraits by Steve McCurry.

Review: Ravens by Masahisa Fukase

Canon EOS 5D: Manual Exposure Guide

Many find shooting in manual exposure mode a bit intimidating, maybe because you run the risk of getting images that are either over- or under exposed. However, a digital camera gives you the option to immediately see the result of your work a few seconds after you have hit the shutter, so the feedback loop is fast and there is every opportunity to learn from the feedback and adjust the exposure. In addition, if you shoot in RAW format, even wrong exposure by several stops can be fixed in post. So the digital age has certainly made photography in manual exposure mode less risky than back in the film days, when you got the feedback in the darkroom!

Canon EOS 5D
This blog is based on the Canon EOS 5D mk III, but I am sure it is applicable to most versions of the Canon 5D.

In this short guide I will take you though the parameters you need to control in order to manage the exposure of the images. If you like to learn from a video instead, there is a link in the bottom of this post to a youtube video that takes you though the same topics as this post.

Mode dial

Canon EOS 5D
Remember to push the centre button on the mode selector when changing between modes. Here “M” for manual is chosen as it is aligned with the white dot on the camera body.

The first step is to get the Canon EOS 5D in manual exposure mode: top left on your camera the mode selector button is located. Press the centre button down and at the same time turn the mode selector so the letter “M” for manual is flush with the little white dot on the camera. Then you have set the camera in manual mode.

Canon EOS 5D
The Q-button is just to the right of the rear LCD, sitting over the large command wheel.

If you press the “Q” button just right to the rear LCD, the screen that appears will top left show an “M” if you have successfully put the camera in manual mode. Press the “Q” button again to turn off the rear LCD.

Canon EOS 5D
The large M top left on the rear LCD shows the camera is in manual exposure mode. You control both the aperture and the shutter speed.

Shutter speed

Just behind the shutter release button, there is a command wheel you can turn left and right. When you turn the wheel, the shutter speed changes by each “click” of the wheel – you can see the values changing in the small LCD top right on the camera.

Canon EOS 5D
Here the top LCD is shown. The shutter speed is 1/6th of a second, the aperture is at f/32 and the ISO is set to 100.

The shutter speed is shown top left in the small LCD as a reciprocal value, so if the value 100 is displayed, it means 1/100th of a second. Again, if you push the “Q” button, the shutter speed will be shown top left in the rear LCD, just right of the “M” mentioned before. Press the “Q” button again to turn off the rear LCD.

Aperture

You control the aperture by turning the big command wheel just right of the rear LCD (it has a “set” button in the centre). Again, the selected aperture can be viewed in the top LCD just to the right of the shutter speed, and just like with the shutter speed, you can also see the aperture on the rear LCD if you press the “Q” button just above the bug command wheel.

Canon EOS 5D
The large M top left here on the rear LCD shows the camera is in manual exposure mode. The cursor is over the f/32 and as the blue bar in the bottom of the LCD shows, this is the chosen aperture.

The widest aperture you can select, i.e. the smallest F-stop number, is determined by the lens. I am often shooting with a 90 mm Canon tilt-shift lens TS-E and it has a maximum aperture of f/2.8. At the other end I can close the aperture down to f/32. So I can select between 2.8, 3.2, 3.5, 4, 4.5, 5, 5.6, 6.3, 7.1, 8, 9, 10, 11, 13, 14, 16, 18, 20, 22, 25, 29 and 32. Quite a number of options!

Be careful not to close the aperture down too much, you will let in very little light and also diffraction starts to set in when beyond f/16 approx.  Shooting wide open lets in lots of light, but the price you pay is that the depth of field gets very shallow, so unless you want to isolate the subject with a blurred background, a middle-of-the-road aperture of say f/5.6 or f/8 may be a better choice.

ISO

ISO is not the sensitivity of the sensor, but a factor that is applied to the amount of light the sensor has registered during the exposure. So turning up the ISO will amplify both the light and the noise the sensor has registered – that is why shooting with very high ISO numbers gives grainy images with washed out colours. The camera is simply amplifying both the signal and the noise and the closer the two are to each other (i.e. the less light) the more the noise will dominate relative to the signal. So be sure not to go too high with the ISO, unless you like grain for artistic reasons.

Canon EOS 5D
The ISO button is the second from the right, sitting just above the top LCD.

Just on top of the top LCD there are 4 buttons. The rightmost turns on the light in the LCD, and just to the left of that button is the ISO button. If you press it once, most of the values in the LCD will disappear and only the ISO value will be shown to the left just above the metering scale. You can see that it says “ISO” just to the left of the ISO setting.

You can now change the ISO value by turning the same command wheel as you use for setting the shutter speed. ISO ranges from 100 up to at least 25.600, but I would advise you never to use so high values. I try to stay at 1600 as my highest value.

Canon EOS 5D
With the joystick top right, you can move the cursor around. Here the cursor has been positioned over the ISO field and the blue bar in the bottom shows that ISO is highlighted. If you hit the “set” button in the centre of the large command wheel, you will get into a menu where all ISO options are displayed for selection.

If you turn the command wheel all the way to the left (i.e. down to 100 and then one more), then an “A” will appear and this indicates that the camera will now select the ISO value automatically. Using the built in light meter and the aperture and shutter speed selected by you, the camera will now set the ISO so that the image is correctly exposed. Be mindful that if you stress the camera with either very little ambient light or brutally closed down aperture / fast shutter speed, the only thing the camera can do is to turn up the ISO to a very large value. So keep an eye on the ISO settings also if you have the auto-ISO turned on.

Adding it all up

Now you know how to set the aperture, shutter speed and ISO and you are in full control of how these values are set. There is help to be found in the fact that the metering system of the camera continues to work and tell you if the 3 parameters you have chosen add up to a technically correct exposed image.

Keep an eye on the scale bottom left on the top LCD; the scale can also be found in the bottom of the viewfinder. If the little dot on the scale is to the left of the middle, your image is under exposed and to the right the opposite. If you are more than 3 stops over- or under exposed, the camera will show this with a little arrow pointing out of the scale in the relevant direction.

All the best with shooting in manual exposure mode!

Video link

Why I got the Godox AD100Pro over the Godox V860III

I have for some time been able to manage with only one flash (!) – the Godox V860III. My copy is made for sitting on a Nikon, but because I trigger it off camera with a Godox XPro, I am able to use the same flashlight across my Nikon, Canon and Fuji cameras. I have to invest in a trigger per camera, but the flash can be the same. This is the first reason why I wanted to stay with Godox – their eco system works really well and the protocol is shared across a lot of their newer products.

Godox AD100PRO
My Godox V860III has been my only flash – supported by reflectors and mirrors.

I wanted to get a second flash to give me more options especially when doing product shoots. I did consider getting an additional Godox V860III, but I really do miss a good modelling light, so I am able to see where the light falls before hitting the shutter. The V860III does have a modelling light, but it sits on the base of the flashlight and hence does not follow the turning of the head. And when the flashlight sits in say a softbox, the modelling light is no good at all.

Godox AD100PRO
The modelling light on the Godox V860III sits on the base of the flashlight and does not follow the direction of the head of the flash light.

The Godox AD100Pro solves this problem by having the modelling light sitting at the edge of the flash light itself, and hence solves the issue I have with the V860III. It is not a very strong light at only 1.8W, and when sitting in a softbox this is not very useful. But when the flash is used “naked” it is really a helpful feature and for my flower photography I really enjoy the modelling light.

Godox AD100PRO
The Godox AD100PRO has a small 1.8W modelling light sitting at the edge of the flash light itself.

Further, the AD100Pro is not a very big flash. It is marginally larger than a can of coca-cola and as I have only a small studio, having a compact flash is important to me. The flash is not that powerful (only marginally stronger than the V860III) and if you need more power, I suggest you take a closer look at the AD200Pro or AD400Pro to mention a few.

Godox AD100PRO
The Godox AD100PRO is a relatively small flash – here compared to the size of a pen.

I was able to get the AK-R1 accessory kit that gives a range of modifiers, including barn doors, snoot and gels. The light modifiers snap onto the flash via magnets, and it is so easy and very fast to mount and swap light modifiers. I really enjoy this addition to my flash, although the size of the light source for my usage (typically product shoots) is small and hence gives hard light. But for a focused beam of light to enhance the brand name or a logo on a product, it is really useful.

Godox AD100PRO and the AK-R1 accessory kit

Finally, the Lithium battery that comes with the AD100Pro is – even when I shoot at full power – able to recycle in a matter of seconds. And the battery easily supports one of my shooting sessions (1-2 hours typically) without a need for charging.

Summary

The Godox AD100Pro works really well for me, but your preferences and use case may vary from mine. If you need lots of power, I recommend that you look to some of the larger models (AD200 and AD400), especially if you want some modelling light that is useful also in daylight when sitting in a softbox.

Video link


Review: In America by Robert Frank

Swiss-born photographer Robert Frank on the cover page of his book “In America” is quoted for saying: “Across the USA, I have photographed with these ideas in mind: to Portray Americans as they live at present. Their everyday and their Sunday, their realism and dream. The look of their cities, towns and highways”.

Robert Frank In America

Many big words – both praising and criticising Franks work – have been written about this book, but I stick to Frank’s simple description of his work done during his travel across America. Then I let others decide if this truly is a landmark in photographic history or a touchstone of American identity.

Robert Frank's way across America.
Robert Frank’s way across America.

What strikes me as a photographer looking through the black and white images of this book is Frank’s extraordinary visual talent. And for me this is a source of inspiration that I can visit again and again. Seeing Franks work really makes me want to be a better photographer – not in the same way as the playfulness of Saul Leiter or the clean compositions of Henri-Cartier Bresson, no, it is a visual talent where the compositions are very natural and – for the lack of a better word – non-composed.

Example images from In America.

Some of his images I can study again and again and still find new nuances and details; new inspiration and the work of a natural talent. It is difficult for me to asses if you will feel the same way, but if you are looking for inspiration from one of the best photographers of all time, this book may be just what you need.

Further reading

Review: Henri Cartier-Bresson Here and Now, by Clément Chéroux

Review: The Unseen Saul Leiter by Margit Erb & Michael Parillo

Review: Hengwin Leather Belt Pouch

Every spring when the weather get warmer I face the same recurring issue: My winter coat has a lot of nice pockets for me to store my wallet, keys and phone, but when summer comes and it is all t-shirts and shorts, what then? When I stuff my pockets with all my gear, I often find that my shorts get more and more interested in saying hello to my angles!

I have sometimes made it with a small backpack, but on a hot summers day, a backpack may not exactly be what you want to keep your back even warmer!

Hengwin

Hengwin Leather belt pouch
The pouch comes with a strap sitting just above the leather pouch itself, and holds my wallet (top left, black leather), keys and iPhone 13 Pro comfortably.

To the rescue comes Hengwin, a Chinese brand laser focused on small bags and pouches, practical solutions for carrying essentials without breaking the bank. You can find their homepage with all their products right here. The bag shown here will set you back around 30 USD. If you used the code “frederikboving” you’ll get a discount and if you order more than one, you may be eligible for free shipping! Make sure to check that you are not subject to import taxes.

Hengwin Leather belt pouch
The Hengwin Leather belt pouch easily takes my iPhone, wallet and keys. I could also have used the vertical pocket for credit cards.

The leather belt pouch that I have in review here easily takes an iPhone 13 pro, my little wallet and my keys. I could also easily have fitted my sunglasses in there along with the iPhone.

Hengwin Leather belt pouch
Inside the large room in the pouch you will find two more pockets – one with a zipper and another without.

Carrying

The pouch gives you 3 options for carrying:

  • Attached to your belt via a belt loop attachment
  • Attached to your clothing via clip-ons and
  • Carried in a cross-body adjustable strap

I must admit that I prefer the 3rd option, as it for me has a little more street credit, but also because I find it a more safe option – I am not sure I would notice right away of someone stole the bag when hanging on my hip! But that is all personal preference! It is nice that Hengwin gives options to choose from!

Hengwin Leather belt pouch
There are 3 options for carrying the pouch: belt, strap and carabiner clip.
Hengwen
Although designed to attach the pouch to your belt, I find that attaching my keys to the snap hook works really well in combination with the cross body strap.

Build quality

I have not yet long-term tested the pouch, but judging from the initial look and feel, the build quality seems to be very good, especially when you factor in the price point. Both the leather, sewings the zippers seem to be of good quality.

I would have loved if the adjustable strap had been made of leather like the pouch itself, but I also appreciate that a long strap of leather also has some disadvantages when age sets in!

Hengwin Leather belt pouch

Summary

I think this is just the solution I have been looking for to keep my bits and bobs in one place. And  even though I may carry a backpack when going to work, the Hengwin is probably with me as a bag in the bag, so I can always find my keys and phone. The build quality seems fine and if the pouch stands the test of time, I think you will find this to be a handy product without breaking the bank.

Hengwin Leather belt pouch
Although the Hengwin bag will take a small camera like the Sony RX100, I usually carry my camera over one shoulder and the Hengwin over the other.

Video link

Related reading

Review: HORL 2 knife sharpener

Review: Timbuk2 Heritage Classic S Messenger bag multi-colored

Atomos Ninja V: Great recorder, but prepare to pay for accessories!

I just ordered my copy of the Atomos Ninja V. It is a great tool if you want to get serious about video recording, but prepare to pay! The Atomos has a few surprises up its sleeve that you might want to know about before buying!

You can find lots of reviews praising the Atomos Ninja V and rightly so – it will unleash a lot of potential from your camera doing internal recording. But buying the Atomos is like buying a german car: the price for the base model looks reasonable, but when you add needed extras, the price suddenly changes in upward direction.

The backside of the Ninja with the SSD drive sitting to the right.
The backside of the Ninja with the SSD drive sitting to the right (light grey).

The Atomos Ninja V comes with no memory. You have to install a SSD drive for it to store information, and if you don’t want the SSD drive to stick out from the side of the Atomos Ninja, you have to buy a dedicated drive. I went for the Angelbird AtomX SSDmini with 500 GB.

To the right the mount for the ninja on the camera hotshoe.
To the right the mount for the ninja on the camera hot shoe. The red button is for releasing the Ninja from the mount.

Further, there is not mount to make the Atomos sit comfortably on the camera – you can make a DYI version, but I decided to go for the Atomos monitor mount. The total of the mount and the SSD drive was around 66% of the price for the Atomos Ninja itself!

Then I learned that I did not have a cable to go between the Ninja and my camera -I needed a HDMI-A to HDMI-D cable for my Lumix camera (your camera may need a different cable). Maybe you are so lucky that you have one on stock, but I did not, so I had to invest once more. Notice that it is useful with a relative short cable if you intend to have the Ninja mounted right on top of your cable.

HDMI cable to go between camera and Ninja
HDMI cable to go between camera and Ninja.

Add to this that the Atomos Ninja V comes with not batteries at all! You can get a Atomos Accessory Kit with batteries and a sun visor and a battery charger, but that kit will set you back another 40% of what the Atomos itself costs, so if you want both batteries, sun visor, memory and a monitor mount, you have to pay a bit more than double the price of what the Atomos Ninja V itself will cost you.

Then there is the question of getting data out of your Ninja! Here there is no USB-C or USB-A connector to “talk” to your Ninja, so I had to get a docking station for the SSD drive.

SSD drive docking station.

The final stab that Ninja Atomos V made at me was when I created a profile on the Atamos homepage and downloaded the latest software. There I learned that a one-time fee of 99 USD for the giving me access to the H.265 codex was required.

H.265 codex access paid!

So, as I said in the beginning of this blog, the Atomos Ninja V is a great tool, but just like cars from Germany: be prepared to cough up some extra of you hard earned cash to make the package complete.

Related reading

Review: SmallRig RM75 Video Light

Review: COLBOR CL100 Video light