When light travels though the lens, the aperture blades can reduce the diameter of the hole the light travels through. Most lenses can close down the aperture to a very, very small area – the size of a pinhead or even smaller.
When light has to travel through such a small hole it simply changes slightly. This can get very technical, but the effect is that your images appear soft, i.e. as if out of focus – even when you have focused perfectly.
Photographers debate exactly when the effect sets in and how large the effect is. Macro photographers often shoot at crazy high f-stop numbers (closed down apertures) and seem to be doing fine, and in many find that the effect of diffraction is exaggerated.
The best you can do is to notice if your lens/camera combination gives diffraction – I think you should start to worry about this from around F/16 and onwards.
I guess a sun star is rather self explanatory just by the name as such. But it does not necessarily come from a sun – it can be any bright light source like a lamppost at night or your smartphone, as this low key image illustrates:Sun star, here the light comes from an iPhone!
To produce a sun star you obviously need a bright light source like the sun, a spot, a lamppost or the like. And then you need stop down the lens, i.e. go to a high f-stop number – this will help produce the sun star. If then in addition partly block the bright light source so it is a very small spot that produces the bright light, then that further helps the sun star to appear.
I usually shoot in aperture priority mode and that allows me to set the aperture and let the camera calculate the shutter speed to get a correct exposure. In order to avoid too slow shutter speeds, I may increase the ISO from base ISO to say 800 or 1200 to secure that camera shake and motion blur is prevented. For most cameras you can easily set the ISO to values between 800 and 1200 without affecting the image quality.
Sunstars can be produced also without the sun!
The number of peaks in the sun star is a function of the number of aperture blades in your lens, so that the number of peaks is double the number of aperture blades. Your blades can also be shaped a bit differently: straight blades in my opinion gives the most beautiful sun stars, whereas rounded blades make then less well defined. But this is all personal preference.
The sun star here underlines the beautiful windless morning
A sun star can be used as a tool to emphasise a scene. In the example above the sun star underlines the beautiful quiet morning with the sun rays seeping through the trees to light up parts of the grass. You will also notice a bit of lens flare top right of the sun star – you can minimize this in general using a lens hood, or if you shoot into the sun, try to point directly into the sun so the lens flare is put on top of the sun itself.
Lens flare is bright areas of light in your image, that you do not find in reality! It is caused by the way light hits the front side of the glass in the lens and is scattered inside the lens.
Here below I have taken a shot of me holding my iPhone up in the dark and taking a picture of it. You see leftmost a hectogon shaped green light (the same shape as the aperture blades) followed by several colored bright spots. This is flare. None of these were there when I studied my iPhone with the naked eye:
A bright light source (here from an iPhone – more typical the sun) in stark contrasts often brings out lens flare.
If the light comes into the lens from a very steep angle, then the result can be a milky white area – sometimes covering the entire frame. And the contrast in that area is significantly reduced – things appear to be washed out.
Here I hold the light from the iPhone so it comes into the lens from almost 90 degrees and from the left. If you’re thinking: 2001: A space odyssey, then you know what creative tools Stanley Kubrick used.
If you want a good test if your lens has flare, go out at night, find a tall lamppost and point your lens towards it. Move the light from the lamppost in and out of the frame to provoke flare. You will probably be able to get some flare effects, especially if you leave the lens hood at home and choose a zoom lens. Zoom lenses have more complicated constructions than primes and tend to produce flare more easily.
Some love flare. In my experience, videographers love flare. When you watch TV or go to the movies, you will quickly spot flare used as a creative tool. It certainly underlines the strength of the sun on a sunny day. Also some photographers love flare, they even add it to the image in post processing!
Others do not love flare so much. If you want realism in your photos, the flare is to be avoided, as it is a thing created by your lens. It sort of gives away that a lens was part of producing the image.
Some lens constructions are better at reducing flare than others. Modern coating of the lens glass greatly reduces flare, but cannot eliminate it fully. Zoom lenses have more complicated constructions and are hence more prone to flare – primes less so. And finally, you can use a lens hood to reduce the flare. I sometimes even hold the hand against the sun to protect my lens from getting the light that produces flare.
In my opinion there is no right and wrong when it comes to flare. It is a creative tool. The problem comes when it is there and you don’t want it or the other way around. But hopefully this article has given you some ideas what to do in these cases.
Thank you for reading this far! Questions and comments are more than welcome!
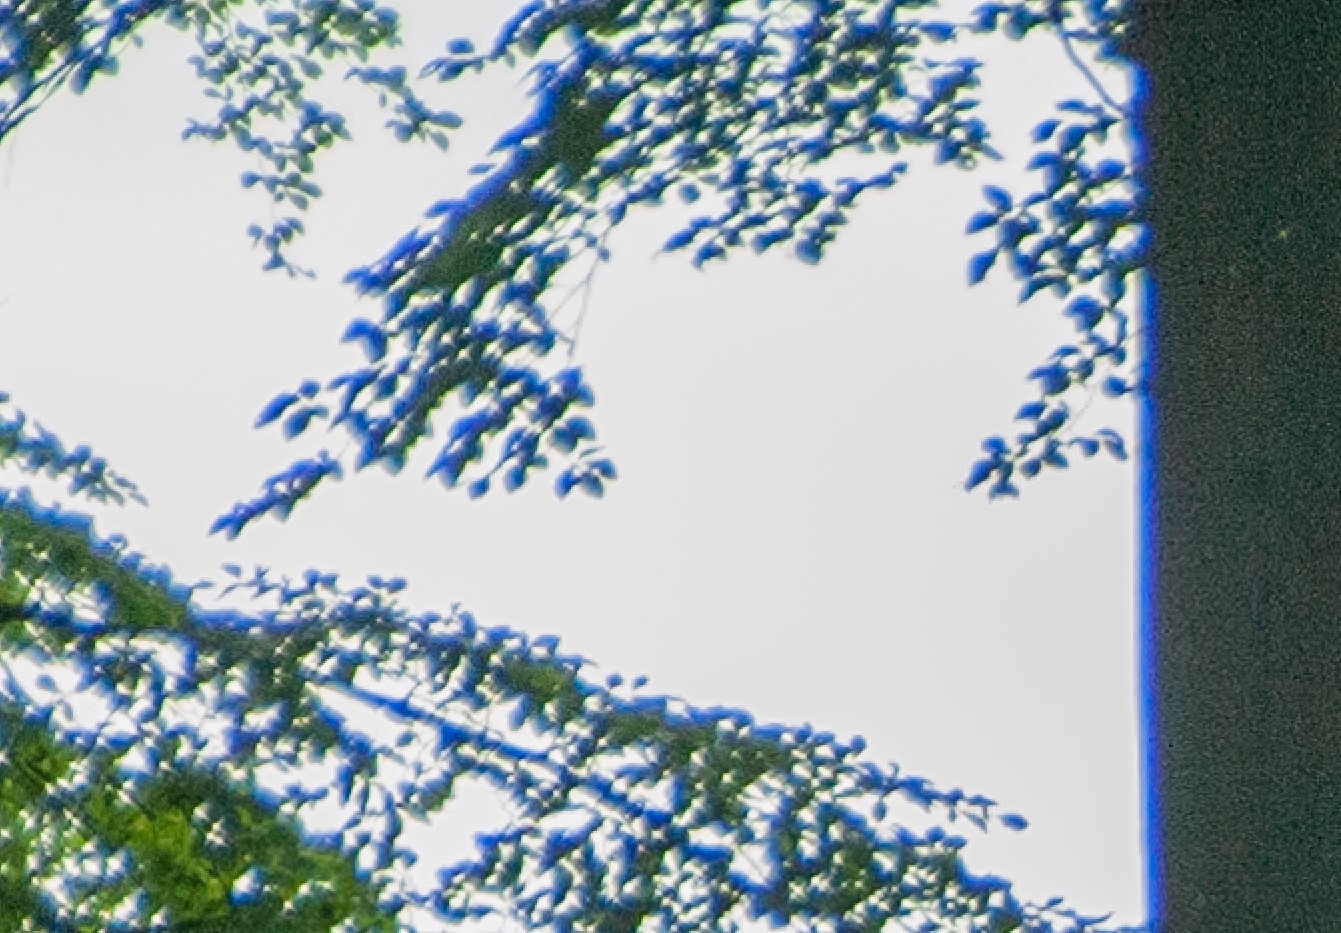
Chromatic aberrations, often abbreviated to CA, is lines of color, typically along high contrast areas in your image. These lines do not reflect what the lens actually saw – it is created in the lens as the light travels through. It is also known as purple fringing or color fringing. So your lens simply adds a line of color along a high contrast area.
Chromatic aberration – notice the line to the right of the stem…
In the image above shot with the Nikkor 28-105mm (formerly a kit lens), the CA is really bad – notice the vertical line that follows the left hand side of the stem, but also all the leaves with white background suffer from serious CA – they are almost more purple than green!
The reason for this is a fault in the lens, where it does not manage to align the different wavelengths of light correct. The reason can be the lens design, slight movement of the glass over years (wear and tear simply) or a combination of the two.
If you notice CA while shooting, you can try to stop down the lens a bit, i.e. go to a higher f-stop number. CA is known to be worse at wide apertures, so this may help you reduce the problem.
Your post processing software can remove some parts of the CA, but not necessarily all. Lightroom has different sliders that you can try to use, if the standard checkbox “remove CA” does not work. I find that in many cases it works, but there are still a few images where I have not been able to remove the CA. If the CA is too bad and it cannot be removed in post, the only option left is to convert the image to a B&W image, as the CA is reduced to a slight blur in the image.
A short description of lens distortion, the two main types and to what extend you as a photographer should worry about distortion.
Straight lines…
Lens distortion is when a straight line in reality is not represented as a straight line in your image. It is caused by the lens and the way the lens glass elements shape the light on its way to the sensor or film in your camera.
Barrel distortion makes the center of the image pop out to appear closer to you even if the wall with these tiles is as straight as they come!
Modern lens constructions seldom have significant lens distortion, as the lens designers know that reviewers by tradition will test the lens for distortion and make a point of it if the lens suffers from distortion. In reality, most of us will never notice the distortion, and only if you shoot architecture, real estate or landscapes with edge-to-edge horizons will you notice the potential distortion in your lens.
Pincushion distortion makes the center of the image appear further away….
Wide lenses, i.e. lenses with a short focal length, suffers more from distortion than longer lenses. The wide field of view that a wide lens has makes it more of a challenge for lens designers to make the edges of the image free from distortion. A good example where the designers deliberately have given up is a so called fish eye lens (say 8mm focal length), where the distortion to a large extend is the point.
In Lightroom and similar editing tools, the lens profile is available to the software and hence the distortion can easily be corrected in post, just by ticking off an option during post processing. In some cases the camera and the lens in combination is able to remove the distortion as part of the cameras internal processing of the image, and hence the image that you find on the memory card of your camera is distortion free from birth.
Thank you for reading this far! Comments and questions more than welcome!
A short definition of what Depth-of-Field in photography is…
Acceptable sharpness
Depth-of-fields (DOF) is the area (depth) in which subjects in view of your lens appear to be acceptably sharp. The DOF area closest to you is called the DOF near limit, and the other end the DOF far limit. Within that interval, subjects appear to be sharp.
If you have not tried to focus manually, I encourage you to try so. Flick the little switch on the front left of your camera (typically) from AF to M, and try to turn the focus ring manually. Notice how different parts of the scene becomes sharp as you turn the ring. You are actually “pushing” the focal plane back and forth when you turn the focus ring – the focal plane being where you as photographer decide the image is to be sharp, but there is an element of “forgiveness” prior and after the focal plane and that is the DOF.
DOF illustrated
I think of the DOF being around 1/3 prior to the focal plane (the focus point) and 2/3 after the focal plane, but this is not a technically correct way to see it, but if you like me just want to have a drivers license to what DOF is, then this is a good and operational way to think about DOF.
Your DOF depends on many factors such as the distance to the subject, the sensor size, most notably the aperture and the length of your lens. Most photographers work with the aperture to control the DOF, but you can also use the distance to the subject.
Macro photography
Macro photographers suffer from the fact that when you are super close to your subject, the DOF shrinks to almost noting, even if you pump up the Aperture to something crazy high – it won’t help, as the distance is so small that you get a paper thin DOF no matter what. Therefore many macro photographers use focus stacking, where you take several images and change the focus point, and then in post merge the sharp parts together to create an image with a larger DOF.
Portrait photography
Portrait photographers use a relatively small aperture to shrink the DOF so that the background becomes very blurred and hence does not take focus from the subject. You can also get this effect at a higher aperture (and hence DOF) if you just make sure that the distance from the subject to the background is by factors way bigger than the distance from the lens to the subject.
One of the things I love about Nikon is the vast amount of cheap vintage glass that is out there on e-bay, plus their backwards compatibility – all the way back to 1950 or thereabout. Than means that most of the Nikon glass that they have produced since back then, can be used on a modern Nikon camera. And if you don’t like Nikon camera bodies, you can buy an adapter to fit the glass on the camera body of your preference.
Back in the film days full frame (FF) was the standard, as it was 35 mm film and not a digital sensor that sat in the cameras. That changed during the 1980’s and later, so that most cameras today have a digital image sensor. And for starters the digital sensor had the same size as the negative on a film – approximately 35 mm. What also changed was the amount of available sensor sizes. The so called APS-C and other reduced formats were introduced, along with new lenses. The advantage being that it was possible make lighter and cheaper glass, as the light would have to cover a smaller sensor. Although being smaller, the APS-C sensors could easily cram say 24 MP into the sensor despite the reduced size and hence a new fan base was created – people who do not want to carry heavy glass but on the other hand do not like the idea of reducing the resolution of the sensor.
Nikon made the APS-C cameras so that they used the same mount – the so called F-mount. That means that you can mount glass designed for APS-C on a full frame camera, and the other way around: mount full frame (FF) glass on a APS-C camera. It is the latter case I want to explore in this post, to see what happens.
In the best of worlds I would have shot the test shots with two Nikon cameras, say the D700 (full frame) and the D7500 (APS-C) or the D5600 (APS-C), but I lost my D7500 in a salt water accident and I have sold my D5600 to finance new gear, so I simply do not have a Nikon APS-C camera anymore. Luckily, I do have a Fuji X-T3 camera, which has an APS-C sensor size. And with an adaptor from K&F concept, I can mount the full frame lens on the Fuji camera:
Fuji X-T3 with a K&F adaptor to allow the Nikkor 24mm f/2.8 to be mounted
The disadvantage is that I now have to focus manually, and that the camera cannot control the aperture so I have to set the aperture on the lens itself. Further, the EXIF information that I get with the picture does not show the aperture anymore, as the lens and the camera cannot “talk” to each other – it is a dumb adapter. But for the purpose of this test, it is no big issue.
I am testing here with a wide lens, the Nikon 24mm f/2.8, and first I want to show you the picture taken on the Nikon D700 full frame body. The subject here is a little clay figure and I have put some items on the table to give some sense of the depth in the picture:
Nikon 24mm f/2.8 at ISO 400 f/2.8 – full frame sensorNikon 24mm f/2.8 at ISO 400 f/2.8 – cropped sensor
The second picture is taken on the Fuji X-T3 using the same lens with the adapter shown previously. As you can see, it seems like the little figure on the table has moved much closer and the frame is much less wide. For example, you cannot see the door to the right anymore and the stands to the right are almost gone.
This is known as the crop factor. When you use full frame glass on an APS-C sensor, then the picture is cropped because the sensor only uses the center part of the light from the glass.
The crop factor is typically 1.5 (for Cannon I believe it is closer to 1.6), and shooting with a 24 mm FF lens on an APS-C sensor as I have here, is the equivalent of shooting with a 36mm lens on a FF sensor. That explains why the frame is less wide and the subject appears closer.
Some say the crop factor is also to be applied to the aperture, so that the 24 mm f/2.8 is actually a 36 mm f/4. Below I have the two shots next to each other in Lightroom, where I have zoomed in on the FF version to the right, so that the clay figure has roughly same size. And then I have put some small lights that I normally use to test bokeh, to see if the full frame version would yield more background blur than the APS-C one. As far as I can tell, they are very similar:
The reason could be that f/2.8 and f/4 are both very wide apertures where the level of background blur does not change much, but from this test alone, I cannot conclude that you need to apply the crop factor also to the aperture to achieve equivalence.
Thank you for reading this far! Please don’t hesitate to leave a comment below or click the like button!
In photography the notion of a holy trinity of lenses refers to a set zoom of lenses that cover the full range of focal lengths, going from the ultra wide 10 mm to the long 200 mm. This is typically achieved by 3 lenses that cover each their area:
Extremely wide – 10-24 mm
Standard zoom – 24-70 mm
Long zoom – 70-200 mm
(and some also have the 200-500 mm, good for wildlife and sports photography)
The beauty of this lineup is that you do not need any other lenses!
The holy trinity of lenses illustrated
The series of lenses is illustrated in the graphics above. Notice that all the above refers to full frame equivalents, so if you are shooting on a cropped sensor, you need to apply the cropping factor to get to the right values (1.5 for DX or APS-C lenses), but the idea is the same: to have a few lenses to cover the full range of focal lenghts.
Not all photographers like zoom lenses, and there are several reasons for this, one being that they are expensive compared to prime lenses, another that their weight can be significant, especially in the long end of the scale and then some argue that prime lenses with fixed focal lengths are more sharp than zoom lenses. Those who agree to these arguments typically cover the focal range with prime lenses to achieve the same end.
As you can see in the graphics above, the angle of view changes as you move up through the focal range, starting at a whopping 130 degrees and a lens of 10 mm (far left), ending at 5 degrees or less at a super long lens (far right). Here the photographer working with primes will have to change lenses each time a new focal length is needed, and as the prime lens only cover a point on the scale illustrated above, you may risk that the prime lenses in your bag does not make the desired focal length available. In such cases a prime lens that typically is too short is used and the frame is afterwards cropped in post processing. Some also “zoom with their feet”, but you have to remember here that the angle of view does not change, no matter how much you zoom this way, so you will not get the same result (due to compression) as you did would with a zoom lens.
Questions and comments
Thank you for reading this far. I hope you found this blog useful. Questions and comments (and likes!) are more than welcome!
When you use a long lens in photography relative to a short lens, the long lens will – all things being equal – give the impression of the picture being compressed. On other words, the background will appear to be moving closer to the subject.
Intuitively, you would expect that if you took a picture with a short lens, then mounted a long lens and walked back until your subject would fill the same in the frame, then the two pictures would be about the same. But they are not. For two reasons. One is compression, the background will appear to have moved closer to the subject, and the other is field of view. The long lens sees a much narrower part of the surroundings of the subject. Sounds complicated? Lets look at some examples.
The first picture here is taken at 18mm focal length:
18mm
You can see that I have put a shovel behind the chair to help me size the subject in the frame as I start to walk backward. Notice the greenhouse to the right.
Next picture is shot at 70mm:
Notice how the greenhouse to the right has disappeared due to the more narrow field of view. And the fence at the back of the garden seems closer – the picture is more “compressed”. Hence the name. And notice also how the arms on the chair no longer point so much outwards, they appear more parallel in the 70mm picture.
If we take it one step further to 135 mm:
You will notice that the black chair behind the brown chair in the foreground suddenly appears. This is because I have walked so far back and the field of view is so narrow that the brown chair no longer “shades” the black chair. And the fence has moved even closer. And finally 300mm:
More of the same: fence is closer, black chair even more visible, greenhouse long gone, etc.
What happens is illustrated below. As you can see, the angle of view is much more narrow with a long lens and hence the greenhouse disappears from the frame in the examples above.
Did you notice how the chair looked more and more natural as the focal length increased? In the first picture the arms pointed very much outwards, but this became better and better with increasing focal length. This is useful for portrait photographers, because shooting too close to your subject with a too wide lens will give a less pleasing picture. You can try to take a selfie with your nose into the lens, and I can assure you that it will not be pleasing! Therefore many portrait photographers prefer relatively long lenses, typically 85 to 135mm.
You will also see that the composition of your picture changes when the focal length is increased. There is less distracting elements in the pictures with the long lens, simply because the angle of view is more narrow. So you can make a picture where the subject is less disturbed by distracting elements around it.


 What also changed was the amount of available sensor sizes. The so called APS-C and other reduced formats were introduced, along with new lenses. The advantage being that it was possible make lighter and cheaper glass, as the light would have to cover a smaller sensor. Although being smaller, the APS-C sensors could easily cram say 24 MP into the sensor despite the reduced size and hence a new fan base was created – people who do not want to carry heavy glass but on the other hand do not like the idea of reducing the resolution of the sensor.


