Review: Sony RX100 M3 = value-for-money!

If you are in the market for a serious (enthusiast) camera that will deliver pictures on par with many entry level cameras but in a pocket able size, and doing do without breaking the bank? Then I think you should have the Sony RX100iii on your short list. I am not sponsored by Sony and I bought the camera myself.

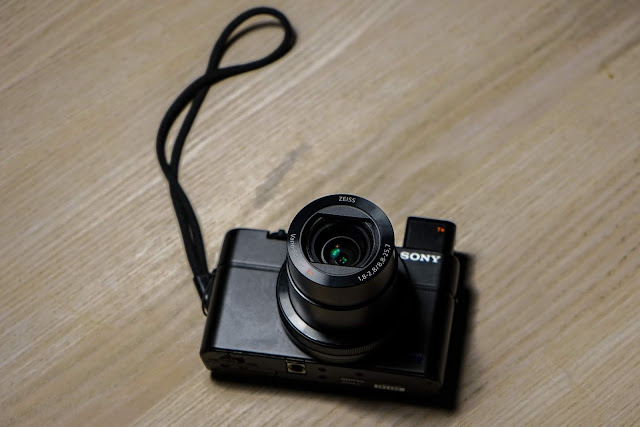
Sony RX100M3
The Sony next to a Nikon DSLR.

I guess we a are all looking for a good deal, and the most value for money, also when shopping camera gear. I find that the Sony RX100iii is an amazing value for money “package” and below i give you 18 reasons why this is a great pocket camera. And then some less-than-optimal features of this camera and finally my verdict after using this camera as my every-day-in-my-pocket camera for more than half a year.

Notice that the camera I review is the mark 3. It comes in later versions: Mark 4 and 5 has the same lens, whereas mark 6 has a new lens with longer zoom (and it is not so fast). Later version gives 4K, more frames per second, etc, but if you like me want to get the best value for money, the trick is to not buy the latest model, but an older model that still fits your personal preferences. So if say 4K video is important to you, the mark 3 is not the one to go for.  So if you decide to go for an older camera model to get better value for money – make sure you do not compromise what is important to you. Ok, lets have a look at the mark 3…

1) Small and compact

The best camera is the one that is with you. We have all heard that statement – but although trivial, it is also very true. I throw the camera in my bicycle bag frequently, and the fact that it is light and takes up very little space, makes it an easy decision to bring it along.

Sony RX100M3
The Sony RX100M3 is compact!

2) Lens cover built in – turtle mode when closed!

Maybe a small thing, but the fact that the camera has a lens cover built in and that it closes every time you shut down the camera is one of those small things that makes life with this camera so much easier. I don’t have to worry about fingerprints on the lens or what way the camera is turning when I grab it to go out the door. It is a turtle until it unfolds!

Sony RX100M3
Lens cover built in!

3) Lens: It is fast! 

With a minimum aperture of 1.8, this Zeiss lens is fast! Notice that the M6 version of the RX100 is at 2.8, also with a longer zoom, but it is not as fast as the M3, M4 and M5 of this camera. If you shoot a lot of available light situations with the “risk” of low light, say restaurants and other places where a flash would ruin the mood, then you will love the speed of this lens!

Sony RX100M3
Ready for shooting!

4) Lens: Good all round zoom range

The lens zooms from 24 to 70 mm, and that is a classic all-round zoom range that I find is great for most situations. Maybe not shooting sports and wildlife, nor a landscape (although it has a built in panorama function), but for most other situations, the zoom range is all I need.

Sony RX100M3
The Sony RX100M3 and Nikon vintage lens.

5) Lens: fast focus!

Maybe someone who has tested a lot of different AF lenses can dig out examples of lenses that focus faster than this camera does, but I must say that I am impressed, given that it is a pocket camera. I have not missed a shot due to the lack of speed in the auto focus, but of course I use this camera mainly for street photography and friends/family, so maybe I am easy to please.

6) 20 mp sensor

20 mp is a lot if resolution. It is only slightly less than Nikon’s entry level cameras D3400 and D5600 and at par with the D7500. I am impressed with the quality of the files this camera produces, both in JPG and RAW. It is truly impressive that such a small camera in terms of sensor resolution and ability to produce RAW files takes up the competition with many DSLRs and mirror-less.

Lighthouse, Langelinie, Copenhagen harbor

7) In body camera stabilization

I could simply not understand how I was able to come home with “stable” pictures shot at 1/4 of a second. That has never happened to with my DSLR – always blurry pictures! That was until I read that the RX100 has in body camera stabilization – and it works! Not that it works miracles, I can still come home with shaky pictures, but it certainly enables me to have the shutter open for longer than on my DSLR, where I would be cautious to go below 1/80. Here 1/4 is the limit in my experience.

8) Tilt screen

Camera reviewers always talk about the benefits of a tilt screen, and to be honest I think it is over rated. But I must admit that especially for shooting close to the ground, I enjoy the option to flip out the tilt screen so that I don’t have to lie on my stomach in order to see what I am shooting.

Sony RX100M3
Tilt screen.

9) Viewfinder in that small camera!

I don’t know how they have managed to fit it in there, but there actually is a “pull it out manually” electronic viewfinder built into this small camera! And it is a great feature for those sunny days where the back LCD screen is of little use. Some complaint that it is a two step process to pull out the viewfinder, but I find that once you have learned it, then no problem. And the viewfinder turns off the LCD screen when you put your eye to the viewfinder – smart!

Sony RX100M3
Sony RX100M3 viewfinder.

10) All the benefits of a mirror-less

You have all the benefits of a mirror-less, meaning that it is a quiet camera, you see what you get in the viewfinder prior to shooting and you have all the LCD information in the viewfinder also. I especially enjoy the level information for shooting landscapes, so I don’t have to level in post but can get it right in camera.

11) Ten (10) frames per second

This camera shoots up to 10 frames per second, and the M4 and M5 takes this even higher (24 FPS). I do not really know what you need all those FPS for in this small camera (I mainly shoot burst for wildlife with a long lens), but if you need it – there it is!

12) Consistent menus and controls 

The Sony product range has as far as I can tell, consistent interfaces and menu systems across their product range. I think all Nikon and Cannon shooters that convert to Sony find the menu system terrible, but it is consistent across the product range and if you “speak Sony” then you will quickly learn how this camera works.

13) Fast startup – ready shoot!

I think the camera starts up and is ready surprisingly fast. Of course, not as fast as a DSLR where it is just a flick of a button (and where the mechanical viewfinder always works). On this camera, you have to wait for the lens to extend and the EVF to get operational, but I often find that I miss a short more because of me fumbling with pulling the camera out of my bag or pocket than the start up time.

14) ND filter

Although the ND filter “only” gives 3 stops, and maybe will not be enough for those loooong exposure where a waterfall turns silky smooth, it still comes handy when shooting into the light and the  maximum shutter speed becomes a limit. Again, I am impressed that it has been possible to cram in an ND filter in this feature packaged camera.

15) Smartphone integration

Unlike the say Snapbridge software from Nikon, the software from Sony actually works every time and transfers pictures from the camera to your smartphone both fast and in a relatively user friendly way.

16) Charges via USB

Sony RX100M3
Sony RX100M3 charging in camera.

You can charge the camera via mini USB, so in your car or in the office, just plug it in and it will start charging. Flashing orange light means charging – steady means done. 

The camera does not come with a dedicated battery charger, which some will see this as a downside. Instead it comes with a cable and an AC adapter. As battery life is a bit shallow on most mirror-less, the option to charge in your car or at the office in my case takes some of the pain from poor battery life out of the equation.

The only minor gripe here is that the plug is not USB-C which the industry seems to adopt as the new standard – but here the fact that this camera is an older model starts to show. 

17) Control ring

The control ring on the front of the camera in my mind is brilliant! Some complaint that it does not have clicks or stops, but it is not on my wish list. What the ring controls depend on the mode, but if you shoot in aperture mode, the camera will allow you to control the aperture by simply turning the ring at the bottom of the lens. I think this is a brilliant way of making an otherwise not-to-user-friendly interface a lot better. 

18) Price

When you go for the M3, then you get a model that is a few years old. And it does not have the latest features like 4K video, a motor driven pop-up eve, 24 FPS or a zoom range of 200mm. If you can live with the specs of the M3, then I think you for the price (400 EUR) get a fantastic feature packed pocket camera that is worth every euro!

On the contrary

Just to complete the picture, I also want to share some of the less great things about this camera: 

  • First of all, it is not weather sealed. A 2 euro cent plastic bag from IKEA can help a lot, but it is not sealed for rough conditions!
  • The zoom range ends at 70mm. If you need longer zoom, then th Mark 6 offers 200mm, but it is also at a very different price, and the lens is then 2.8 at the short end (up from 1.8)
  • The LCD screen is not a touch screen. As I have a few “older” DSLRs where the LCD is not touch screen either, I am used to using controls to swipe and zoom in and out. But it is annoying when you have been shooting with a smartphone for a while to come back to a screen that does not react to a touch!
  • Battery life is not good – but I think this is a common feature of the mirror-less cameras with all the power that is necessary to operate the EVF and the LCD screen.
  • Some may miss the external flash (a hot shoe), but the camera does provide a built in pop-up flash.
  • Others may miss a dedicated charger – standard this camera only comes with a AC adaptor for in-camera charging.
  • The menu system and user interface is – as it is with Sony – a bit cumbersome, but you get used to it. It is a funny mixture of features you use often and features you seldom or never use. So shooting experience is sometimes hampered by a less than optimal user interface.
  • Some get frustrated by the fact that the camera closes down when you close the EVF. I am now used to it and actually find it quite useful.
  • 4K video is not a feature of the M3 (comes in later models), but I am fine with 1080p and this camera does ok video footage as far as I can tell.
  • The electronic viewfinder has to be “pulled” out manually, in later models it opens up motor driven. I have no problem with the manual solution. The EVF even survived that I dropped the camera on tarmac, landing on the corner with the EVF (not popped out when it happened, but still!)

Conclusion

This is a feature packed pocket-able camera that I bring with me almost everywhere I go. I love the combination of great technical features and specs packed into a very compact camera body. The shooting experience is not great – the user interface is as Sony is, and it takes some getting used to. But past that hurdle, this little camera delivers and punches far beyond its weight. And if you can live without 4K and 200mm zoom, then this value wise, as I see it, is difficult to beat. Provided what you mainly shoot is landscapes, street photography, travel pictures and friends/family. Sports and wildlife, macro and other more specialized types of photography is not what the pocket cameras out there are intended for. 

My only major concern with this camera is that there is no magic or x-factor! When I shoot with a Nikkor vintage lens I sometimes get the feeling that some sort of magic blends into the equation and gives something extra to the pictures that is hard to define. Not with this one. Top level engineering. But no magic. Just technically good pictures. In pocket format. For around 450 EUR (March 2019). I find that value package difficult to beat.

Sony RX100M3 sample image.

Comparison table III to VI

Below a table with selected differences between the later models of the RX100. As you can see the mark 3 is starting to get old, but in my mind still is a very good pocket camera, considering the price point:

RX100 III IV V VI VII  
Release year 2014 2015 2016 2018 2019  
LCD Touchscreen No No No Yes Yes  
Lens focal length eqiv 24-70 24-70 24-70 24-200 24-200  
Lens aperture f/1.8-2.8 f/1.8-2.8 f/1.8-2.8 f/2.8-4.5 f/2.8-4.5  
ND filter Yes Yes Yes No No  
FPS 10 16 24 24 20*  
Video 1080 4K 4K 4K 4K  
             
          *90 in Burst  

Related reading

Sony RX100 M3: It has all the modes you can think of!

Sony RX100 M3: How to shoot Panorama pictures in camera with

Video link

Shopping link

Affiliate shopping links: 

Sony RX100 M3

Sony RX100 M4

Sony RX100 M5


Nikon AF-D 50mm 1.4 is so much fun!!

The Nikon 50mm 1.4D comes with mechanical auto focus, and hence only works for those Nikon cameras that have a built in AF motor. So if you have a D5x00 or a D3x00 series Nikon, beware that AF will not work. The entry level cameras simply assume that the lens has built in motors. It is a mechanical construction with no motor and no stabilization. The construction is an oldie, but still a goldie:

The Nikon AF 50mm f/1.4

The aperture ring enables you to manually switch from f/1.4 to f/16, and the lens is an FX lens, meaning it will work both on full frame cameras and on cropped sensors. However, on a cropped sensor, you may want to go for a 35mm lens to get the equivalent of a 50 mm.

The Nikon AF 50mm f/1.4

Why the Nikon AF-D 50mm 1.4?

Price. Unless you are flea market shark (very lucky or a very good negotiator) you will find that a lens as fast as f/1.4 is very expensive, as it requires a lot of glass. This lens will only set you back 230 USD, which compared to other lenses is a true bargain. I think it is because the lens construction is very old and has been produced in so many copies that the R&D that went into making this lens has been recovered many times since the first version of this lens saw the light of day back around 1950. You can get it used a lot cheaper, and if you go for a Pentax 50mm f/1.4, then you can get it down to 50-80 USD if you follow e-Bay closely for a while!

Low light shooting. This lens is fast and will let in a lot of light. Lots of light enables you to shoot where there is very little ambient light, without adding flash or the like. For each f-stop you go down, the amount of light the lens lets in doubles, i.e. it is not a linear relationship but a more “explosive” one. So a 1.4 lets in double the amount of a 2.0 which is also considered at fairly fast lens.

Background separation. When the lens is wide open and you shoot at f/1.4, the depth of field (DoF) is very narrow, meaning that you will have excellent background separation, even to the extend where parts of your subject may be out of focus! I find that if I take a picture of my cat at f/1.4, then if the eyes are in focus, the nose may not be! The DoF is that shallow! At 45 cm distance (minimum focus distance for this lens), the DoF is 1-2 centimeters!

Shooting wide open on a summer’s day

An apple tree on a summers day

You may find that your pictures are overexposed if you shoot at f/1.4 on a summer’s day.  

The problem is that the lens lets in so much light, that even at a ISO 100 and maximum shutter speed, to much light hits the sensor. My Nikon D750 has a maximum shutter speed at 1/4000th of a second, and shooting a white or yellow flower in bright sunlight leads to over exposed pictures. The solution (other than stopping down) is a Neutral Density filter. I find that a ND3 filter (takes out 3 stops of light) solves the problem in most cases.

Sample pictures 

Below some sample picture that I hope can give inspiration. I really enjoy shooting with the 1.4 lens, and if you are a photography nerd but have never tried to use a super fast lens, I can only recommend you try it! It is really great fun! If the price tag seems steep, try to see if you can lend or borrow one – but be prepared to be hooked! PS: Links to related reading at the bottom of the below images.

A thermometer
A thermometer – notice the blurred background.
A pair of glasses in the sun.

The below is a wine bottle cork with some graphics on top. It stands on my kitchen table. But because the DoF is so shallow, the structure of the wood is only visible very close to the subject – the rest is blurred:

A small souvenir from Rome...
A small souvenir from Rome…
A small figure in the window space.
A map of the world.
A map of the world.
A backlit flower.
A backlit flower.
A backlit flower.
A backlit flower.
A backlit flower.
A backlit flower.
A backlit flower.
A backlit flower.
The Nikon 85mm f/2
The Nikon 85mm f/2
Easter decoration
Easter decoration
A backlit flower
A backlit flower

Related reading

Nikon 50mm 1.8 AF-S lens review (G series lens)

Nikon 28-105 f/3.5-4.5 AF-D lens review

Nikon 24mm f/2.8 AF lens review

Video link

Sony RX100 M3: Manual exposure guide

Introduction

Maybe shooting in manual mode with the Sony Cyber-Shot DSC-RX100 (M3) is a contradiction in terms, as the camera has been designed with a lot of features to automate the process of taking pictures, but it still offers a manual mode despite all the automated options available. The advantage of manual mode is that it gives you as the photographer full control of all the parameters (shutter speed, aperture and ISO) and hence no decision to be made on your behalf by the camera. So if full control is your thing, manual mode is for you.

In the following the back screen will be used to show the menus and the effect of changing the shutter speed, aperture and ISO. Notice however, that all of this can also be seen in the viewfinder, so that you do not need to use the back screen, for example on a sunny day when the back screen is difficult so see.

Mysterious manual mode?

Manual mode is often regarded as a complicated mode only managed by the most senior of photographers. With the introduction of mirrorless cameras like the Sony Cyber-Shot DSC-RX100, this is much less so now, as both the viewfinder and the back screen shows exactly what the sensor is capturing as it happens, and hence an over- or underexposed picture will be visible before the fact, so you can adjust the settings beforehand. So my suggestion is that you simply give manual mode a try to see what it is like and then based on that decide if manual mode is for you.

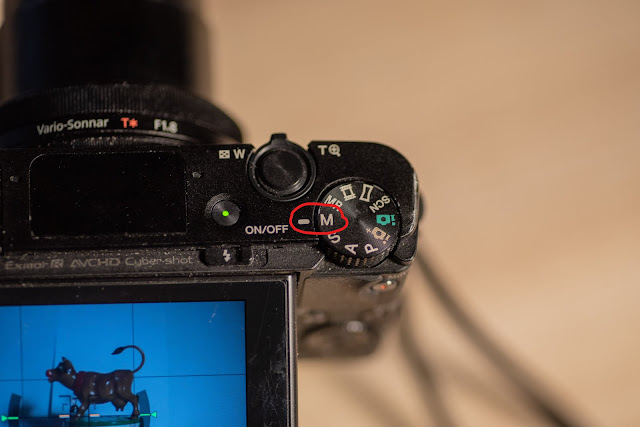
Manual mode selection

Manual exposure mode. Sony RX100 M3: Manual exposure guide.
Manual mode is selected on the mode dial on the top of the RX100 as the red circle shows

Aperture

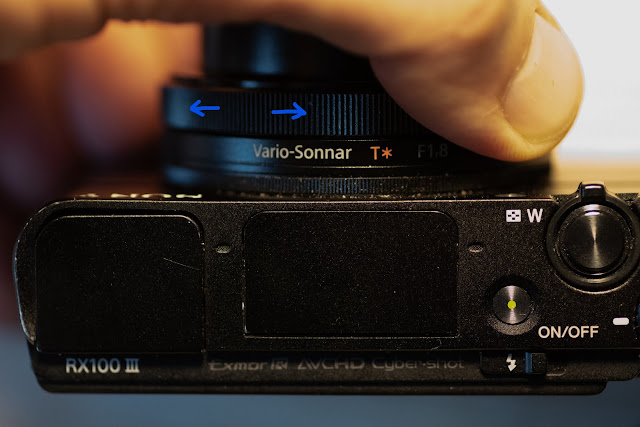
When in manual mode, the aperture is controlled by the ring on the front of the camera. By turning the ring as indicated by the blue arrows, you change the aperture. 

Selecting the aperture. Sony RX100 M3: Manual exposure guide.
Selecting the aperture

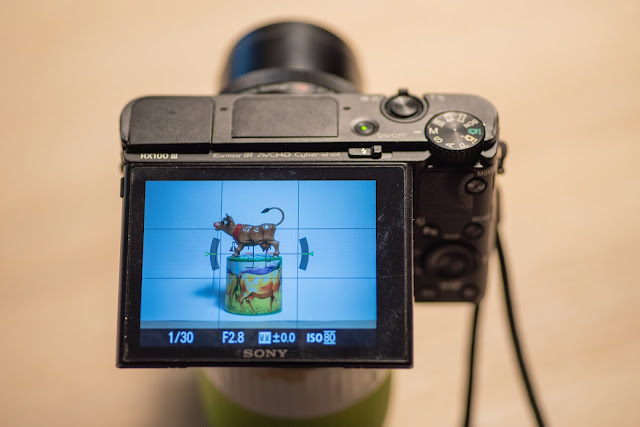
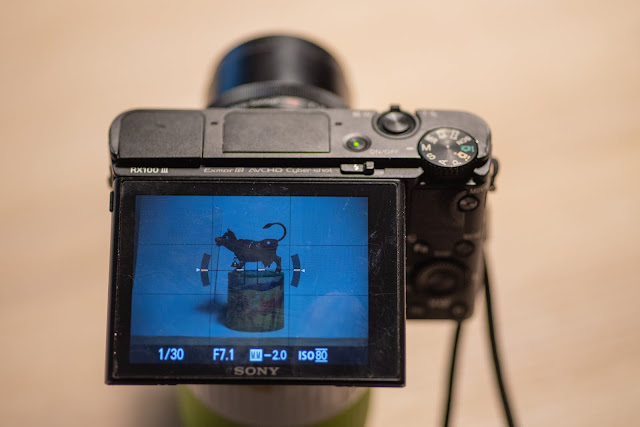
The aperture value is shown at the bottom of the back screen. Here it is f/2.8 which is very wide and open i.e. letting in a lot of light:

The Sony RX100M3 at f/2.8. Sony RX100 M3: Manual exposure guide.
The Sony RX100M3 at f/2.8

Here is the same motive, same light, same shutter speed (1/30) and same ISO (80) but with a much more narrow aperture (f/7.1). Notice how dark the screen is now compared to the above:

The Sony RX100M3 at f/7.1

This is one of the big advantages of mirrorless over DSLRs – you can see the picture will be underexposed immediately – no need to take the picture and review it afterwards. You can fix the exposure problem before you take the picture.

Shutter speed

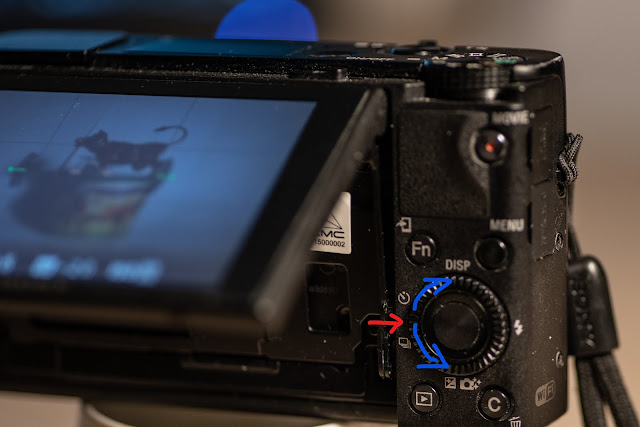
The shutter speed is controlled by turning the command dial (red arrow) in the direction shown with the blue arrows:

Selecting the shutter speed. Sony RX100 M3: Manual exposure guide.
Selecting the shutter speed

The shutter speed can vary from 30 seconds to 1/2000th of a second. And again, you will see the brightness of the picture right in the back display, so if it all black or very dark, you probably need to go to a slower shutter speed meaning that the sensor is exposed to light longer. 

ISO

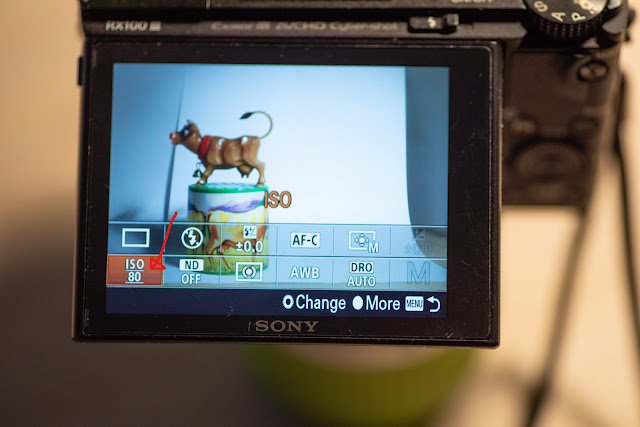
ISO as far as I can tell from the RX100 manual does not have a dedicated button. Instead you have to push the “fn” button just above and to the left of the command dial. When doing so you can move the cursor to the  bottom left cell using the command dial:

ISO value displayed bottom left in the rear LCD. Sony RX100 M3: Manual exposure guide.
ISO value displayed bottom left in the rear LCD

Pressing the center of the command dial selects the ISO menu point, and then a list appears where the ISO can be selected, ranging from 80 (the least sensitive) all the way up to 12.800. Notice that you can also choose auto-ISO, where the camera selects the ISO automatically for you. The advantage is that you do not have to worry about the ISO when shooting, but you leave the selection of the ISO up to the camera. The camera may then select a very high ISO, which may not be to your liking.

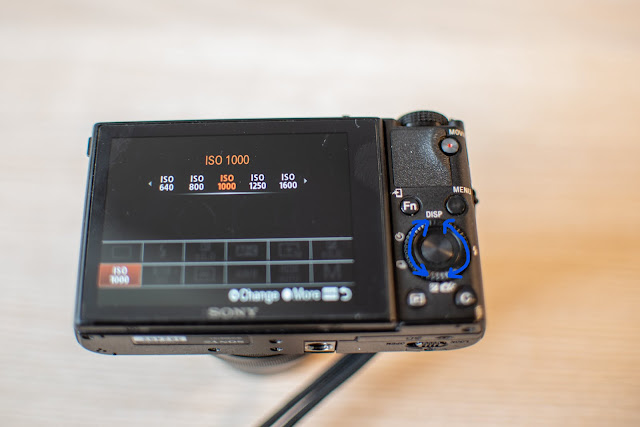
When the menu selector is on top if the ISO item, then an alternative an more easy way to change the ISO is to use the command dial to change the ISO. No need to press the center button first. Simply turn the dial in the direction shown with the blue arrows to the right (do not press down as when moving the cursor around) and a little table appears top center as shown below here. Simply turn the wheel to change the ISO value.

Selecting the ISO. Sony RX100 M3: Manual exposure guide.
Selecting the ISO

Maybe even easier that this is that instead of using the command dial, you can use the ring on the front of the camera (the one used for aperture previously) and that will have the same effect as turning the command dial.

The price for a high ISO is that your pictures are likely to be grainy, meaning that it looks like sand or pebbles have been thrown at your picture. So be careful if you go much above 1000 – you may get some very grainy pictures. Post processing software like Lightroom may be able to remove or reduce the grain, but it is better to get it right in camera to minimize your post processing time and workload.

Related reading

Sony RX100 M3: It has all the modes you can think of!

Review: Sony RX100 M3 is a value-for-money compact camera packed with features

Sony RX100 M3: How to shoot Panorama pictures in camera with

Video link

Shopping link

Affiliate shopping links: 

Sony RX100 M3

Sony RX100 M4

Sony RX100 M5


Select the right Peak Design plate for Manfrotto

Standard versus dual

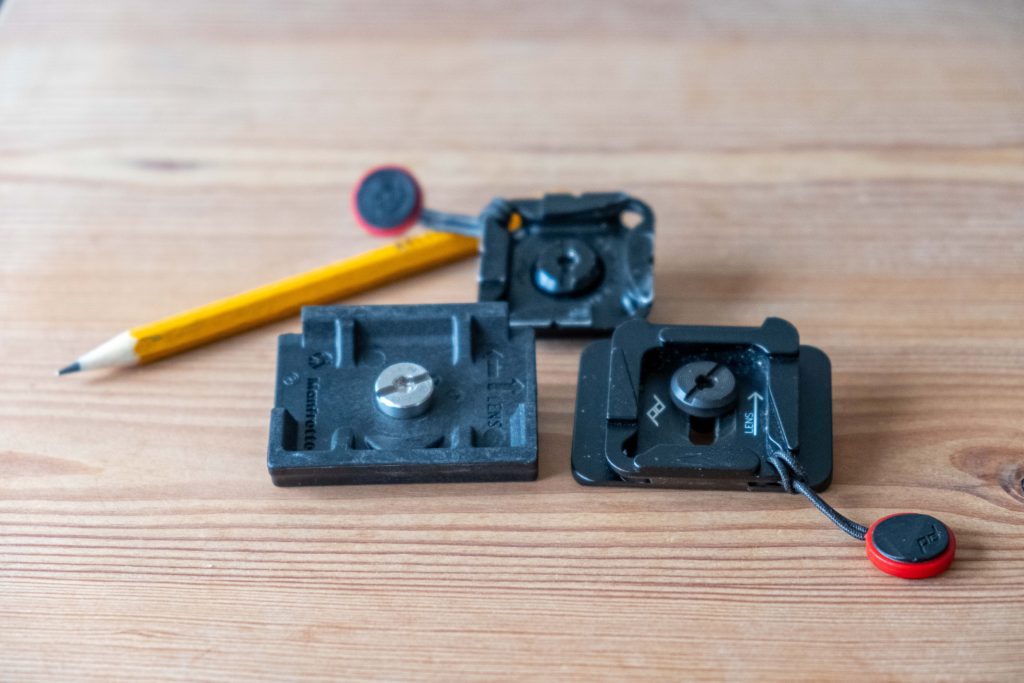
If you have bought a Manfrotto tripod with a ball-head or just a Manfrotto ball-head, you may have come across a plate that is a little wider than the Peak Design standard plate. Have a look a this picture where the Manfrotto plate (left) is a little wider than the Peak Design plate (right):

If you try to mount the Peak Design standard plate on the Manfrotto tripod head, then it will simply not grab on to the plate properly and it is likely your camera falls of if you attempt to mount it anyway.

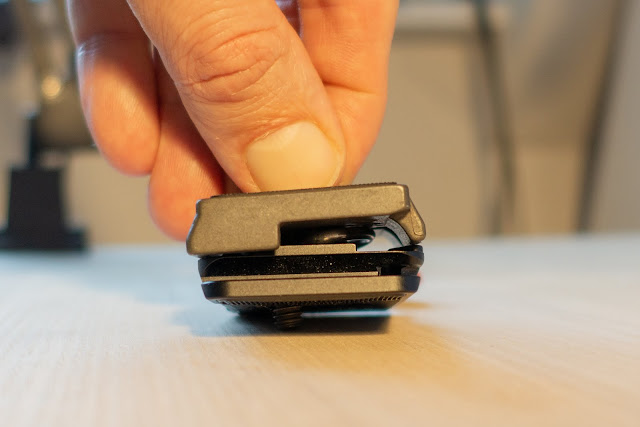
So why not simply use the Manfrotto plate to the Manfrotto ball-head? If you like me absolutely love the Peak Design anchor links, that enable you to attach the strap to both the side of the camera and to the plate on the bottom of the camera, then you will miss the holes in the Manfrotto version, meaning that you will have to change the plate at the bottom of your camera back and forth between Peak Design and Manfrotto. However, there is a simple solution.

Dual plate

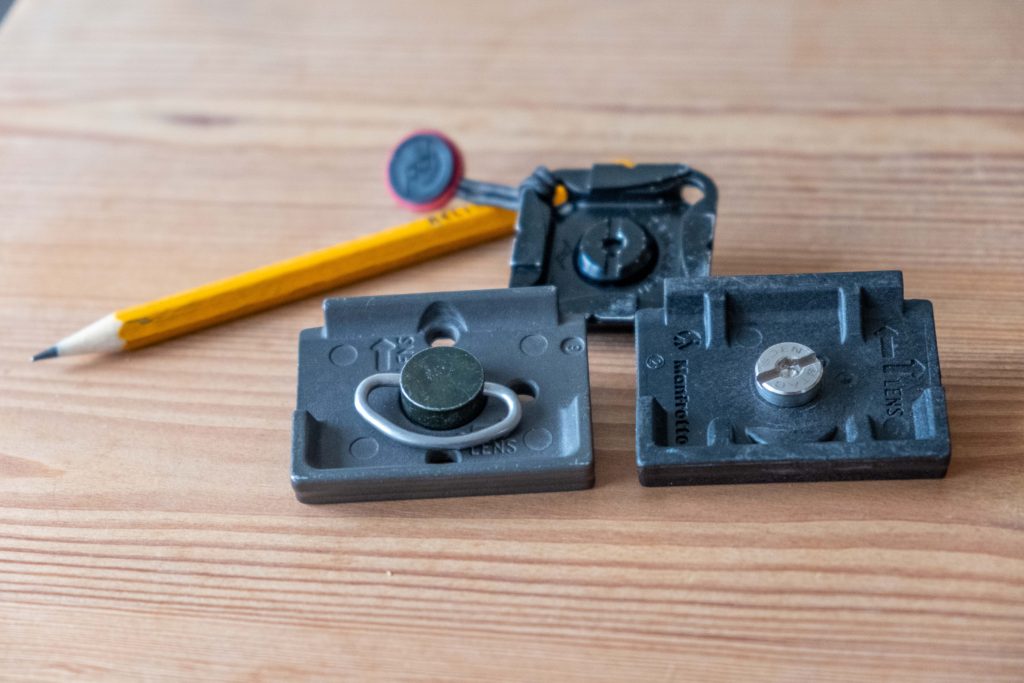
Peak Design makes two sizes of plates, one called standard and another dual plate. The dual plate is the same size as the Manfrotto one. In the picture, the Manfrotto is on top, Peak Design bottom):


In addition, the Peak Design version has the holes to allow the anchor links to be mounted. So when you order your peak design plate, make sure to go for the dual plate model, if you want your Manfrotto ball-head to work with your Peak Design plate.

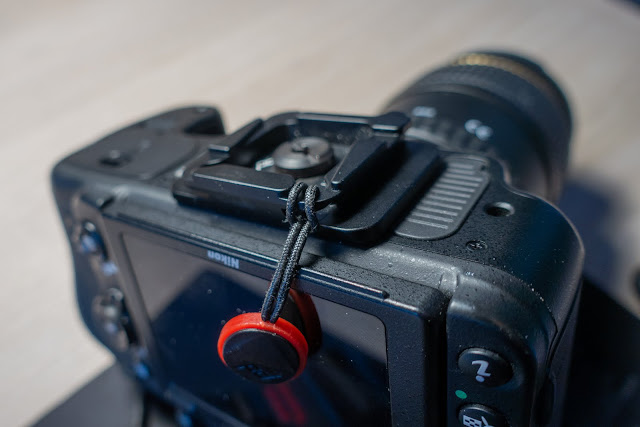
Here you see the Dual Plate mounted at the bottom of my D750 (viewed upside down):

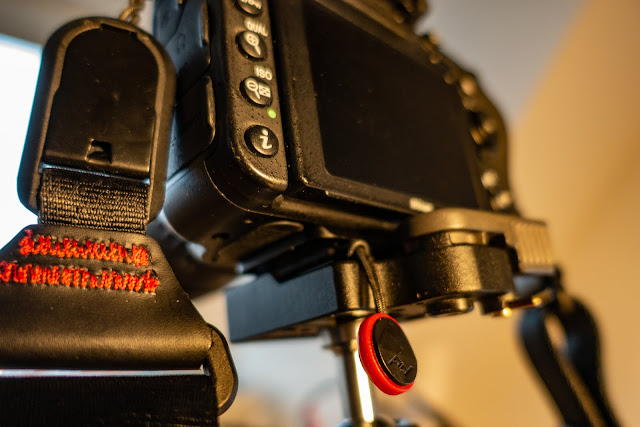
And here it is mounted on a Manfrotto head, with the Peak Design anchor link sticking out:

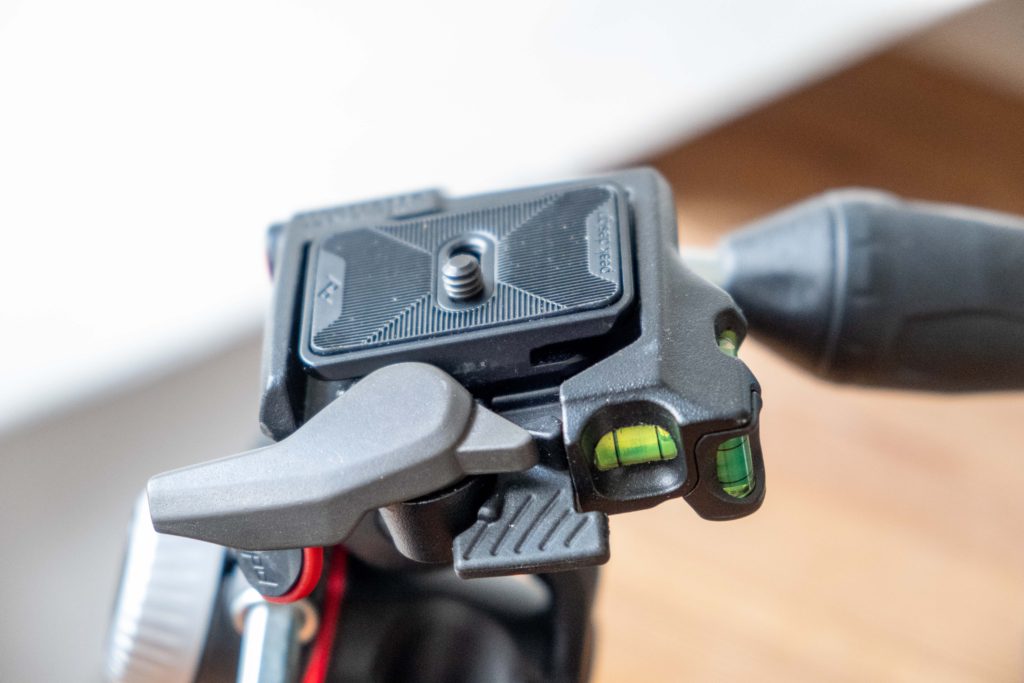
And just to illustrate, here is the Peak Design plate in the Manfrotto head but without the camera, so you can see how it fits. You can see the black/red anchor point sticking out to the bottom left. Also notice the plate with the stripes in the center bottom – you have to push that one down in order to move the leaver to the left of it, and hence this is a very effective locking mechanism, that reduces the risk of an accidental release of the plate to and absolute minimum:

Below the Manfrotto plate to the left and the Peak Design to the right. The normal size plat is in the background with a pencil to give proportions. Notice how the rectangular shape of the plate introduces a direction for mounting the lens. You can see the arrows in the right hand side of both plates:

When the plate needs to be mounted with a certain direction, I cannot use my “trick” to turn the entire plate when tightening it. That works for the square standard plate as I can force it into position (it is never more than 89 degrees off). But with the dual plate, there is only one direction that is right, and then you have to put the plate in the right position and tighten the screw with an allen key. As I seldom have an allen key at hand, you may want to get a model where it is possible to tighten the plate without a plate like the model shown here to the left. Unfortunately I have not been able to find a Peak Design dual plate with a tightening ring like that one, so for my Peak Design plates, I have to be disciplined and bring an allen key, if I do want to be able to mount my anchor points. No free lunch, apparently!


Questions and comments

Hope you found this blog useful. Questions and comments are more than welcome.


Sony RX100 M3: How to shoot Panorama pictures in camera with

Introduction

The Sony Cyber-shot DSC-RX100M3 camera makes it easy to take panorama pictures. Most of us have got used to the ease of taking panorama pictures from our smartphones, and the RX100 matches that in terms of user friendliness, and on top also gives better picture quality. The RX100 will get your panorama picture ready “in camera” meaning that no post processing is necessary in order to stitch the pictures together. It is ready for you to view a few seconds after the sweeping is completed. But lets dive right into how to take a panorama still picture with the RX100.

How to

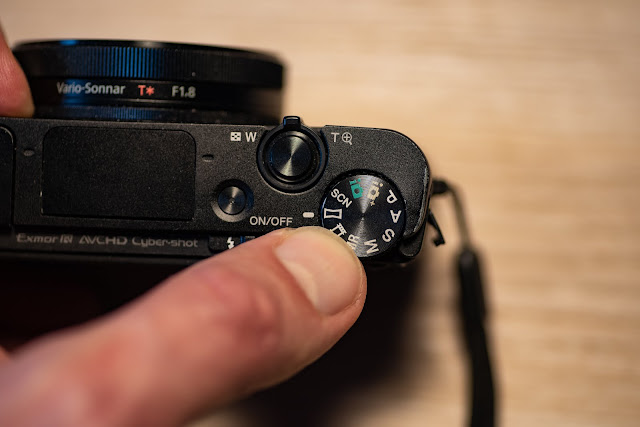
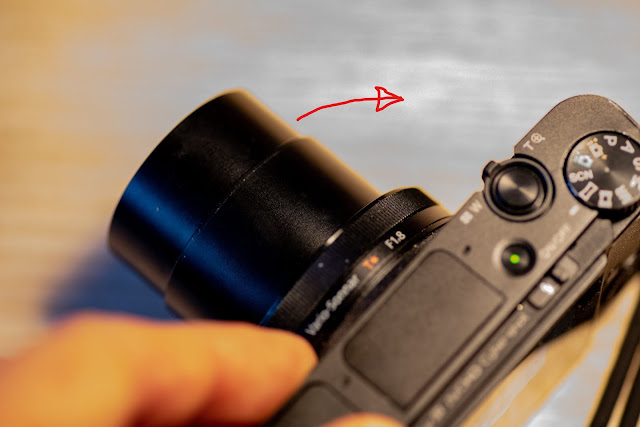
To get started you have to turn the mode dial to the panorama mode as shown below. It has a symbol that looks like a box that has been stepped upon lightly:

The panorama symbol above is flush with the white dot on the camera body. Once that is done, all you have to do is press the shutter and follow the instructions on the screen. Notice that you don’t have to hold down the shutter while the panorama shooting is in progress – you can release the shutter immediately – the camera takes over from here.

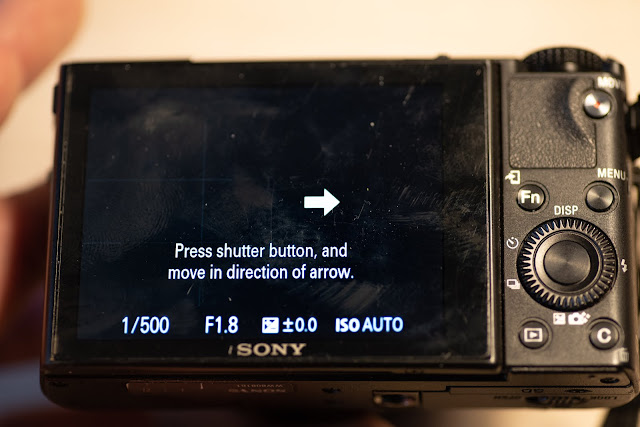
By default the camera will ask you to swipe the camera from left to right while it takes a series of pictures. And it will tell you this via the LCD instructions:

In that case, start pointing to the left of what you want to be in the center of your frame and with a steady hand swipe the camera from left to right.

You can use a tripod or the like to stabilize the camera while you sweep, but in my experience the camera (in daylight) takes excellent hand held panoramas.

When you sweep, the camera will give you a status bar showing the panorama progress, but I would ignore that for starters. Simply concentrate on moving the camera in a steady pace from left to right and continue until the clicking sound stops. Once the process is complete, the picture will be presented to you on the LCD screen.

If you have moved the camera too slowly, the RX100 will give an error message at the end of the shooting and ask you to start over again. Don’t be frustrated when this happens – it generally takes a few attempts to get the panorama captured.

The result

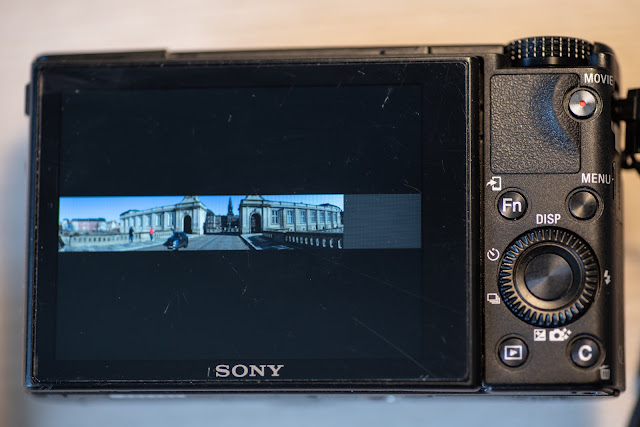
The RX100 presents the result in the LCD screen, and it may look a bit strange since it is presenting a very wide picture that is not very tall on a small LCD:

The example above is a picture of the Danish parliament. As you can see, the camera shows the picture in full width and hence not very tall. And apparently I have done something wrong as the right hand side of the picture is left grey. But it is super easy and fast to do a new panorama, so no harm done.

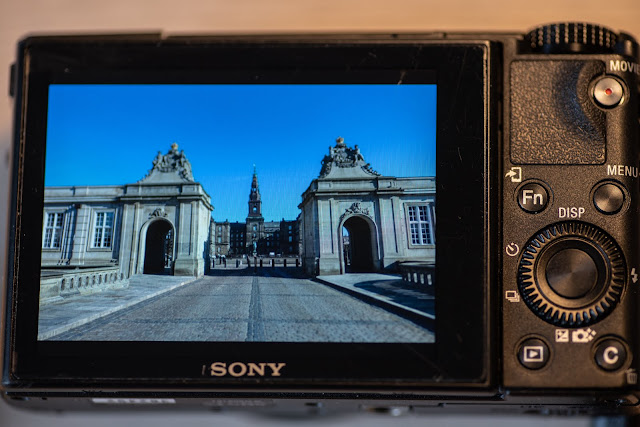
If you have the panorama presented as above, you can get the RX100 to present the panorama as a small movie, where it pans across the picture. Just press the center of the command dial while the panorama is displayed on the LCD, and the presentation starts. The good thing about this way of seeing it is that all of the screen is used top to bottom:

Configuration

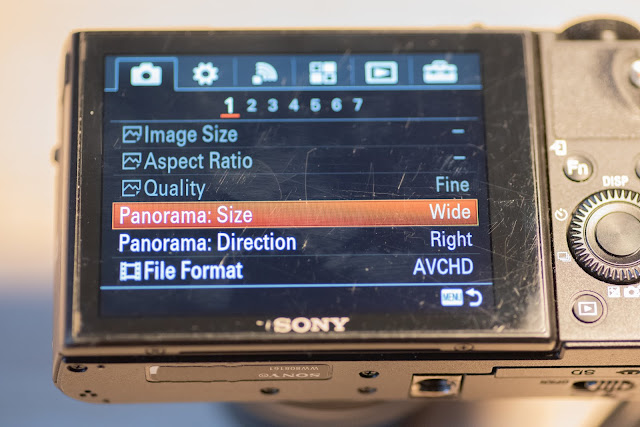
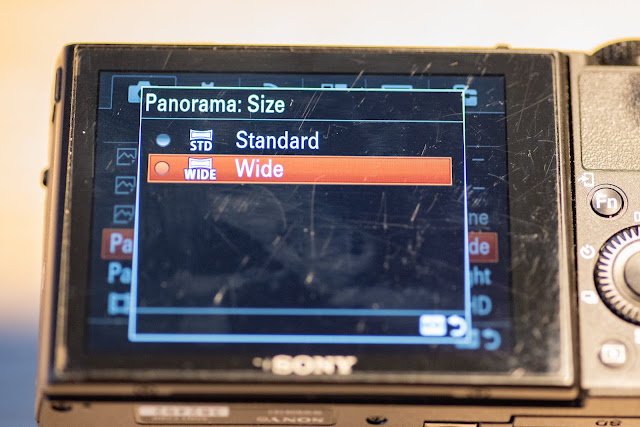
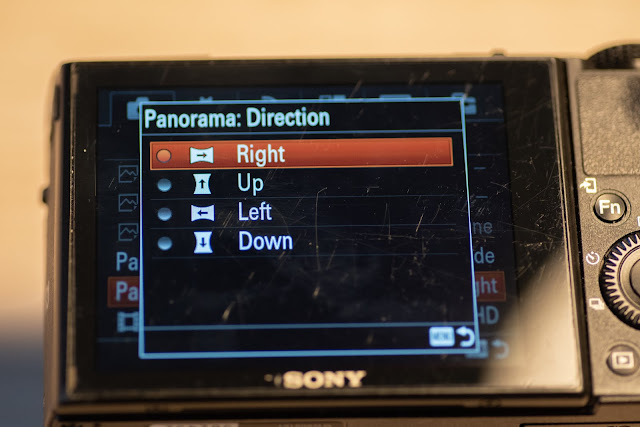
There are a few options available regarding the panorama function. If you go into the menu system and on the first page on the first sub-menu in the main menu, you will find two options: size and direction (sorry that the LCD is so scratched here – it is a camera I use a lot!):

The size menu gives top options: Standard and wide:

You can test both versions, but as you probably have guessed, the wide version stitches together more pictures than the standard mode, and hence will give a wider panorama and ask you to turn the camera for a bit longer than the standard mode. My suggestion is that you try both and see which one is to your liking.

The direction menu lets you choose which way to swipe the camera, and I find this option especially useful if I do a panorama in portrait mode. Then I ask the camera to swipe up, but as the camera is 90 degrees turned it becomes sweeping to the right! The point is that the aspect ratio of the panorama is changed so that the picture is more tall and less wide, but there are probably many other reasons why you want to change the direction.

There is a more easy way to change the direction when in panorama mode – simply turn the ring on the front of the camera, this will change the direction (the LCD will inform you):

Moving objects

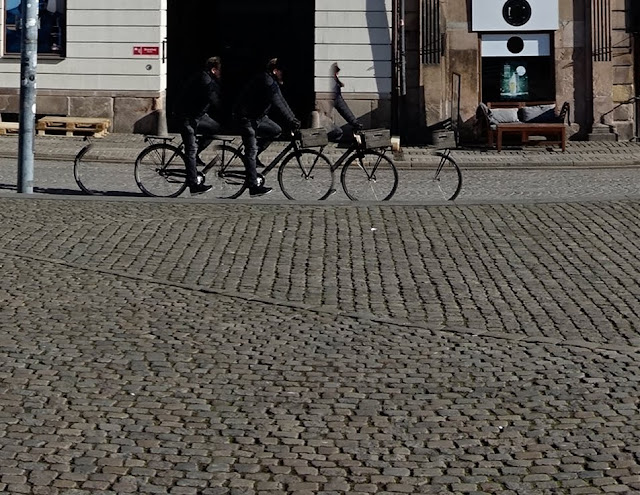
If you have moving objects while shooting the picture, you may find that you get some strange results. Take a look at the picture below, where the cyclist has been captured many times and chopped up in the most dramatic way! Poor guy! As you have probably guessed, he is moving in the same direction as the camera while producing the panorama. Had he been moving the opposite direction, we would have seen him appear only once and in half a version!

So if you can, try to avoid moving objects when shooting your panorama, unless you are prepared to work with the picture in post when you get back home.

Questions and comments

Hope you found this blog useful. Questions and comments are more than welcome.

Nikon D5600: How to use manual exposure?

You select manual mode on the mode dial top of the camera, right next to the right of the viewfinder. Turn the dial to position (M) for manual mode:

Manual exposure

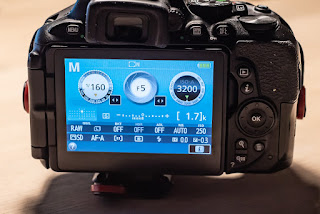
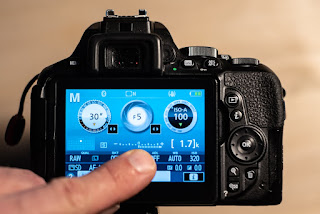
Make sure the pivoting LCD screen is facing outwards (i.e. not towards the camera body) and press the Info button located right next to the viewfinder and just above the LCD screen. This should give you a picture with an M top left, and the shutter speed, aperture and ISO values shown (your picture may be different, but the information content should be the same):

Here the shutter speed is 1/160th of a second, the aperture is f/5 and the ISO is at 3200

Shutter speed

The command dial is located on the camera top right. The command dial controls the shutter speed – turning the dial increases and decreases the shutter speed. The slowest shutter speed is 30 seconds, after that follows bulb and time mode (will not be addressed here). The fastest shutter speed is 1/4000th second. To avoid camera shake, be careful not to use a shutter speed slower than 1/80th of a second, unless the camera is mounted on a tripod (or you have a very steady hand!).

Aperture

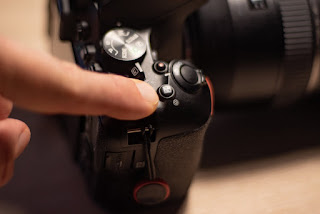
Just in front of the main dial, a smaller button is located:

Manual exposure

You can see the graphics is +/- and also a circle illustrating a shutter:

Manual exposure  Nikon D5600

This button, when pressed down, alters the effect of the command dial, so that instead of controlling exposure compensation, it changes the aperture. So hold down the +/- button while turning the main dial, and this changes the aperture. The aperture values are subject to the lens mounted, but typically range from f/1.8 to f/22 or thereabout. The larger the number (the f-stop), the smaller the aperture and the less light is let in by the lens.

ISO (sensor sensitivity)

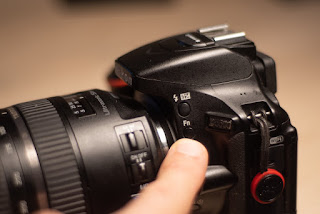
Finally, to change the ISO setting, find the “Fn” button on the front left of the camera. Pressing this button while turning the command dial changes the ISO value, the same way holding down the +/- button did for aperture:

Manual exposure
The Fn (function) button is located on the front left of the camera.

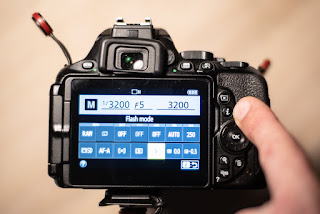
You can also change the ISO setting using menus: press the information button (i) as shown here, and a menu appears on the LCD screen:

Manual exposure  Nikon D5600

In the top right corner is the ISO value. Use the multi selector (the large round button just below the (i) button) to move the cursor to the top rightmost cell in the screen. It says “iso” with small letters in the bar just above the cell. In the picture above, the ISO is set to 250. Place the cursor over the ISO cell and push the center of the multi selector (ok) and the ISO selection screen appears. Using the multi selector again, the cursor can be moved to the new ISO value, ok pressed and the ISO value is changed.

Auto ISO sensitivity control

There is an option to let the camera (within boundaries) select the ISO value itself, in order to arrive at a properly exposed picture, given the aperture and shutter speed selected by you. It is not a perfect solution in all cases, but it can be a great aid in the beginning especially, in order to avoid over- or under exposed pictures. And it enables you to focus on one thing less in the beginning of your work with shooting in manual mode.

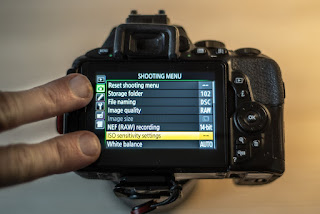
To switch on Auto ISO, press the “menu” button located top left on the back side of the D5600 camera body. Using the command dial (the big round button middle right), scroll down to the so called shooting menu. The shooting menu has a green icon that looks like a camera viewed from the front. Press the right hand side of the command dial to enter the shooting menu, and press the bottom side of the command dial to scroll down to the “ISO sensitivity settings” menu:

Manual exposure  Nikon D5600

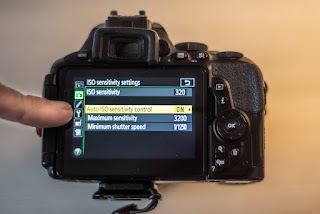
Press the center of the command dial (ok) to select the ISO sensitivity settings. In this menu you can switch the Auto ISO sensitivity on and off, set the maximum allowed ISO sensitivity setting (high values gives grainy pictures), set the minimum shutter speed and select the ISO sensitivity.

Manual exposure  Nikon D5600
Auto ISO sensitivity control…

The minimum ISO value for the Nikon D5600 is 100 – this is a value determined by the nature of the sensor in the camera, and cannot be changed via camera setting.

Notice that when Auto ISO is on, the camera ignores the ISO sensitivity value you have chosen. Only when you switch the Auto ISO off, the ISO setting chosen by you will be used by the camera.

Getting the exposure right

When shooting in manual mode (and Auto ISO is not on), it is very easy to select aperture and shutter speed values that give an over- or underexposed picture. In the bottom of the viewfinder, and also when you press the “info” button, there is a light meter indicating if the picture will be over- or underexposed:

-│ – – │ – – 0  – -│ – – │ +

<————│

If the arrow below the meter points to the left, then the picture will be underexposed. This is the case in the example shown above. If the arrow points to the right the picture will be overexposed, as the picture below illustrates:

Manual exposure  Nikon D5600
The markings to the right of the zero shows the image is over exposed…

Only if there is no arrow visible, the picture will be exposed just right. Minor deviations can be fixed in post, only to some extend for JPG files, more so when shooting in Raw format, but the easiest is to get the exposure right in camera.

Video link

Related reading

Nikon D5600: Still a good buy as an entry level camera in 2021?

Which enthusiast Nikon DSLR to choose?

What is negative space in photography? And why use it?

More than just empty space…

The use of negative space is simply using nothing to put emphasis on something, i.e. leave a lot of unused or empty space to draw the viewers attention to what is in the frame:

It doesn’t really matter what the subject you want to emphasise is – it can be the tree above (or the man walking), or it can be a spider sitting on your kitchen window:

It may seem counter intuitive to use negative space, as the frame itself is a reduction or a selection of a part of reality, but it does give the picture a special mood of calmness:

However, it is important that there is a subject to be emphasised, otherwise the viewer is simply puzzled and cannot figure out what the point with the picture is. In the below example, there really is no apparent subject to be emphasised:

Sometimes negative space can be used to express isolation and loneliness:

Or being together in a bigger frame:

Or put emphasis on the sunrise and the silhouettes:

Or feeling very insignificant in a big universe:

Or simply majestically rise above the haze:

Or waiting for something to happen:

Or simply emphasizing a beautiful view:

Whatever your chosen use of negative space is, I hope the above has given inspiration for your creative work. Please leave a comment or question below – happy to try to give answers and inspiration for your work.

How to do flower photography (beginners)

How difficult can it be?

If your are new to photography like me, your first thought when you see a picture of a beautiful flower may well be: How difficult can it be to take a good picture of a flower? But I think that if you give it a try, you’ll find that there is more to it than just point-and-shoot. Not that it is complicated or anything fancy, but there are a number of things you can do to maximize your chances of a good picture. I’ll cover the basics here. 

Taking flower pictures involves many hours out and about, so before moving into all the photo specifics: remember yourself first! I find that a rain coat, a cap, a bit of sunscreen, something to keep the mosquitoes at bay, a bottle of water, good walking boots (that supports your ankles) and a few biscuits are invaluable items when spending many hours in nature.  

1. Bad weather is good weather!

Bad weather is your friend! Quite counter intuitive, bad weather is good weather for flower photography! A cloudy day, even a rainy day, is excellent: direct sunshine from a cloud free sky gives harsh light and strong shadows and can make it really difficult to get some appealing shots of flowers. And a few drops of water on a flowers petal almost always looks beautiful! I know that some use a spray bottle to add water but I find that mother nature is so much better at this, that I prefer not to, and instead shoot flowers after the rain has ended.

If the sun is beating down and there is no clouds in sight at all, you can diffuse the light with a thin white piece of cloth (like a piece of sheet wrapped around a hanger) or you can buy an umbrella designed to diffuse the light – you can get one for a very reasonable price, they wont take up much space in your camera bag and it doubles as a wind shield.

Shooting forget-me-not in direct sunlight diffused by an umbrella

2. Stabilize your subject

Wind will push your subject around and make focus difficult. See if you can find a quiet corner if it is windy. Flowers sitting low are typically less prone to wind, and you can also try to see if a shield (yourself or a piece of cardboard) can help. Supporting the flower with a stick and a clothespin can also help, especially if in combination with some kind of shield. Finally, there tends to be less wind early in the morning or in the evening.

In the picture below (yes, I admit it is somewhat busy) you can see that I have a clamp around the stem of the little purple flower I am shooting. The clamp is not holding the stem as such (it would probably ruin the stem), instead it simply creates a tight space where the stem can only move very little and that is enough to stabilize the flower head also. The stand that I am using was too tall for this flower, so I had to tilt the stand 90 degrees to get it low enough. This is where more clever photographers buy one of these flexible arms with a clamp (also known as a plamp) to get the job done in a more elegant way!

The reason a stable subject is vital for flower photography is that you typically shoot with the lens very close to the flower, and hence the depth of field (how much of your picture that is in focus) becomes very shallow, so that even a very small movement of the flower can change it from in focus to out of focus. In other words, a stable subject is key to success.

3. Stabilize your camera

3.1 Tripods and monopods

Stabilizing your camera is as important as stabilizing your subject. You can get really great stabilization either via the lens or the camera body (IBIS – in body image stabilization), but you may not have access to such gear and anyway it can never be a bad thing to have a stable camera to avoid camera shake. 

Using a tripod for flower photography

I am only too aware that not everyone likes a tripod, but if you don’t mind, get a heavy tripod like the Manfrotto 550 (no, not sponsored by Manfrotto). You can of course use a sand bag or something heavy to make the tripod more heavy and stable, but I find it is easier if it is simply born heavy. Also, if you can get a model that (as in the picture above) can go really low by spreading the legs almost parallel to the ground, this is a great aid when trying to capture a flower sitting low.

If a heavy tripod is not to your liking, then a lighter travel friendly tripod could work for you, like the Manfrotto Befree (no, still not sponsored by Manfrotto), and if that is to heavy for you or takes up to much space, a mono pod could be the answer. 

mono pod only stabilizes the up/downwards movements obviously, but it is better than no stabilization. If you wear a camera strap around your neck, you can push the camera away from you so that the strap is tight, further eliminating back and forth movement. A mono pod may seem like the least optimal solution, but if you go looking for flowers where the ground is covered by bushes or other stuff that makes it difficult for the tripod to get footing, the mono pod may simply be the only viable option for such locations.

If none of all this sounds appealing to you, then my best advice is to use your own body for stabilization. Squat down and let your elbow rest on your knee and hold the camera tight to your face to reduce movements and shake.

3.2 Remote triggers

In the best of worlds, you should also use a remote trigger. I seldom do, I must admit, but if you want to minimize all the factors that contribute to camera shake, there is no way around a remote trigger. Notice that with many cameras you can remotely trigger your camera via your smartphone and an app – no need to invest in a separate remote trigger. 

A good compromise is to you can use the timer function so that your camera releases the shutter after 5 or 10 seconds – this is my preferred option, as it is almost as good as a remote trigger and it gives me one piece of gear less to remember when I pack my bag.

4. The gear

4.1 Use a reflector

A reflector is cheap, light, packs down easily and does a lot of good in terms of casting more light to your subject! I find it is one of the most overlooked or under-praised aids of photography! Even on an overcast day the reflector helps a lot and can remove unwanted shadows or simply give you more light to work with.

Using a reflector for flower photography

So always bring a pack able reflector! You can get smaller version that the one in the picture above (!). If you don’t have a reflector, use something reflective to add light to the flower – try using your smartphone or a piece of tin foil.

If you do decide to buy a reflector, no need to buy a big one. The one that I show here is 30 centimeters in diameter, and it does not need to be much larger than that to work for flower bud shooting. This version is a 5-in-one version that has both diffusor, reflector (white, silver, gold) and a black side. It serves me well.

If you find you don’t need the reflector, it can double as wind shield, so in my mind it always comes in handy. The biggest problem with a reflector (other than learning how to fold it down!) is to hold it in the right position and stay there! If you have someone with you, this is where an extra pair of hands really make a big difference. And if not, this is where you will be extra glad that your tripod holds your camera steady, so you have one moving part less to deal with!

4.2 Use an artificial background

Experienced flower shooters knows that a good part of a good flower picture is the background. Sometimes the background can be difficult to control – no matter how much you change your angle and try to be creative, the background is simply too busy or too bright. You can try to use the reflect as background (many reflectors have a black side and a white side in addition to the silver) and even better you can bring a piece of cloth or cardboard or whatever in the color of your liking:

Above I am using a green piece of cloth to isolate the rose, but you can try with many different colors. If you don’t have a piece of cloth, the reflector can be used as a background – here I am using the black side of the reflector to create a more “calm” background:

This enables you to – with a bit of post processing – to create a picture where the flower is the only subject of interest in the frame and hence no distracting elements.

If you instead use the reflector as background, you get a very different expression. Here I was so lucky that the sun lit up the diffusor that I held just behind the flower, and as you can see the expression in this picture is very different from the one above:

4.3. Use the lens you have 

I suggest you to start out with the lens that you have available and see how you like flower photography, before you move on and invest in a lens. A kit lens or a 50mm nifty fifty can be used for starters. In my mind the most important for your lens is to go close to the subject. If you cannot help investing in a new lens, see if you can lend or borrow it and try it out, before you make the decision. 

I know that some like to use a long lens and zoom in heavily, and if you have a long lens available, you should certainly give this a try. The advantage of using a long lens is that the background is more compressed and hence it is easier to compose the picture. Further, the increased distance between lens and subject also increases the depth of field, making it easier to get the entire flower in focus – when you are very close to the subject, even with very narrow aperture (high f-stop numbers), the depth of field is paper thin.

However, I find that the camera shakes in such setup simply make me seasick as the slightest move of the lens makes what I see in the viewfinder jump up and down vigorously! So I use a lens that can go close to the subject, i.e. where the minimal focal distance is 30-40 cm or so. If you have a long lens, give extension tubes a try – they are metal rings (extension tubes) that you put between the lens and the camera body to increase the distance between the two. The effect is a reduced minimum focus distance, i.e. your lens becomes more of a macro lens.

If you decide to invest in a lens, one way to save money is to go for a used vintage lens. I use the Nikon Nikkor 35-70 mm 2.8D that I think you can get on e-bay for 100 EUR or a little more, subject to the condition. The Nikon has a macro mode that enables you to really fill the frame with the flower. 

Nikon Nikkor 35-70mm 2.8D

Another classic lens for macro / close-up photography is the 100mm Tokina F2.8D, which is very fairly priced even from new. I think it comes with different mount systems, so with a bit of luck, there also is a version for your camera body. The Tokina is known to be a budget friendly lens that produces pictures with a sharpness you would expect only from much more expensive lenses.

4.4. Using a non-macro lens

Sometimes the scene or the setting is as important as the subject. With macro lenses or lenses that can go very close to the subject, you often want the subject to fill the frame and be the only start in the picture. However, sometimes the flower sits in a wonderful setting, where the scene or the setting is as big a star as the flower itself. In such cases you can use a short lens to capture this:

The above picture was shot with a Samyang 14mm f/2.8 which is a very short lens (manual focus, aperture control on the lens). You can also give a nifty-fifty lens a try in order to capture the setting.

In the examples above I used the 50mm Pentax Super Takumar f/1.4 vintage lens. As you can see I cannot get as close to the flower as with a macro lens (and cropping would yield a too low resolution result). So I have included more of the setting or the scene the flower sits in.

4.5 Add flash

Adding a flash may sound like a lot of complication for taking a simple picture of a flower, but you will find that adding a flash will raise the quality of your pictures. I have heard that most professional flower photographers shoot with flash maybe 95% of the time, so it is worth a try to see if it works for you. Rather than being frustrated with all the technical terms like TTL and other advanced flash features, simply set the flash in manual mode at say 1/64th for starters and see what it does to your pictures. If you can get the flash off camera so that you can control the angle of the flash independent of your camera angle, then that can really help getting those dark areas and shadows lit.

Try moving the flash closer to and further from the flower and also try to change the power of the flash output – start with say 1/64th and work your way up and down from there. You will quickly find a level that too much power makes your picture look artificial, too little will leave the shades too dark.

If you want to rely solely on the flash light, that is also possible. Simply set the ISO and shutter speed so that the ambient light alone gives a completely black picture. Then add flash and see what happens. The picture above of the yellow flower is made that way. It gives some great options for isolating the flower completely on a pitch black background. Notice that the flash will make the flower cast a shadow and reflect light from any objects close near by – make sure the flash light is reflected outside your frame.

4.6 Take care of yourself!

I think many of us photographers get so into the process of shooting pictures that we forget everything around us, including ourselves! If you plan to stay out for several hours, think about your own comfort and that you will need drink and food. A banana and a bottle of water cannot hurt – the weight penalty in the camera bag is small compared the benefit.

And in terms of comfort, I know that some bring a little fold-able chair along, others – like me – even bring a pillow of some sort to lie on when shooting flowers close to the ground.

When you lie flat on the ground face down, your elbows and body make up a very natural tripod, so if you know you are going to shoot some flowers close to the ground and only that, then you may find that you can do without your tripod.

5. The site

5.1. Start close to home at first

Before your run into the woods or up a mountain or whatever your plans are, my advice is to start close to your home or your base, so that it is easy to return to base. I often find that I forget something (like the SD card!) that I need for my flower photography, so test your setup in your own garden or in the yard where you live, so it is not too much of a pain if you have forgotten something. After a few shooting sessions close to home, you will know the gear you need. Make a checklist and follow it every time before you leave home. You will not regret it, although it not that exciting.

5.2 Location scouting

Obviously you need to find some beautiful flowers to shoot, and my guess is that you may already have some ideas as to where they can be found. If not, see if there is a public available flower garden near you, or simply take a walk in the woods or in the city. You will find that flowers are everywhere, especially if you look for small ones!

Once at your location my best advice is: take your time. Go look! Use your eyes! Wait at least 5 minutes before you start shooting pictures. Scouting the location will give you a good overview of what is available and what to expect. And you can start with some of the best flowers rather than the first flower you com across. So no stress. Take your time!

6. Plan the shot

6.1. Arrange! 

I know this is a bit controversial, but I think we are allowed to intervene and arrange things to make it look as beautiful or pleasing as possible. I know some purists will say that this is cheating and that mother nature put that faded leave in your frame for a reason, but I suggest you arrange and compose as you see fit. It can be removing withered leaves, pushing some less-than- beautiful leaves to the side or whatever is required. Of course, all with moderation and in respect of the locations you are using (the gardener may not like it if you cut off some of his flowers!), but I think we are allowed to improve the composition. Take this example where a flower stands out from the crowd:

And you may think that mother nature has arranged this composition? Not quite:

6.2 Composition is important

Much has been said about composition, and it is a big subject, so I will refrain from diving into it extensively here. But it is always a good idea to have the subject a bit off center and have a beautiful background to go along with the flower. Many good flower pictures are ruined not so much because of the composition, but due to the wrong background. 

The rule of odds says that we like uneven numbers like 1, 3, 5, 7 and so on. You can use this when making your composition, so that there are e.g. 5 flowers in your frame:

Balance and symmetry is another thing to look for when composing your picture – a nice balance between the elements in the picture makes it more appealing and easy to take in:

Framing, i.e. “boxing in” your subject to guide the viewer to find the subject is also a classic composition technique, and often nature itself provides the framing if you look for it:

Make it easy for the viewer to find the “star” in your picture. In this example, as beautiful as it may be, it is confusing who is the star and what the photographers point with the picture actually is:

So, keep it simple. Both for your own sake, and to help the viewer read your picture.

Finding a good balance in the picture, maybe even symmetrical, is also a good composition principle, so that your picture is not e.g. “too lefty” meaning that a lot of the visually heavy elements in your picture are to the left. Try to strike a good balance:

When shooting, simply to change your angle of view (move your camera a little bit up, to the side, etc) to see the effect in the viewfinder. I am often surprised how moving the camera just a little bit can take a messy ad confusing background and turn it into a nice balanced scene for the flower. 

6.3 Help the viewer

Your eyes tend to search towards things that are bright and in focus. Dark and blurry things the opposite. When you work with your pictures in post or when you select your composition during the shoot, think about how you can guide the viewers eyes to the main subject (the star!). 

In the example above, the two flowers to the right are out of focus whereas the dust prisoners on the flower to the left are in focus. So your eyes will naturally go to the sharp areas whereas the rest of the picture is perceived more as a scene or framing. 

6.4 Flat, flat, flat

You can angle your lens towards the flower as you see fit, but one way of making the picture very simple is to shoot a flat flower where the lens front glass is 100% parallel to the flower: This way you get the focal plane and the flower to be aligned, so that the shallow depth of field does not stop you from getting the entire flower in focus.This way of shooting can give some very simple yet powerful pictures where the flower seems to be “floating” in mid air as the flower is sharp but the rest of the frame is blurry.Some photographers are so dedicated to this way if shooting, that they only go for “flat” flowers, i.e. with very limited depth.I don’t think you should limit yourself in such way, but “straight on” pictures like the one above is good to include in your photography toolbox.

6.5 Morning light is good light

Morning light is special. I don’t know why, but I guess it is because the sun is lower in the horizon and hence the light has to travel further through the atmosphere before it reaches the ground? Anyway, the light is very soft and even if the sun is shining from a cloudless sky, the morning effect softens the light so you don’t get the same problem with harsh shadows that I mentioned in the start of this post. So if you are up for it, set the alarm clock and shoot flowers in the morning!

6.6 Back lit is a good variation

If you can get the angle right, then a back lit flower gives a very different expression than the more traditional “front lit”. You see the structure and the composition of the flower so much better: Droplets of rain (or some you add yourself) is another good variation, so shooting just after the rain has stopped is another way to vary your flower photography.

7. When shooting

7.1 Think background first

The headline seems counter intuitive. Of course you want the subject to be beautiful and stunning, but a good subject deserves the right setting, so work with the angles when you shoot. A messy and confusing background can distract the viewer from the beauty of your subject. 

The example above is not an award winning picture, I agree, but it serves to illustrated the point: I managed to get the red to contrast with the black background. As you can see, had I chosen an angle just a little different, then both green and brown would have joined the party and made the picture more messy. I have heard experienced photographers say that the background is almost more important than the subject – not sure that I completely follow, but the background is as important to bring out the best in your subject.

7.2 Work with the aperture 

As you probably know, the more you open the aperture, the more light the lens lets in but it also makes the depth of field more shallow meaning that backgrounds will be blurred. This picture is shot at f/2, meaning very wide open and with a paper thin depth of field:

Whereas this picture of the same flower with the same camera and lens is shot at f/16, and you can see much more of the background: 

You may find the first picture more attractive as it has a more dreamy feel to it, but the challenge with shooting with wide apertures is that you get a very shallow depth of field and keeping the subject in focus is more difficult. In this case the flower is flat so you can’t really see it, but had it been deeper, it is likely that not all of the flower would have been in focus.

If you can, see if you can get the subject close to you and the background far away. That will give a blurred background, also at narrow apertures (high f-stop numbers). That way you can get the flower in focus even if it is a “deep” one and still have the blurred background. This one is shot at f/16 and the background is blurred despite the brutal f-stop:

For flower photography I always shoot in aperture mode, so I can control the aperture “manually”. I leave the shutter speed and the ISO for the camera to select (sometimes I also control the ISO manually), but most of the time I shoot in aperture priority with auto-ISO in. I find it is the best way that allows me to use my focus on the aperture setting and leave the rest to the camera.

7.3 Shoot, shoot, shoot!

I find that even though I hit the shutter with a few seconds interval, the result that emerges in Lightroom can be very different. I don’t know why it is so, but I guess that one explanation can be the flower moving a bit, me moving the camera a bit, or both. It can also be due to changes in the ambient light that you do not notice. Whatever the reason, I find that of two pictures taken seconds apart can come out as brilliant and hopeless respectively. So maximize your chances for success and  fire away. In a digital world, all it takes is a bit of space on the SD card and a bit of battery power. And you can always delete when you work with the pictures in post.

7.4 Try manual focus

Should you be so lucky to have auto focus, then it is of course a big comfort, provided you can get the camera to focus exactly where you want it to. The number of focus points in a modern camera has inflated over the last years, but I find that the only one that works for me is single point focus, where I can control the focus point completely.

If you are up for it, give manual focus a try. Be prepared to invest a bit of time before you you get the hang of it, but it is worth every minutes spent in my opinion, and it is a more engaging way of shooting.

When not shooting with a tripod, I zoom in all the way and throw the focus ring to the closest to the subject possible, and then instead of focusing, I rock back and forth with the camera until focus is obtained. That way I know I have filled the frame to the max.

7.5 Watch the shutter speed

When you shoot in daylight with a very open aperture, your camera will – in the automated or semi automated modes – compensate by reducing both the ISO and the shutter speed to the minimum. Your cameras max shutter speed (typically 1/4000th of a second or 1/8000th), will sometimes not be fast enough to get the picture exposed correct. The result is that your pictures are over exposed, so watch out for the shutter speed – it will typically be flashing (or in other ways try to get your attention!) when the max shutter speed is exceeded.

The fix is to close the aperture a bit – one or two stops usually does it. You will then not get the ultra thin and shallow depth of field that gives the “dreamy” pictures that so many find appealing, but better that than overexposed pictures. Alternatively you can start working with ND filters or see if an umbrella or the like can reduce the amount of light in your frame, but then I find that things become too cumbersome for me and I take the easy way out and reduce the aperture a bit.

7.6 Try underexposing just a little bit

If you dial down on the exposure compensation, this may help you make the background more dark and hence make your subject stand out more clearly and even contribute to a more “dreamy” expression. You can do a lot of “recovery” in post processing with an underexposed picture – in my experience it is far more difficult to work with and overexposed picture because the details in the high end of the spectrum have gone lost.
As with so many other things in photography, there is a balance balance to be found, so try to dial down maybe 1/4 or 1/2 a stop for starters, and see how you like it. Then you can always go to more extreme settings if you like to underexpose.

8. After the shoot

8.1 Post processing

I think most photographers do some level of editing although some dislike it and find it to be a bit of cheating. I just want to bring the best out in my pictures, so I have no problems with post processing in Lightroom or Photoshop or whatever you prefer. 

When editing I have a few ground rules: 

  1. For every edit done, be careful not to edit too much. Less is more.
  2. Leave the picture for 5 minutes (coffee break) and come back and see if you still like the edits. If you edit for too long without a break, your sense of proportion gets skewed and it gets worse and worse the longer you edit. Take a break. 
  3. Take a few steps back from the screen and see if you still like the picture. Sometimes your are too close to the picture when sitting in front of the monitor. Assessing the composition is difficult when your nose is 30 centimeters or so from the subject. Take a step back!
  4. Remember that what is sharp and bright gets attention. Dark and out of focus the opposite. Use this to help the viewer take in the picture and focus on the important parts. 

8.2 Try black and white

Often flowers are about vivid colors and the beauty in that, but you can try to blend in a few black and white photographs, to put emphasis on the structure and the form rather than the color.  It may also open your eyes to new dimensions in the flowers and thereby take your color flower photography to a new level. I prefer to shoot everything in color and then convert to black and white in post processing, that that is due to my lack of experience: I have a hard time forecasting if a subject will work better in color or monochrome. So taking everything in colors gives me options for both at the price of a little bit of post processing.

Black and white dandelion

Questions and comments

Thank you for reading this far! Questions and comments are always welcome! Hope you will enjoy shooting flowers as much as I do! 

How to use Nikkor DX lenses on FX bodies

Starting my “career” as a photographer on a Nikon D5600, I quickly built a portfolio of good and less-good glass. One of my favorite lenses was the Sigma 18-35 mm 1.8 DC, and must admit that this lens was one of the reasons why I hesitated to go full frame – it is that good!!

However, someone kind told me that not all is lost. The Nikon F-mount is still the Nikon F-mount and the lens will fit and you will get all the EXIF information still. So what happens if you use the DX lens on an FX camera body?

Limited coverage

As you probably have figured out, the DX lens for the cropped sensor is designed to cover a smaller area than the FX sensor, so when you shoot with the DX lens, you will get vignetting meaning that especially the corners of the picture are darker or pitch black. The lens throws a light intended to cover the DX area comfortably, but when challenged with the FX sensors larger area, the circle cannot cover, and especially the corners are cut off.

However, how much depends on the zoom. The wider you go, the bigger the problem becomes. The first example here is at 35mm, i.e. the most zoom that the Sigma 18-35 mm 1.8 DC can give and as you can see there is some vignetting in the corners:

If you widen the perspective to 22mm (this is not even the widest it will go), you will see that the problems have gotten worse and now more of the corners are cut off:

However, if you study the pictures carefully, you will see that the 22mm has a wider reach than the 35mm despite the vignetting. In the water, top left, there are two buoys and you can see that there is more of the horizon to the left of them in the bottom picture. So although you have to crop the picture in post processing to get something useful, you still get a fairly wide picture using the  Sigma 18-35 mm 1.8 DC on a FX body. 

So, don’t sell all your DX glass if you decide to go for full frame – you may find that the DX glass is useful on a FX body. But it varies a lot from lens to lens, so the best is if you can test your lenses with the camera body you plan to buy, so you know exactly how useful your DX glass is on the FX frame.

Nikkor AF-S 18-140mm 3.5-5.6 ED DX VR 

One of Nikons classic kit lenses is the Nikkor AF-S 18-140mm, and as you can see the vignetting is bad both when zoomed out (18mm) as this shot of a window frame shows:

And it only gets a notch better when zoomed in close – here at 140mm of the same window frame:

If you compare this to the Nikkor AF-S 35mm 1.8G DX, you can see that the vignetting here is much less, actually – I think – hard to see unless you know it is a DX lens on a FX frame:

I think you have to compare it to the 50mm FX equivalent (Nikkor AF 50mm 1.4D) to notice the difference:

So the Nikkor AF-S 35mm 1.8G DX in my mind is highly usable on a FX frame whereas the Nikkor AF-S 35mm 1.8G DX is much less. Finally, lets take a look at another classic kit lens.

Nikkor AF-S 18-55mm 3.5-5.6 G II ED DX

This lens is probably one of the most common kit lenses, and at 18 mm it – not surprisingly – shows the same vignetting as the 18-140mm:

However, at 55 mm there is hardly any vignetting:

So I think this illustrates that you need to test the specific lens you want to put on a FX camera as it is hard to make a conclusion or a guide that applies to all lenses.

Questions and comments

Questions and comments are more than welcome – please post below. Hope you found this blog useful. Thank you for reading! Please share if you find this post useful.

Nikon D5600: Still a good entry level camera?

Yes, the Nikon D5600 is not a modern camera. It came out in November 2016 and here in 2023 it is about 7 years old! That is a long time in this day and age, looking at the expedient development of mirrorless cameras with backlit sensors and image stabilisation and what not.

However, if you are willing to live with a camera that will not make the heads turn when you flash it in the local café, you may find that you get a camera that takes some excellent pictures and does so offering a wonderfully easy to use sets of dials and buttons. And for a price that does not break the bank.

Nikon D5600
The Nikon D5600 with a 50mm AF lens mounted.

But let’s have a look at some strongholds and some shortcomings, based upon my personal experience after owning and using this solid camera for more than a year.

Strong features

Price

Maybe the biggest advantage of the D5600 is the price: 530 EUR new with kit lens (Europe, April 2019) and 389 EUR for a camera body only version. That is less than what a battery grip costs for some mirror-less cameras! And if you further can live with a model that is a little older (the D5300) but with many of the same features as the D5600, then I have found it used on e-bay for 230 EUR and you have entered the world of photography on a budget.

A very good sensor still

It is still a very good sensor that sits in this camera, also compared to standards of today. It has 24 megapixels which is still very common for cropped sensor cameras (e.g. most of the Fujifilm x-series cameras). Despite an anti aliasing filter that it has become fashion to remove because some say it affects picture sharpness, it still produces some very great pictures with Nikon’s well known picture quality and color rendition. And you can shoot both RAW and JPG, and the JPGs are fine as well.

Ergonomics and user friendliness is top

Maybe what I enjoy the most with the D5600 is that the camera body is very light and the grip is deep. Some say the grip is not tall enough and that their pinky lacks a place to rest, but I have a very big hands and I have never had that as an issue. The camera is so light that holding it for hours has never been an issue for me. The user interface it the “good old” Nikon one, and although the D5600 lacks a front dial, the D5600 interface is very similar to other Nikon models, so if you speak Nikon, the D5600 is very easy to use. And if you don’t, you will quickly get familiar with the controls.

Nikon D5600
Superior ergonomics, especially if you – like me – do not have the smallest of hands.

The LCD screen is a bonus

Maybe the LCD screen by today’s standards does not have the best resolution, but the screen is pivoting, touch sensitive, and it reacts – even compared to a modern smartphone – fairly quick. 

Nikon D5600
Articulating rear LCD

Further, it can turn “inwards” when not used, i.e. protected from scratches and guaranteed not to bother you when using the viewfinder. This is a good thing when you shoot at night or throw the camera into an ordinary bag with other stuff – you don’t have to worry about that side of the camera!

Nikon D5600
Articulating rear LCD can turn “inwards” for maximum protection.

Crop factor = “longer” lenses

The fact that the D5600 sensor is a cropped sensor (APS-C) means that the length of all lenses you attach to the D5600 are multiplied by 1.5. My 70-300mm Tamron lens suddenly becomes a 450mm at the far end which enables me take loads of pictures of birds sitting at the bird-feeder in the far end of my garden. So although some photographers claim that only full frame sensors will do, it is worth noticing that a cropped sensor also has some capabilities that full frame does not offer. 

The full frame versus cropped sensor debate is one of the oldest in the photo community, and I do not want to add to the discussion, but for an entry level camera like the D5600 with 24 megapixels, I think you will find that you have plenty of resolution and picture quality for both social media and an occasional print.

Nikon glass and Nikon f-mount

The Nikon F-mount has been around since Donald duck was an egg, and there is literally thousands of lenses available for the Nikon D5600 and its f-mount. Shop around on e-bay and the local flea market, and you will be able to find some cheap vintage glass for your D5600, provided you are not afraid of manual focus. And the good thing is that if you later decide to upgrade to a higher level camera, then much of your glass can be reused. You can also find some new glass at a fair price – Nikons kit lens is a good start, and a 35mm prime lens can be achieved brand new for a reasonable price.

Nikon D5600
The 135mm prime from Nikon. A wonderful lens!

It is not a mirror-less

Yes it is a strange headline. But after going mirror-less also, I have come to learn to appreciate some of the features of the D5600 that I miss with the mirror-less cameras:

Battery life is awesome! As the D5600 has an optical viewfinder (and not an electronic one that needs to be powered like a tv-screen), the power consumption of the D5600 is very low, both when it sleeps and when it is switched off. I have my D5600 lying in the windowsill for weeks for an occasional bird shot without charging. That is so nice!

Sensor cleaning. On a DSLR the mirror sits between the sensor and the lens mount and that gives some protection to the sensor that I have never thought of. On a mirror-less the sensor is exposed at every lens change and that leads to dust and dirt on the sensor much faster than a DSLR. In fact, after more than a year of use, I have only cleaned the D5600 sensor once.

Shortcomings

It is a DSLR after all

Yes, a DSLR is a bit old-school and does not give you all the benefits found with a mirror-less: 

There is no viewfinder with all the “heads up display” benefits. So you cannot in the viewfinder have aids like focus peek or a level meter or in general see what your picture exposure will be like before the fact. 

The DSLR is noisy and it has mechanical elements. So if silent shooting is important to you, you need to look for a mirror-less camera. Many DSLRs have silent shooting modes, but you will find that they are not silent at all!

Live view is SLOOOOOW! The reason being that the camera swings the mirror away when going in live view mode (where the LSD is your viewfinder) and for each picture it swings the mirror forth and back again. That takes ages!

No 4K video

If you do a lot of video and 4K is important to you, this camera is not for you. It only does 1080p and a DSLR in my opinion is best suited for stills. If you want a great video camera, I would turn to mirror-less instead, or maybe simply use your smartphone for starters (my iPhone X offers 4K!).

No in-camera AF motor

Many of the older Nikon lenses, although it says AF for auto focus on the tin, assumes that your camera body has a built in motor to control the auto focus on the lens. The lens itself does not have a motor. Unfortunately the D3x00 and D5x00 series Nikon do not have this motor and you have to look at the D750 or the D7x00 series or higher.  Or live with manual focus. Or buy only lenses that have motors built in (AF-S), but that of course rules out the vintage lenses.

The lens needs a motor in the camera body in order for auto focus to work.

If you are not sure if your camera – or the one you plan to get – has a built in AF motor, look for a little metal “ear” that sticks out bottom left on the f-mount ring when you look at the camera front. In the picture above, the bottom camera is the D7500 that has an AF motor (you can see the pen pointing at the metal “ear”), whereas the top one is the D5600 and you can see the AF motor is missing. The pen at the upper camera points to where the AF motor “ear” should have been.

No image stabilization

For years and years photographers have taken great photos without image stabilization in neither the lens nor the camera body. Now both seem to be a big wish from many, all of a sudden. So be aware that the D5600 does not have in body image stabilization (IBIS) so you either need a tripod or to buy lenses with stabilization, if you want to avoid camera shake with shutter speeds slower than 1/80th.

One SD card

People looking for a camera to be used professionally often shy away from cameras with only one SD card. I doubt that this is a concern for you if you are considering the D5600. but if coming home with pictures secured 100% on digital media, then a dual slot camera is key. The D5600 “only” as one. I underline that statistics show that it is seldom that an SD card fail, but it does happen and probably when you want it the least (that important child birthday or passing a long time dreaded exam). So if data security is high on your agenda, then a dual card solution is worth a consideration and the Nikon D7100  and D7200  deliver in this department.

Nikon D5600
Only one card slot. Often makes event photographers run for the hills….

Snapbridge…?

The smartphone integration (Snapbridge) could be more user friendly and many reviewers love to hate Snapbridge. I think it is better than its reputation, and you can actually remotely control your camera from the smartphone via snapbridge. But compared to say Sonys solutions for integrating your camera and smartphone, Snapbridge is cumbersome and has stability issues.

Conclusion

Nikon D5600
The Nikon D5600 with a 50mm f/1.4 lens – a good combo at 75mm FF equivalent.
The Nikon D5600 with the 50mm 1.4D (a nifty fifty)

So, to answer the question if this is the right camera for you here in 2019, depends on your decision criteria and personal preferences: If you are a video shooter, I would seriously consider alternatives to the D5600. If a silent camera is important, I would look toward mirror-less. But if you simply want to take the step from shooting with your smartphone to a level above that, say for friends, family and an occasional landscape photo, the D5600 should be on your short list, provided you want a solution that does not break the bank. It is a very capable camera still, although the future probably is mirror-less. But some still listen to old Long Play records. And others still shoot 35 mm film based photos. Leading edge technology the D5600 is not, but it is still capable of producing great pictures worthy of social media and an occasional print. But before you make your decision, a few alternatives are worth considering.

Alternatives

I am not an expert on Canon or other brands, but I am sure that Canon and Sony and Pentax and … etc … has alternatives that compete in the same price range. The camera vendors know that if they can get you to like their camera system when you enter the market, it is likely that you will stay with that brand so you can re-use your glass. So typically they price their entry level products aggressive, in the hope they get a life-long friend in you.

If a lower pixel count is not a problem for you, and compact and portable is important, maybe your smartphone will simply do. You can get click-on lenses that fits your smartphone, and I started my photo career shooting with an olloclip lens on my iPhone 7 (the alternative is Moments). The problem with that solution is that if you upgrade your smartphone, you are likely to be in need of buying new glass or mount as well, but it is still a small investment compared to a full camera. The pictures you take can compete with an entry level camera in my opinion, and for example the iPhone X shoots 4K video, so it is actually a capable video camera! If you want the higher resolution but portability and compact is important to you, you may want to look for compact cameras such as the Sony RX100 series.

The entry-entry level camera from Nikon is the D3x00 series, and I believe the D3400 is the current model. The D3400 is available at a lower price point, but be ready to loose the pivoting screen and the touch sensitive screen as well, along with exposure bracketing and time lapses. If these features are not important to you, the D3400 could be your camera – the sensor and hence picture quality is very much the same, but check the full list of specifications to get a full overview of what the D3400 misses compared to the D5600.

Within the D5x00 series you can also go backwards on go for one of the earlier models, say the D5300. You will get very much the same camera, but a few features are different or missing on the D5300 but it is fundamentally very much the same camera.

If you are willing to spend a bit more on a camera an you want to stay with Nikon, then the D7100 and the D7200  are where you should look. These cameras are – as far as I can tell – still used by many professionals, and I have read many posts praising the pictures that these cameras produce. And then you have a camera with which you can grow as a photographer – with the D5600 you may find that you quickly grow out of it if you are bid by the photography bug.

Finally, if you want to go mirrorless, the Z50 is a very attractive alternative to the entry level DSLRs from Nikon. It is a APS-C mirrorless camera with the new lens mount that Nikon developed for the Z-series. If you do not have a lot of vintage or F-mount glass you want to re-use, then the Z50 as an entry level alternative should definitely be on your short list.

Related reading

Nikon D5600: How to shoot pictures with manual exposure?

Using full frame glass on cropped sensors – what happens?

Video link