Should you upgrade from APS-C to full frame?

Many photographers start out with an APS-C (cropped) sensor camera and make their first system camera shooting experiences with such one. And with good results. But as you dive more and more into the photography universe and all the gear debate, you unlikely come across the big question: what sensor size is right for you?

The full frame (FF) name comes from the fact that the sensor size on full frame is the same as good old analogue 35 mm film negative from back in the days when photography wasn’t digital at all. A cropped sensor (APS-C) is a tad smaller and the micro four thirds is even smaller than that. To confuse things even more, an even bigger sensor size is now starting to gain a larger market share, the medium size format. So there is plenty to choose from.

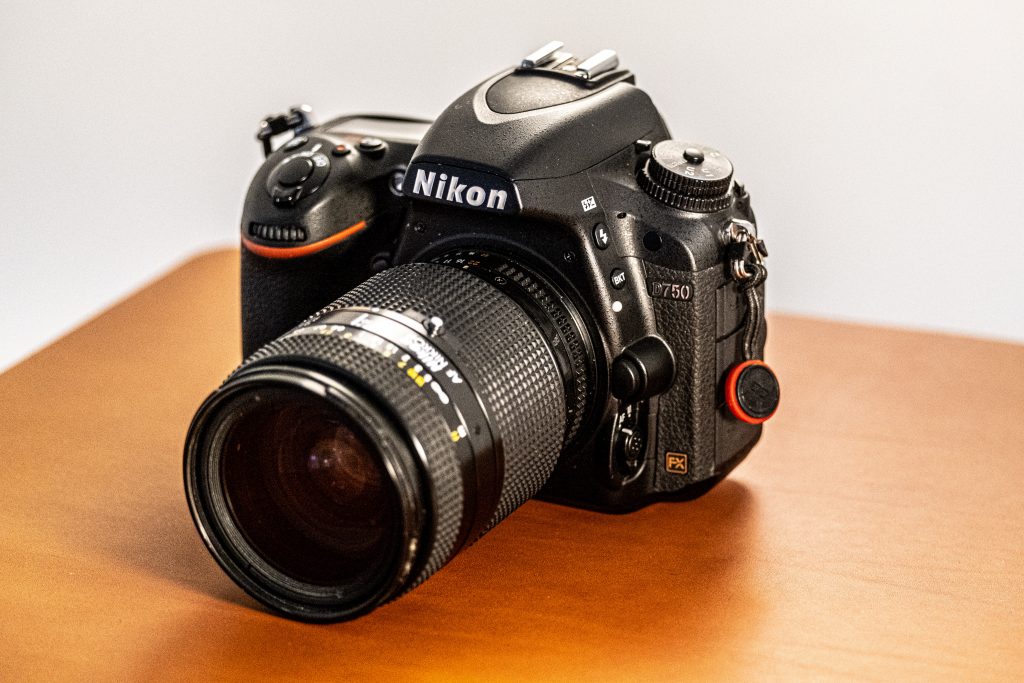
The Nikon D750 is one of the most popular cameras Nikon has ever made.
Full frame, but at 24 MP the resolution is at par with many APS-C cameras.

What attracts you to full frame (FF)?

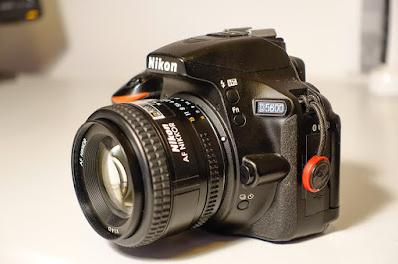
When I upgraded from my Nikon D5600/D7500 (APS-C) to D750 (FF) it was for 2 reasons (1) curiosity and (2) I had to see the improvement for myself. Retrospectively I can say that the difference is not as big as you may think. And it is expensive to switch all your glass! Only some glass from APS-C can be used on FF and often with some vignetting, although the mount may be the same and the lens hence fits fine irrespective of sensor size. So be prepared to invest in a new lineup of lenses if you make the leap from APS-C to FF. Good news if you are a Nikon or Canon shooter is that there is plenty of vintage glass out there so you can upgrade your glass collection at a fraction of the cost compared to buying new glass. But it is still a significant investment, especially if you insist on prime lenses and need to cover the full range of focal lengths.

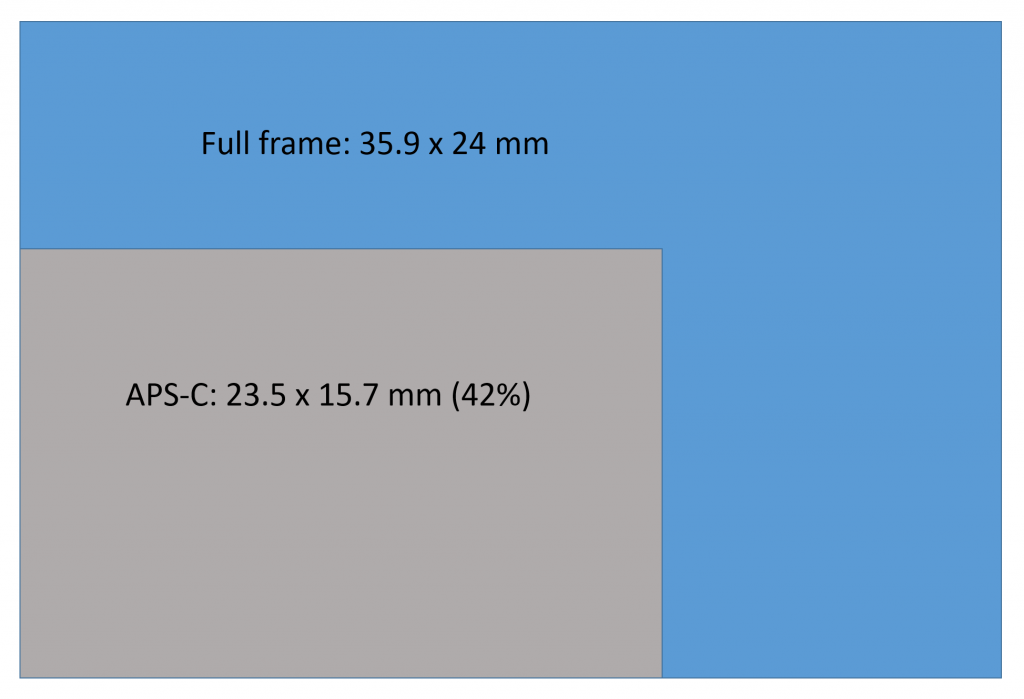
Many will probably be surprised to learn that the APS-C sensor size only makes up
42% of the FF sensor, i.e. the FF sensor is more than 2 times larger than APS-C.

Put the question upside down!

If you want to understand what FF will give you compared to APS-C, you could look at it the other way and ask: what will a downgrade from APS-C to micro four thirds take away from me? As far as I can tell, not much. Portrait photographer Joe Edelman has made the shift, and so has the British landscape photographer James Popsys. None of them seem to miss anything, and they are happy that their gear and especially lenses weighs a lot less after they made the switch. So what is it with FF that is so attractive to some? Lets look at 3 arguments in favor of FF.

Low light performance (1/3)

One of the areas where FF shines is in terms of low light performance. The fact that the sensor is simply bigger dictates that it can pick up more light all things equal, i.e. that the APS-C and FF has the same pixel count.

Further, provided you compare sensors with the same pixel count, the larger sensor gives space for larger pixels and hence each pixel can attract more light. And all this points to better signal to noise ratio. This may sound very technical, but it simply means that the larger sensor is better at picking up the image then there is very little light.

If you are a portrait photographer like Joe Edelman using flashes left, right and center, this means very little, as flashes makes sure there is plenty of light. But if you shoot in low light situations where a flash would ruin the mood, like a restaurant, then the low light performance is key. So the dynamic range of your FF camera is typically better than it is for APS-C or micro four thirds.

Notice that the dynamic range is not the same as the ISO range. The ISO is simply a factor that is multiplied to the sensor reading, so an impressive ISO range simply means that your camera can multiply the sensor readings with a large number!

Background blur (2/3)

Another area where FF is often praised to be better than APS-C is when it comes to background blur or the separation of the subject and the background. Although this is true, you can get much of the same simply increasing the distance between your subject and the background. Or shooting with a more shallow depth of field. But there is no doubt FF has the upper hand here.

Some argue – and this is a long debate with many viewpoints – that the aperture is also to be multiplied with the crop factor, and hence you would also need a smaller (faster) aperture on the APS-C camera to get the same aperture effect (DOF / background blur) on an APS-C as you would for full frame. As far as I have been able to test, this is true, but most compare likes for likes only with regards to focal length and not aperture, and hence the short version is often that FF has more background blur and that the glass is heavier.

Curiosity and one excuse less… (3/3)

When I upgraded from APS-C to FF, the main driver was not so much the arguments in favor of FF, but rather that I was curious. I had read tons of articles, blogs and reviews explaining the difference between the two, but I had to see it with my own eyes. If you are like me, maybe the best and cheapest way forward is simply to rent or borrow a FF camera and get your curiosity satisfied. Then that itch is out of the way and you can see clearly again.

The other thing I wanted to achieve was one excuse less. Although not very rational, I often blamed the gear when my pictures disappointed me. Now I have one excuse less. This is of course a completely silly and irrational argument, but the more excuses you take out of the equation, the more the truly determining factor remains: the photographer.

The price to pay

Besides the obvious investment in a new camera body, you will also have to invest in glass that covers the full frame sensor. If you have a lot of APS-C glass already, this could mean that you need to change your entire lineup of glass. Further, if you are a photographer on the move, be prepared to carry more weight. The glass is more heavy.

Another thing you loose when you move to FF is the lack of cropping. The smaller sensor size on the APS-C means that a 200 mm lens is suddenly a 300 mm lens. Wonderful when you are a sports and wildlife photographer. So with FF you will need to buy longer lenses to get the same reach as APS-C. And I can assure you that long FF lenses are very expensive.

Should you shift to FF?

As you have maybe picked up from the above, I am not a strong advocate for FF cameras from a rational point of view. I think APS-C cameras are often wonderful (I love my Fuji X-T3) and with modern sensor and processor technology, the gap between FF and APS-C in my opinion has declined rapidly the recent years.

Further, what no camera manufacturer will tell you is this: You probably have a great camera! Most of the cameras that are out there in the market today are great, because they have been reviewed by thousands of bloggers and youtuber’s and passed the test. If they had not, the gear would not sell and the manufacturer would have pulled the product out of the market instantly. The transparency the internet has created is fantastic – and terrifying if your product is less-than-great. Camera manufacturers will blow new features and improvements out of proportions in the marketing of their latest model. They do not make any money if you buy used vintage glass on e-bay. So remember to scale down the excitement the next time you see a manufacturer marketing a new version of a auto focus system or image stabilization system. The previous camera was probably also great.

Finally, many of the photographs that are iconic today have been taken with camera gear that by today’s standards are classic, vintage, old-fashioned, out-of-date, dated, etc. So go figure: how come the best pictures have been taken with so primitive gear? The answer is: the photographer makes the difference. You.

Fan Ho or Henri Cartier-Bresson did not worry about their gear as far as I know. They worried about taking good pictures. And maybe we should learn from the masters. Happy shooting!

Questions and comments

Thank you for reading this far. I hope you found this blog useful. Questions and comments (and likes!) are more than welcome!


What is the focal plane in photography?

In this short blog I will give a non-scientific layman terms explanation of how I see the focal plane in photography. You can find more technical and advanced explanations out there, but this one focuses on what you need to know to make use of the focal plane.

A big umbrella

The focal plane is the plane where your lens and camera in combination has your subject in focus. So when you zoom in and out, different things will appear sharp in your viewfinder. If you take a picture of a person, you risk that the eyes are out of focus if you focus on the ears or the nose. Eyes are super important in portrait photography, and hence all portrait photographers and advanced auto focus systems make sure to zoom in on and detect the eyes. It is less of a problem if the nose or ear is slightly blurred or out of focus.

You can think of the focal plane as one big virtual umbrella that you push back and forth as you turn the focus ring on your lens. Exactly where the fabric from the umbrella touches the subject, the subject will be sharp.

In the picture below, you can see the glasses that I have put in focus are almost the only thing in focus. Both before and after the glasses, everything is out of focus:

Only one focal plane

It is important to understand that there is only one focal plane. No matter how advanced a camera you have and how much intelligence there is in the auto focus system of your camera, the physics and mechanics do not change. There is only one focal plane. You can only push one “umbrella” back and forth. You can do this with auto focus or manual focus, but there is only one.

I say this because when you see or read some of the camera manufacturers adds for the latest and greatest in auto focus technology, you get the impression that the intelligent systems have overcome all focus and sharpness issues. They have not, because they cannot fundamentally change the fact that only one plane can be in focus at a time.

There is some good news…

The good news – and what has saved me a lot of times – is that a little before and some after the focal plane, there is an additional area where the subject appears to be sharp. This is known as the depth of field. Good news is that you can increase (or decrease) the depth of field if you change the aperture. A small aperture (large f-stop number) gives large depth of field. In other words, there is some room for slack if you have a small aperture (large f-stop number like f/16) .

There is no such thing as a free lunch in photography. So the price for a small aperture is that it lets in very little light, which means you need to bump up either the ISO or leave the shutter open for a longer time or both. This introduces the risk of camera shake and subject blur, meaning your pictures will appear not-so-sharp anyway. So you have to strike a balance, find a compromise. General advice is hard to give in this regard, but try to start out with a middle-of-the-road aperture (say f/5.6) and work your way up or down until you find a good compromise.

Depth of field is also depends on your distance to the subject, so the closer you are to your subject, the more shallow the depth of field will be in absolute terms. This is what causes a lot of headache for for example flower photographers. This is where focus stacking comes into play, but that is the subject for a different blog.

Questions and comments

Thank you for reading this far. I hope you found this blog useful. Questions and comments (and likes!) are more than welcome!


Review: Nikon AF 24mm f/2.8 lens

Best VALUE landscape lens for Nikon F-mount?

Spoiler alert: Can I recommend this lens? Yes! But the recommendation comes with 3 caveats. Let me take you through these and then review this lens with sample pictures. It will not be a scientific review with pictures of brick walls showing how soft the lens is in the corners wide open, more a does-it-yield-great-pictures kind of approach.

 
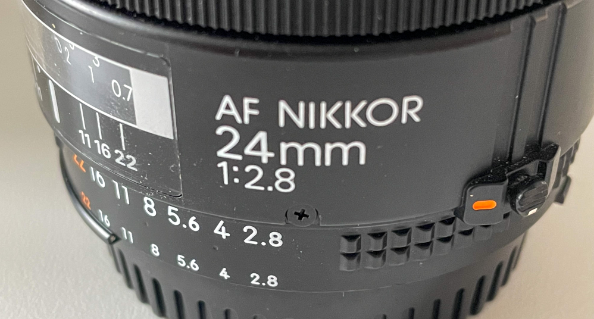
Nikon Nikkor 24mm f/2.8 - a gem in the Nikkor vintage lineup
Nikon Nikkor 24mm f/2.8 – a gem in the Nikkor vintage lineup
Buy the right used version of this lens (1/3)

The lens comes in different versions. The older ones does not have distance information (hence the name 2.8 without the D) and also the manual focus ring is very thin and plastic-ish. You can see that my 50 mm lens to the right below is the right version. The one to the left is the version you should not buy:

The Nikon 50mm to the right with the wider manual focus ring.

To my knowledge there is no major changes done to the glass from 1985 to now, so if you don’t mind the flimsy focus ring and do not miss distance information, the older ones may work well for you – bonus is that you may find a very cheap older copy on e-bay or amazon.

There is no need to buy a brand new copy of this lens. My copy is around 35 years old, and everything works like a charm and the glass is great. But make sure you check the glass well before you buy.

Make sure you need this lens (2/3)

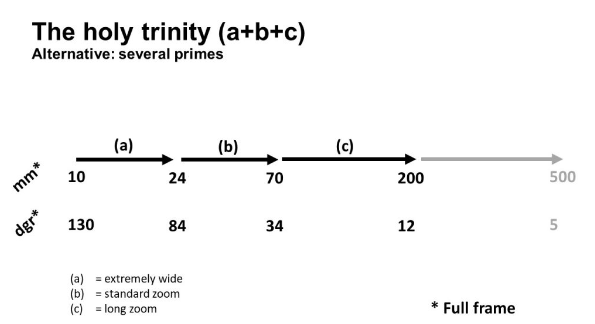
This is a prime lens. If you plan to have the holy trinity of zoom lenses then this lens may not be for you. The 24 mm sits right between where a zoom set of lenses would shift between normal zoom and ultra wide:

The holy trinity of zoom lenses.

So you may find that the 24 mm replaces both the extremely wide zoom and the standard zoom, in which case you have saved a lot of money and weight. On the other hand, you may find that the 24 mm is an odd animal and that you prefer to use your zooms. In that case, the 24 mm probably never leaves your camera bag and is wasted. Here it comes down to personal preferences. All I ask is that you check if you think you really need this lens.

Make sure you have an AF motor (3/3)

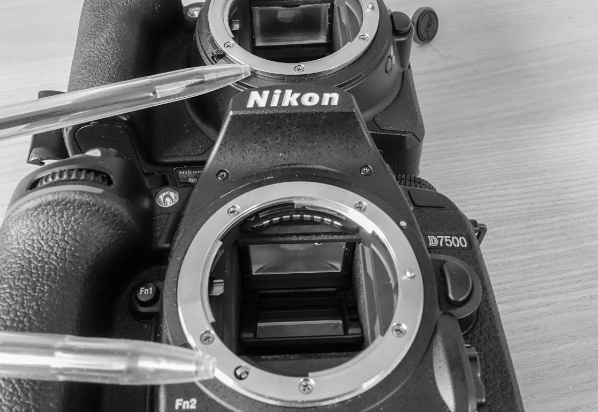
The tin may say auto focus, the lens may say auto focus, but if you have an entry level Nikon camera, then the AF will not work. The reason you see below in the picture – Nikon D5600 on top, D7500 below:

The lens needs a motor in the camera body in order for auto focus to work.
The D7500 has an AF motor built into the body. The D5600 does not. You can see that the little split that drives the screwdriver AF mechanics is missing in the top camera. For cost saving reasons (I guess), Nikon has decided not to put AF motors in the D3x00 and D5x00 series cameras, so if you have one of these you are left with manual focus. Nothing wrong with manual focus, and maybe this will not stop you – I just point to this to avoid you get disappointed when you mount the lens for the first time.

You should also be aware that some copies have a problem with the rear glass (known as the CRC) which yields out-of-focus pictures very consistently. This could be what why this lens has received some lukewarm reviews from many respected reviewers. Make sure before you buy that your copy does not have this issue (or simply ask the seller to confirm this is not an issue). Best way to mitigate a mis-aligned CRC is to test the lens before you buy.

Specs and review

Ok, with those 3 caveats out of the way, lets look at what this lens is all about. It is an old construction, so no image stabilization and no silent AF motor built into the lens. Just good glass and a mechanical AF system.

The price I paid for my 35 year old copy was 220 EUR, but I am sure you can make a better deal if you look carefully and have a bit of patience. I bought my copy in Europe, but in my experience the prices in the US is much lower. So around 200 EUR for this gem of a lens! Notice that in this price range you also find the Samyang 14mm ultra wide lens, and it is also a great lens with lots of super positive reviews, but it is also more heavy, larger and the front glass is round, meaning that buying any kind of filter could prove to be costly. But the Samyang should definitely be on your short list of ultra wide lenses to consider, before you make your decision.

It is a relatively small lens that takes up the same space as the classic nifty fifty that I showed above. At f/2.8 it is not as fast as they come, but unless you shoot indoor in low light i doubt the 2.8 will be a problem for you. The advantage of the 2.8 is that the construction is light at 275 grams. The angle of view is 84 degrees and that is more than double the nifty fifty at 40 degrees. You can really tell the difference.

Color rendition is very much up to personal preference, but I have always been a fan of Nikon in this regard. The below pictures show a piece of art from the Louisiana Museum of Modern Art north of Copenhagen in Denmark, and the colors are reproduced exactly as I remember them. In my mind Nikons color rendition is spot on, and the 24 mm is no exception. 

At 50mm
At 50mm
At 24mm
At 24mm
I have not tested the bokeh of this lens in great detail, but the example below shows that both background separation and bokeh balls are more than approved. Maybe the bokeh is a bit oval, but unless you are an enthusiastic photographer, I doubt you will ever notice:
From the shop at the Louisiana Museum of Modern Art.

The minimal focal distance is where this lens really shines. Have a look here what you can do with this lens, where the art piece to the left is sharp and close up:

 
From the Louisiana Museum of Modern Art.

The minimal focal distance is 30 centimeters, and as you can see, you can get really close to your subject and still have it sharp:

 
From the Louisiana Museum of Modern Art.

Another area where this lens shines how much you can include in the frame. Below an example where I have shot with both the 50 mm and the 24 mm. 

50mm
50mm
24mm
24mm

Wrap up

Ok, I hope the above gave you some idea about what the 24 mm lens from Nikon can do. I have not talked about distortion because these can be fixed in post, so why worry? The sharpness is great in my humble opinion, but I have only the pictures to judge from – no studies of brick walls under microscope. I think others have done that, and concluded this is a sharp lens!

So in conclusion, if you need a 24 mm in your lineup and f/2.8 does not scare you off, then the value for money you get with this little lens, makes it very easy for me to recommend this lens with the aforementioned caveats.

Nikkor 24mm, Nikon D750
Video link

Related reading

Nikon AF-S 16-35mm ED 1:4G lens review

Nikon AF-S 70-200mm F2.8 G VR II lens review

Nikon AF-S 50mm 1.8 G lens review


What is the holy trinity of lenses in photography?

In photography the notion of a holy trinity of lenses refers to a set zoom of lenses that cover the full range of focal lengths, going from the ultra wide 10 mm to the long 200 mm. This is typically achieved by 3 lenses that cover each their area:

  • Extremely wide – 10-24 mm
  • Standard zoom – 24-70 mm
  • Long zoom – 70-200 mm
  • (and some also have the 200-500 mm, good for wildlife and sports photography)

The beauty of this lineup is that you do not need any other lenses!

The holy trinity of lenses illustrated

The series of lenses is illustrated in the graphics above. Notice that all the above refers to full frame equivalents, so if you are shooting on a cropped sensor, you need to apply the cropping factor to get to the right values (1.5 for DX or APS-C lenses), but the idea is the same: to have a few lenses to cover the full range of focal lenghts.

Not all photographers like zoom lenses, and there are several reasons for this, one being that they are expensive compared to prime lenses, another that their weight can be significant, especially in the long end of the scale and then some argue that prime lenses with fixed focal lengths are more sharp than zoom lenses. Those who agree to these arguments typically cover the focal range with prime lenses to achieve the same end.

As you can see in the graphics above, the angle of view changes as you move up through the focal range, starting at a whopping 130 degrees and a lens of 10 mm (far left), ending at 5 degrees or less at a super long lens (far right). Here the photographer working with primes will have to change lenses each time a new focal length is needed, and as the prime lens only cover a point on the scale illustrated above, you may risk that the prime lenses in your bag does not make the desired focal length available. In such cases a prime lens that typically is too short is used and the frame is afterwards cropped in post processing. Some also “zoom with their feet”, but you have to remember here that the angle of view does not change, no matter how much you zoom this way, so you will not get the same result (due to compression) as you did would with a zoom lens.

Questions and comments

Thank you for reading this far. I hope you found this blog useful. Questions and comments (and likes!) are more than welcome!

What is light falloff in photography?

The inverse square law…

You may have heard of the inverse square law and seen some posts and videos going through the technical aspects of the inverse square law. I will try to stay clear of the technical aspects here, and simply say that light falloff is the fact that the intensity of the light drops fast, as you move your light source away from your subject.

Quite counter intuitively, the light falloff does not happen in a linear way, rather it drops like a stone! In the beginning that is. So if you move your flash from 1 foot away from you subject to 2 feet away, the intensity of the light has dropped not by 50% but by 75%! So by doubling the distance, you only get a quarter of the light on your subject. This is what the inverse square law is all about: the non linear relationship between light intensity and distance. You can maybe see it in the picture below, where I have taken a LED light and put it close to a white wall:

Good news is that the curve flattens quickly, so 3 feet away the light has dropped to 11% of the original light, 4 feet away it is 6 % and so on. So if you are very far away from your light source, moving one foot closer or further away means very little.

The intensity of the light drops dramatically as distance to the light source increases.

In the example above, had there been a 4th cup, it would get only 6%! If you draw a curve of the intensity of the light as a function of distance, you will get what I call a hockey stick curve – it drops a lot as distance increases only to flatten the more the distance is increased. 

If you photograph a group of people and light them up using a flash, the ones standing in the rear will get a lot less light than the ones standing in the front, if you have the flash (or modifier) close to the front row. The solution is to move the flash further away from the subject to make the relative drop in light less. The price you pay is that your flash will need to work harder and that the light is less soft.  

You can use the light falloff to produce a grey or black background, even if you have a white backdrop. Just make sure the distance between your subject and the backdrop is sufficient, then the light falloff will take care of “dimming” the backdrop to grey or even black! See the examples below, where the only thing changed is the increased distance between subject and the backdrop:

Here some light is still reflected from the backdrop. But not much, hence the grey color.
 
Here the background is black due to light falloff. But IRL the backdrop is pure white!
Using a flash and the effect of light falloff, I was able to make these withered leaves stand out on a dark background. If you are thinking that it did not look like this IRL, then you are absolutely right!

Related reading

What is hard light vs soft light?

What is flash exposure compensation?

What is HDR? What is bracketing?

High Dynamic Range (HDR) is a technique used to get the best dynamic range in a picture, when the subject is comprised of both very dark parts and very bright parts. Your eyes have an amazing capability to see bright and dark subjects at the same time. Your camera does not, at least not to the same degree, although dynamic range has improved a lot over the recent years. So your camera has to cheat a bit, and combine an over exposed, an under exposed and a normally exposed picture into one, picking the best parts from each picture.

HDR on your smartphone

You probably have heard about HDR from your smartphone, where HDR is a feature that can be switched on and off. Often the camera factory settings is so that the camera will make the call if HDR is needed and it then processes the pictures behind the scenes without involving you, simply presenting you the final result as one picture and ditching the individual pictures.

Most DSLRs and mirrorless cameras do not offer this service level – all they do is enable you to take a series of pictures with different exposure levels, so the combination of the pictures has to be done like post processing software like Photoshop or Lightroom. And the camera manufacturers will refer to the series of pictures as bracketing – and to complicate matters you can bracket for all sorts of things other than exposure, but to keep things simple we stay with exposure here.

Example HDR

Your DSLR or mirrorless will typically have a mode selector or a menu option that enables bracketing. Factory settings are typically that the camera takes one normally exposed picture, one over exposed and one under exposed. However, it is possible to increase number of pictures to 5, 7 or even 9 and also control how much each picture is over and under exposed. I normally stay with 3 pictures and over/under expose by 2 stops, but more pictures and smaller exposure steps would probably yield a better result.

Take a look at these 3 pictures. The one to the left is under exposed, the one to the right is over exposed and the one in the middle is normally exposed.

The camera typically varies the shutter speed or the ISO or a combination to over and under expose the pictures. In the picture to the right, you can see the details in the wood, but the horizon and the sky is completely blown out. It will hence make sense to use the rightmost picture for the woodwork. Similarly, the sky and the clouds are most visible in the center and leftmost picture, so the horizon part of the picture should be picked here.

Luckily the post processing software has the ability to figure out all this so we can enjoy the combined picture without worrying too much about which parts are combined:


The combined result.

Of course the above picture has had more editing done than the simple combination of the pictures, but the result above would not have been possible had the dynamic range not been built with the help from all 3 pictures.

Related reading

What is exposure compensation?

What is a histogram in photography?


What is compression in photography?

When you use a long lens in photography relative to a short lens, the long lens will – all things being equal – give the impression of the picture being compressed. On other words, the background will appear to be moving closer to the subject.

Intuitively, you would expect that if you took a picture with a short lens, then mounted a long lens and walked back until your subject would fill the same in the frame, then the two pictures would be about the same. But they are not. For two reasons. One is compression, the background will appear to have moved closer to the subject, and the other is field of view. The long lens sees a much narrower part of the surroundings of the subject. Sounds complicated? Lets look at some examples.

The first picture here is taken at 18mm focal length:

18mm

You can see that I have put a shovel behind the chair to help me size the subject in the frame as I start to walk backward. Notice the greenhouse to the right.

Next picture is shot at 70mm:

Notice how the greenhouse to the right has disappeared due to the more narrow field of view. And the fence at the back of the garden seems closer – the picture is more “compressed”. Hence the name. And notice also how the arms on the chair no longer point so much outwards, they appear more parallel in the 70mm picture.

If we take it one step further to 135 mm:

You will notice that the black chair behind the brown chair in the foreground suddenly appears. This is because I have walked so far back and the field of view is so narrow that the brown chair no longer “shades” the black chair. And the fence has moved even closer. And finally 300mm:

More of the same: fence is closer, black chair even more visible, greenhouse long gone, etc.

What happens is illustrated below. As you can see, the angle of view is much more narrow with a long lens and hence the greenhouse disappears from the frame in the examples above.

Did you notice how the chair looked more and more natural as the focal length increased? In the first picture the arms pointed very much outwards, but this became better and better with increasing focal length. This is useful for portrait photographers, because shooting too close to your subject with a too wide lens will give a less pleasing picture. You can try to take a selfie with your nose into the lens, and I can assure you that it will not be pleasing! Therefore many portrait photographers prefer relatively long lenses, typically 85 to 135mm.

You will also see that the composition of your picture changes when the focal length is increased. There is less distracting elements in the pictures with the long lens, simply because the angle of view is more narrow. So you can make a picture where the subject is less disturbed by distracting elements around it.

Related reading

What is the holy trinity of lenses in photography?

What is lens distortion?

Nikon D750: How to use manual mode – the basics

Manual mode

Manual mode is to many an off limits discipline, but there is no need to shy away from manual mode as it is a small investment to learn, and it pays off in great dividends in terms of better control of the camera and hence the pictures you take. And the good side effect is that by knowing manual mode, you also automatically know Shutter priority and Aperture priority, as these are “sub sets” of manual mode. But I advice you to practice manual mode until you have it “under your skin” and the controls and dials are – if not second nature – then at least part of your muscle memory, so you don’t have to think too much about the controls when you start shooting in manual mode for real.

If you want more detail on the exposure triangle, this post may be of interest to you.

Manual mode selector

To initiate manual mode, you need to select mode “M” on the mode dial, located on the top left of your D750 camera. Remember to push down the center button while turning the dial, otherwise your camera is less cooperative.

The Nikon D750 set to manual mode

Aperture

The aperture is controlled via the command dial on the top right front of the camera. By turning the wheel left and right, the aperture changes accordingly. In the LCD display on the top right of the camera, you can see the selected aperture. In the picture below, the aperture is set to F/10:

f/10, 1/100th shutter speed and ISO 12800 (auto).

Shutter speed

The shutter speed is c controlled via the command dial on the top right rear of the camera. By turning the wheel left and right, the shutter speed changes accordingly. In the picture above, the shutter speed is set to 1/1000th of a second, which is pretty fast. This is shown as 1000 – the “1/” is implicit. So a quarter of a second (1/4) is shown as 4.

ISO

The ISO has a dedicated button at the bottom left if the camera, the second button from the bottom.

The ISO button on the left side of the D750

When you push and hold that button as shown below, the ISO selection menu appears. Notice that only bottom half of the screen relates to the ISO – it is boxed in by a thin frame. The front command dial now controls the ISO auto setting (on/off) and the rear command dial controls the ISO value. You can see the graphics illustrate this to the very right. The selected value here is ISO 125 and ISO Auto setting to on.

When ISO setting is on, the camera selects the ISO as it sees fit (remember, you still control the Aperture and Shutter speed). If Auto ISO is on, the selected ISO sensitivity is ignored by the camera, but as soon as you set Auto ISO to off, then the camera uses the value selected here.

ISO sensitivity settings

You can re-program the record button on the top of the camera (the one with the red dot, sitting right behind the shutter release button) to act as the ISO button. Press the menu button on the rear of the camera, top left, select the custom settings menu (aka the pencil menu), select f for controls and scroll down to F9. Here you can set the record button to act as an ISO selector:


Using the movie record button for ISO

Many find this configuration useful, as the entire exposure triangle can no be controlled with the 3 buttons/dials sitting right next to each other on the top right of the camera, with no need to move the eye away from the viewfinder.

Ok, that concludes the walk through of the controls and dials on the Nikon D750. Please don’t hesitate to drop a line in the comment section below if you have any questions or the like.

Video link

What is the exposure triangle?

The exposure triangle is probably not new to you, the point is simply that the aperture, the shutter speed and the ISO controls what level of exposure your picture will get. Changing one of the three in upwards direction will require one (or both) of the other two to drop accordingly to maintain the same exposure. And the other way around. In (fully) manual mode, you set all 3 values.

Aperture is the iris of the lens. The more light you let in, i.e. the more open the aperture is, the more exposed your picture will get. The confusing part is that the aperture is measured in f-stop numbers, and these are “upside down”, meaning that a low F-stop number means the lens is letting in a lot of light.

Shutter speed is more intuitive, if you ask me. The longer the shutter speed the more light is allowed to hit the sensor. A fast shutter speed is great if you want to avoid camera shake (you move the camera while the shutter is open) or motion blur (the subject moves while the shutter is open). But fast shutters lets in only a little light, so a balance it to be found.

Finally  ISO is how sensitive your sensor appears to be. I say appears to be, as it technically is a gain that is applied to the base sensitivity of your sensor, but don’t focus too much on this part. All we need to know is that higher ISO means more sensitive to light. There is no free lunch in photography – so the price to pay for high ISO is grain. So we want to keep the ISO at bay. Modern cameras can ramp up the ISO with impressive results, but for now let’s just say that beyond 1600 you need to be more cautious.

This image has an empty alt attribute; its file name is exposure-triangle.jpg
The exposure triangle – Aperture, ISO and shutter speed.

How to use (Nikkor) Vintage lenses with a Fuji camera


Adapter

In order to use your vintage glass on the Fuji X-T20, the first thing you need is an adapter that enables you to mount the vintage glass on the Fuji body. I always go for a “dumb” adapter, meaning that there is no communication between the lens and the camera body which of course means the camera has no idea what focal length is mounted or what aperture is used, but I can live with that. What is probably worse is that you also loose the auto focus, but if you shoot mainly stills, portrait, landscape and street, then I think you will find the manual focus to be ok, some even start to like it more than auto focus, as they feel more involved in the process of taking a picture.

In my case, I have Nikkor (Nikon) vintage glass made for full frame cameras, and as the Fuji is a cropped APS-C camera, that means I will have to multiply the length of the lens with 1.5 due to the crop factor. However, you can get a so called speed booster to reverse this effect, and in addition it gives you a stop more light, i.e. makes your lens faster. I went for the Zhongyi Lens Turbo II:

Zhongyi Lens Turbo II
Zhongyi Lens Turbo II adapter.

But there are many other good options to choose from. Here you can see what the Nikon 135mm f/2.8 looks like with the speed boost adapter mounted:

Zhongyi Lens Turbo II with the Nikon 135mm

And here is the camera with the 135mm lens mounted:

Zhongyi Lens Turbo II with the Nikon 135mm on the Fuji XT20

As you can see it is in this case a long lens for such a small camera body and it also makes the camera quite “front heavy”. Some don’t like this – I don’t mind, but as the X-T20 is quite a light camera, mounting fast FX glass will often give a dramatic weight increase to the total system. I have the Fujinon 27mm lens to the right, just to compare.

Shooting “blind”

As the camera has no communication with the lens, you need to tell the camera it is OK to release the shutter with no lens mounted. It will look that way to the camera! Go find the tool menu and in that menu look for “button/dial settings” and select that menu:

"button/dial settings" menu
“button/dial settings” menu

In that menu, find the item “shoot without lens” and make sure it is set to “on”:

"shoot without lens" and make sure it is set to "on".
“shoot without lens” set to “on”.

Now your shutter should work with a vintage lens mounted!

Focus aid

The next thing is to select how you want the Fuji to help you focus. I prefer the focus peak option, where the camera highlights the areas in the picture with strong contrast, which is often also where you will have the focal plane. In the “AF/MF” menu (the second from the top), select the “MF assist item” (MF is Manual Focus):

Manual focus assist in the shape of peaking highlights.

In the sub menu that appears, the manual focus assist settings can be chosen. I go for the focus peak and select the color to help me find the area of focus:

Manual focus assist in the shape of peaking highlights.

Now we should be ready to shoot!

Final hurdle

When shooting in this setup, there is however no focus peak assistance! It is possible to shoot and focus, but you get no help with the manual focus! How come?

The solution to the problem is on the front left of the camera. Here you select drive mode by turning a little dial, i.e. if the camera is in (S)ingle frame mode, (C)ontinuous or (M)anual mode. Hence the letters S, C and M:

Dial on the front left of the camera

You need to turn this dial to “M” in order for the focus peak to start working. Then the high contrast areas area highlighted in the viewfinder and LCD screen. Enjoy! (Remember to flick the switch back to C or M when you mount a Fujinon lens – otherwise you will continue with manual focus…!)

Further aid

When you shoot, in addition to the focus peak, you have the focus magnification that helps you zoom in on details in the frame to see if they are sharp. Press the rear command dial (yes, it feels strange – you are used to turning it! But press as in push!):

Zooming in using the rear command dial

and the camera will show you a magnified area of the picture:

Zooming in using the rear command dial

If you then turn the rear command dial, you will see that the camera flicks between two levels of magnification. In the first example you can see the entire cow, but if you turn the rear command dial the zoom gets extended:

Zooming in using the rear command dial

Now you can only see parts of the cows head! Notice how the graphics (the two boxes – one white and one green (blue?)) show you the zoom level. When you turn the command dial again, the camera jumps back to first level of zoom. So turn the rear command dial to select between the two zoom levels. Press (push) the rear command dial go leave zoom again. And press it once more to get back in, etc.

You will notice that with a long lens and the extended zoom peek switched on as shown above, the picture gets very nervous if the camera is hand held!  This is a good reminder to shot with a fast shutter speed to avoid camera shake and hence blurry pictures.

Finally

The Fuji X-T30 offers 3 different manual focus aids:

  • Standard (basically no aid!)
  • Digital split image
  • Focus peak highlight

In the examples in the previous sections, I have only used the focus peak highlight, as I find it to be the best aid for manual focus. However, some like no aid and some like digital split image (where you have to align two pictures so that the vertical lines in the intersection are exactly on top of each other).

If you want to switch fast between the 3 modes mentioned above, you can push the rear command dial for a few seconds (not a brief push – you need to push the button in for a few seconds) to change to the next mode (the button is hiding behind my thumb top right):

Fast switch between focus modes.

When you have kept the button in for a few seconds, the mode the camera is about to switch to will be shown in a bar in the lower part of the screen. If the camera is in standard mode, it will switch to split, if in split then it will shift to focus peak, if in focus peak back to standard and so on. So it is like a wheel turning: standard -> split -> focus peak -> back to standard. Remember to keep the button pushed in until you see the bar on the screen.

Related reading

Review: Fuji X-T20

Charging the Fujifilm XT-3 vertical battery grip